Proverbs and sayings about May HORIZONTALLY: 2. May will deceive - in ... will leave.4 ....


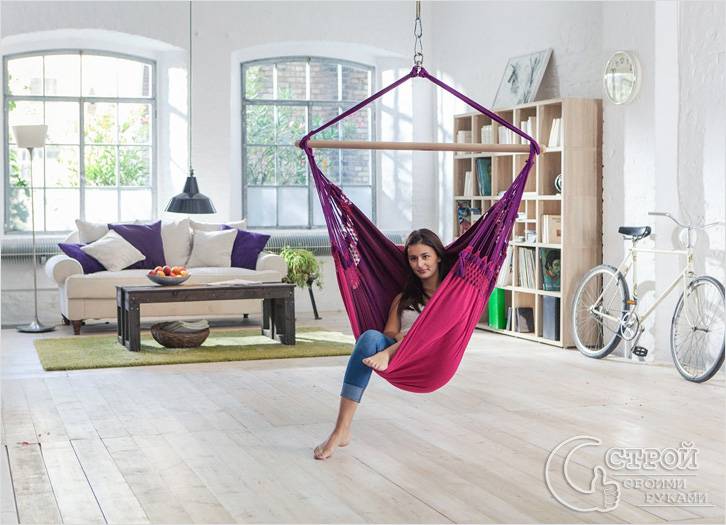
Hanging chair is a comfortable and unusual garden furniture designed for relaxing outdoor activities. This device appeared in the 50s of the last century and in a short period of time became an integral part of the house, which claims to be a truly comfortable home.
A beautiful "cocoon" can be used as a swing, a place to sleep or meditate. It is noteworthy that a hanging chair for a home or a summer residence is easy to make on your own from improvised means.
Users often search:
Currently, there are several types of products:
Making a comfortable hammock for a comfortable pastime is not as difficult as it might seem at first glance. First you need to prepare the necessary parts:
Let us dwell in more detail on the choice of a hoop. As a supporting structure, you can use the following materials at hand:
The list of materials suitable for creating a hoop is not limited to the listed options. Everyone chooses the basis for the frame - it all depends on the imagination.
Cutting material for a hammock chair requires accuracy and care. If in doubt, it is better to leave a small supply of fabric, in the future it can be removed without problems.
The principle is this: measure seven times, cut once.
We cut out the squares
Bend and sew the edges
Insert and sew the hoop
Sew the edges
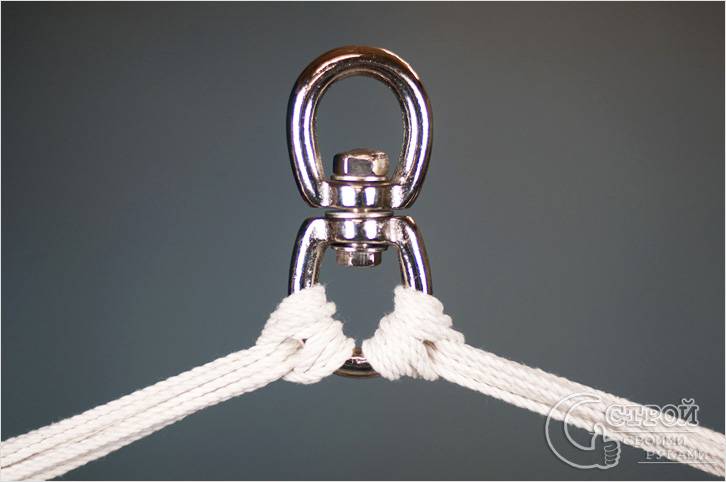
Attaching the slings to the hoop
Pattern example
Hanging chairs are a kind of swing, a cozy place for relaxation and solitude.
Macrame technique allows you to create original products on your own.
Photo: egg-shaped wicker hanging chair - a comfortable place to read books in the fresh air
This unusual structure consists of several circles woven together in a macrame. For such an "egg" you will need the following details:
It is worth mentioning that rings of smaller diameter are also suitable for the product, since these characteristics are the maximum for the chair. It is better to buy a thread of the required length immediately in order to avoid differences in color or quality. After preparing all the parts, you can safely begin to work on creating an "egg".
For weaving the back, any patterns are suitable. The cord is attached to the top. The work is going down. On the lower hoop, the knots are tightened, the remnants of the threads are collected in tassels. The design requires reinforcement with 2 wide cords connecting the seat to the back. Slings are attached to the finished product - and the “egg” hanging chair takes its well-deserved place in the summer cottage.
Having made such a device, you will get a cozy corner for secluded relaxation and forget about problems and stress for a long time!
In the warm season, almost any city dweller dreams of getting out into nature and spending at least a few days or even months there. Outdoor recreation is necessary for every person, and it is very important to have a comfortable hammock or chair for this. A hanging chair is considered very popular, which can plunge a vacationer into childhood. After all, all children love to swing on a swing. But since the cost of this piece of furniture is quite high, skilled craftsmen learned how to make it on their own.
The right approach to business will help create a product no worse than those sold in stores.


The first hanging chair appeared in Denmark in the middle of the 20th century. This designer furniture is most often used for arranging a garden plot and less often for apartments in megacities. An unusual design combined with a variety of materials makes this piece of furniture in demand among many buyers.

A hanging chair is a comfortable seating area that is usually made from natural or man-made materials such as wicker or rattan. The product itself is either suspended from the ceiling or mounted on a special stand so that you can swing in the lounger. It is also called a rocking chair or swing chair, because their main purpose is to rock a person.
It is interesting that such a product is able to withstand a very large weight. Therefore, a mother with a child or two teenagers may well rest in it. The main thing is that the dimensions of the furniture allow you to accommodate more than one person.

Hanging chairs can be divided into wicker, fabric, hard and soft, and they differ in shape and material. These products are designed to swing in different directions. There is only one type of hanging chair that does not move diagonally and back and forth. It is attached to the floor and ceiling, and therefore can only spin in a circle.


The frame of the product can be made of various materials. Rigid ones are made of rattan, wicker, metal, acrylic or transparent plastic. And in order to soften the product, it is covered with a soft blanket or a synthetic winterizer mattress is placed inside. Sometimes the base is covered with a dense fabric, and small pillows are placed on top.
The hammock chair has a soft frame, because it is made of a fabric base, which is suspended from the ceiling.


Also, the hanging chair can be divided according to its purpose. For example, a garden product is designed to be installed outdoors, and therefore its material must be moisture resistant. But the children's product should have a small size and a soft seat.
There are many models of hanging chairs, and each of them can be an addition to a garden plot or apartment. Making furniture with your own hands has a number of advantages over purchased goods, because they allow you to show your imagination and make sure of its quality.


The complexity of the work depends on the design of the product, and therefore it is worth familiarizing yourself with all types in order to make a choice.
These unusual chairs can be made from different materials. The design itself is lightweight and reliable, and most importantly, it can have both a soft and a hard base. Swings can decorate a summer house, a sleeping area, a children's room, an attic or a playground. It is within the power to make it yourself, using strong ropes and dense textiles.


The cocoon chair, or egg, is one of the most popular models. It differs from other products by the presence of walls that hide almost the entire interior space. It is made, as a rule, from natural or artificial rattan, and sometimes a vine is used. This design will appeal not only to adults, but also to children. After all, in such a cocoon you can find solitude.


This model is interesting in that for its manufacture you only need an iron hoop, which must be braided with strong yarn. The structure itself must be hung from the ceiling with strong ropes. The nest can fit in any room, even in a small room.


A variety of models also provides for the method of attaching the base. The chair can be suspended from the ceiling or stand on a stand. The choice of mounting depends on the characteristics of the room and the personal preferences of the owner.
The type of product chosen depends on the material for its manufacture.
So, for the construction of a swing, it is necessary to prepare a dense fabric, strong ropes and wooden blocks. And if the product involves weaving, then willow, bird cherry and rattan will do. Their flexibility should be sufficient to be woven by hand.
To make a nest chair, you will need an iron or plastic hoop that has sufficient rigidity. And to give a unique style, it is important to use hard-wearing fabric, foam filling, weaving laces and wooden boards.


Much depends on the technique of weaving. One of the most famous is the macrame style, which involves the interlacing of knots of rope or ropes. With it, you can achieve a sophisticated look of the product.
To ensure the reliability of the base, apply the patchwork technique. To do this, a patchwork bedspread is attached on top of the base material.


The base of the product can be tied with strong yarn or laces. Weaving from multi-colored laces will look especially beautiful.
An openwork pattern can be created using the tatting technique. Such a product will seem weightless and light, which will undoubtedly attract the attention of guests.

When choosing a material for weaving or creating a base, you need to take into account its characteristics. After all, not every material has sufficient strength to withstand the weight of an adult. It is also important to select strong fastening elements so that the structure can withstand the weight of the seated person and not break.
There are many drawings and step-by-step instructions for the independent manufacture of this type of furniture. But the simplest is the swing chair, which will appeal to both adults and children.
To make it, you will need two meters of dense textiles, a thick meter-long wooden stick, a drill, carabiners, a strong cord, reliable threads and paint.


Performance:


You can decorate the resulting product with decorative pillows with a bright print. It is ideal for the outdoors if placed on a veranda or under a large tree.
Another interesting model for self-production is a drop. For this, about 500 rattan rods, a steel hoop, several metal pipes or strong ropes are purchased, which will be woven together in the form of a circle. Then you will need PVA glue, strong rope, cord and chain.
Stages of work:


In the finished chair, you can lay a thin blanket or put a large flattened pillow.
Depending on the type of product chosen, different materials may be needed. First of all, you need to prepare those that will make up the design of the hanging chair. It can be pipes, a hoop, rods, ropes or bars. If a swing chair is made, then only durable and wear-resistant fabric is needed.


It is important to decide what will be the filler for the bag, which will be in the chair. After all, being in it should be as convenient and safe as possible, so it is better to purchase a synthetic winterizer or foam rubber. But the foam pillow will not be able to transfer moisture, and therefore it is better to use this option in the house.
, beds, armchairs different types - these interior items special attention is paid, and the most stringent requirements are put forward in their selection. It can safely be said that such furniture has the largest number of different models, variations and manufacturing methods. One of the most original and unusual places to relax in the house is a hanging chair. The first mention of this piece of furniture dates back to the 50s of the last century. Since then, the hanging chair has become not only one of the vagaries of interior fashion from the pages of glossy magazines, but also a comfortable component. living rooms, bedrooms and children's rooms in simple apartments.
For more than half a century of its existence, the hanging chair has undergone many metamorphoses and "reincarnations", and at this time there are already several types of this piece of furniture.
In addition, hanging chairs are divided into types and according to other criteria - the type of fastening (axial and rod), the material used and the load. Before choosing a chair, it is necessary to decide where and how it will be used, and what intensity of load is expected on it.
Like everything that surrounds us, hanging chairs have their pros and cons. Their advantages include originality, uniqueness, if the chair is made by hand, in a single copy. But their main advantage is, of course, comfort. Where, if not in a hanging chair, you can remember your childhood, calm the nerves that have been shattered during the day?
The disadvantages of such a piece of furniture are the difficulty in moving, because it is quite difficult to install or dismantle a hanging chair. In addition, if you move the chair to another place, then on ceiling there will be traces of the old fastening.
Having a hanging chair is a dream for many. But most prefer not to buy it, but to do do it yourself. You do not need to have any special skills, you just need to prepare all the necessary tools and materials. To make a hanging frame chair with your own hands, you will need:
All these materials can be bought at any hardware or haberdashery store.
DIY hanging chair- a great way to save money without spending money on the purchase of such a hanging piece of furniture. Of course, it’s easier to buy - place an order or choose a finished product in the store, pay for delivery and admire the chair in the garden at home or in the country, sitting comfortably in it, pick up your favorite book, plunging into fascinating stories, or just relax, falling asleep under bird singing. A very bright prospect, if you do not take into account the amount that you have to spend on the purchase. Just in order not to waste money on what you can do yourself, you will need this article. From our material, you will learn how to design a hanging chair with your own hands, what options are available for these furniture designs and how to properly attach it.

There are many types of hanging seats. Some of them are quite elementary to make and, given that for work you need to have at least some knowledge in the field of sewing, weaving and knitting, then this is more women's work than men's. Work for the whole family: she prepares materials, fabrics, weaves, and he connects and fixes everything. Some materials don't even have to be specially bought, because they are already in your house, hidden in the pantry, since they are not needed. For those materials and tools that are not found in the home arsenal, of course, you have to go to the store. However, it will in any case be cheaper than buying a ready-made hanging garden or home chair.
So, what are the types of hanging chairs?
Chair type | Peculiarities |
Hammock chair | The hammock chair has a soft frame. And if the hammock bed is mounted on two racks, then only one mount is enough for a hammock chair, that is, there is no significant difference between them, it is only in size and hanging method. |
Nest chair | The nest chair (ball), for the frame of which an ordinary metal hoop is used, is one of the most popular models of hanging seats. Having a pleasant and interesting shape, this chair will fit perfectly into any interior. Choose the technique of weaving, colors, add decorative elements depending on personal preferences and where you are going to place the hanging seat. To make a nest chair, you will need the following materials: metal hoops (you can also use plastic ones), durable and dense textiles, wooden bars of various sizes, synthetic fillers, and decorative cords are useful for weaving. |
Drop chair | In a drop chair it will be convenient for both an adult and a child, however, this view is still more considered childish, since the external conical shape resembles a house where you can take toys and not get out of there for hours or even fall asleep. |
Swing chair | Many different materials can be used to make a swing chair. The frame in this case can be both rigid and soft. The design of such a suspension seat is quite simple, but at the same time sophisticated. The swing chair will be a wonderful decor for a garden plot or a yard in a country house, a terrace of a country house, it will complement the interior of any room, both a nursery and a bedroom, a guest room. To make such a chair, you will need dense textiles, wooden blocks and various synthetic ropes. |
Cocoon chair | A cocoon chair, or as it can also be called an egg chair, is ideal for those who want to “hide” from the world, be alone, be alone with themselves, with their thoughts and in silence, for example, read. The walls of this type of seat are woven, and the frame is quite rigid. Half of the interior space in such a chair is hidden, so, as we have already said, it is ideal for privacy. The rods of willow, bast, bird cherry, rakita have sufficient flexibility to make a cocoon chair. |
Wicker chair with hard frame | A wicker chair on a rigid frame, which can be made of acrylic, wicker, metal, plastic or rattan. This type of chair looks like a rocking chair, only instead of legs it is fixed from above, to the ceiling or to the branches of a tree. The base of the furniture must be covered with a fabric with high strength or leather strips, wicker, rattan. |
Choose the technique for any hanging chair yourself, depending on your skills and abilities. Giving a master class, professionals use the following techniques:
As you can see, the options for both the chairs themselves and the technician for their manufacture are enough to choose from.

Making a hanging nest chair with your own hands cannot be called a very complicated process, however, you still need to try a little, and in the end you will be satisfied with the result. At the same time, this type of design is considered the easiest to manufacture on your own. You can personally verify this. We know two options for structures of this design, where you need one hoop and two. To make a nest chair according to the first option, you will need the following materials:
During work, you will have to use a sewing machine, scissors, thread and needles, a centimeter and a marker.
Now we will give step-by-step instructions on how to design a nest chair from a hoop with your own hands.
It is interesting! Instead of a hoop, you can use PVC pipes. Their advantage is light weight, high strength, warmth and softness of the plastic material. You can buy a pipe in a finished round shape in a specialized store. You will only need to choose the desired diameter for the size of the chair and connect the ends of the pipe correctly. You can fasten the ends using an insert, which is made of dense plastic or wood. Its diameter should be slightly smaller than the diameter of the pipe so that the insert fits snugly without leaving an empty space in the pipe. Place the insert at the ends, then slide them and fix them with self-tapping screws, the length of which will be 15/20 mm. It is important not to make a mistake with the size of the screws, so that they do not go through the pipe.

Now we will tell you how to make a nest chair with your own hands according to the second method, for which you need two hoops. This type of hanging furniture is made using the macrame technique. You will need to use the following materials
As in the previous version, we will give step-by-step instructions for completing the task.
Ready! Now you can make a nest chair with one or two hoops with your own hands.

Suspended wicker cocoon seat is a classic version of this type of furniture. It is made from pre-harvested and processed branches of bird cherry, willow, bast, rakita or rattan.
In order to make such a wicker cocoon chair, you will need to use the following materials:
The manufacture of a hanging cocoon chair proceeds in the following sequence of actions.
You have mastered the art of creating a hanging wicker cocoon chair.

Do-it-yourself swing chair made of boards is a pretty good and easy-to-make version of hanging furniture structures. You do not need to have specific carpentry skills. We will tell you how to process the boards and drill the holes necessary for the construction. There are several options for making a hanging chair from boards. We will share with you recommendations regarding two methods.
In order to build a chair according to the first method, you need to “arm yourself” with the following materials:
Of the tools, you will need a hacksaw, or rather a jigsaw, sandpaper, a drill and wood drills with a diameter of 6, 8 and 10 mm.
Follow this step-by-step technology for making a hanging chair.
The second option for making a swing chair is considered more childish, so making it is even easier than following the first method.
Prepare the following materials for the construction of the structure:
If you take already processed lumber, then for work you only need a screwdriver.
Follow the step by step instructions:
We sorted out the hanging swing chair from the boards.

There are several ways to attach hanging seats: they can be attached to the branches of a tree in a garden in a country house or to the ceiling in an apartment or house. And if there shouldn’t be any special problems with fastening on the street, then you need to talk more about fixing a hanging chair to the ceiling. It must be incredibly strong to support weights above 120 kg.
Chair suspension method |
|
Concrete ceiling without voids | In the concrete ceiling, you need to drill a hole for the anchor with a hook and fix the hanger. This option is only suitable for a concrete ceiling without voids inside. |
Concrete ceiling with voids | If there are still voids in the ceiling, then you need to make a hole and fill them with a special mixture (high strength chemical anchor). After filling the voids, it is now necessary to mount a metal anchor with a hook, leave it for at least two days so that the mixture completely hardens and hardens, and only after that hang the finished chair. |
Suspended ceiling | If the ceiling is closed, it is tension or plastic, then you need a slightly different option for fastening, where there will be a section of the desired length, and at the end there is a threaded sleeve. The bracket must be attached to the concrete ceiling and led out through the hole in the false ceiling, and then a hook or ring should be built into it, on which the chair itself is suspended. |
So, here you have learned how to make a hanging garden or indoor chair with your own hands, as well as how to attach it correctly. Choose any design option you like and equip yourself with a comfortable seat for relaxing.

Rest plays an important role in the life of every person, as relaxation allows you to recuperate and escape from hard everyday life. To do this, in the modern world there are many devices, one of which is a hanging chair. Undoubtedly, it can be bought at a furniture store, but it is much better to do this work yourself, which will save the family budget. The finished product can be hung both in a city apartment and in the country. It is very convenient to read books, have a conversation or drink tea in the garden. It does not take much effort and time to make it. How to make a hanging chair yourself from improvised materials will be discussed in this article.
The chair, like any interior item, has its positive and negative characteristics. Let's take a look at them. The pluses include:
The list of cons is smaller, but it is important to consider them in order to avoid mistakes:
To solve the problem with fastening, it is important to decide on the chair model itself, since there are a large number of them today.
Note! If the design of the chair implies its use in several rooms, then it is worth immediately providing for several mounting systems. This will allow you to easily and effortlessly transfer it at the right time.

There are such types of hanging chairs:

In addition, there is another classification that divides all hanging chairs according to several criteria:
Note! Most hanging chairs are designed for a load of up to 100 kg, these include plastic, fabric and rattan models. For loads up to 200 kg, it is necessary to choose acrylic options.

As already mentioned, most chair models can be made at home from existing materials and a standard set of tools. So, the easiest to manufacture can be called a model with a cover. To do this, you need to prepare the following materials:

Of the tools, you only need a sewing machine and all tailor's accessories (centimetric tape, chalk, scissors, pins, threads, etc.).
The first step is to make a cover. To do this, a 3-meter fabric is cut into two identical squares 1.5 × 1.5 m in size. To cut out a circle of the correct shape, each piece of dense matter is folded 4 times, a circle with a radius of 65 cm is outlined, plus an internal contour is outlined with a dotted line, stepping back 4 cm. Cut out. You also need to make markings for the lines: landmarks can be obtained by ironing the folded fabric with a hot iron. So, the first pair of lines will be placed relative to the bend by 45 °, and the second - by 30 °. After all the markings are ready, you can lay out the fabric, cut out circles and smooth it well.
Next, we make cuts 15 × 10 cm along the contour of the Y-shaped markings, which turned out inside the rectangles. To make the cuts the same, we fold both pieces of fabric one on top of the other and chop off with a pin. Using interlining and an iron, we glue the edges, having previously unbent the petals of the slots.

We sew the circles along the dotted line, leaving a small opening to turn the cover inside out and insert the hoop. The filler is cut into strips, and the frame (hoop) is sheathed with them so that it does not press. We also fill the cover with an even layer of synthetic winterizer, not forgetting to fix the edges with a hidden seam. To strengthen the material on the frame, it is worth quilting in several places. The length of the sling depends on the height of the ceilings, but on average it is 2 m. It is necessary to cut 4 pieces, which are fixed through the prepared slots. The upper ends are fixed on a ring, which will be suspended on a mounting system from the ceiling.
Note! In the role of a hoop, you can use a metal hula hoop or make it yourself from a metal-plastic pipe.
See below for a video tutorial on how to make such a hammock:

If there is a desire to independently sew a suspended structure, but at the same time spend a minimum of time and effort, then a hammock chair will be the best option and a way out of the situation. To make it, you need to prepare the following materials and tools:

The sewing technology is quite simple and does not require special knowledge and skills:
A wicker chair will look no less original in a similar design.
Note! When choosing a material for sewing a hammock, you need to combine it with the interior of the room. Thanks to this, the design will easily fit into the interior and complement it.

In addition to matter and ropes, which can be used as the basis for chairs, there are other options:
Most often they are used to create models such as a hanging chair egg or a ball. It is very difficult to make them on your own, as it requires special knowledge, skills and tools that not every owner has. Therefore, professionals advise to purchase them in specialized stores or order them in workshops for individual design.
Some models can be hung from the ceiling, but a special metal stand would be the best option. Such models will have more advantages:
Note! Keep in mind that not all options are suitable for placing a hanging chair on the street, so it is better to give preference to those that are not afraid of moisture.
For the manufacture of a hanging chair, it is important not only to choose durable materials, but also to create a reliable mount. It should be designed not only for the weight of the structure, which can be made of heavy materials (for example, a ball chair is made of dense plastic with a strong frame), but also for the weight of the person who will sit on it.
Another criterion that is taken into account when developing fasteners is the maximum load on the ceiling ceiling. It is calculated in kg / m 2. With a large weight, the entire load will have to be distributed along the ceiling, for which a power frame is built, which is combined with anchor bolts.

Note! During the game, children will swing and jump on the chair, which increases the load, so this option should be considered.
In principle, this is only a small part of what can be said about the designs and features of hanging chairs. We have considered the manufacture of the simplest options. You can add something different to each of them, for example, decor or tulle to protect against annoying insects.
Proverbs and sayings about May HORIZONTALLY: 2. May will deceive - in ... will leave.4 ....

Popova V.N. primary school teacher MBOU "Kishertskaya secondary school" Rebus is ...

To learn how to compose and understand puzzles, you should figure out what they are from ...