


Proverbs and sayings about May HORIZONTALLY: 2. May will deceive - in ... will leave.4 ....


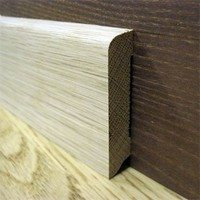
In the Soviet Union, skirting boards were only wooden, they were installed quite simply - with a hammer and nails. Panel houses had a plinth made of cement mortar. In our time, there was also a plastic plinth.
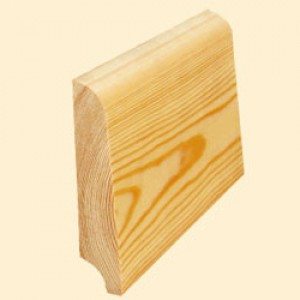
And yet the most ancient and reliable option for edging the floor is a wooden plinth. Wood-rich Russia has long used this material in construction. Today, a wooden plinth, so to speak, a classic of Slavic housing construction, is very widely in demand, since, with all the positive properties of plastic, wood is a living, breathing natural material, looks very good and is easy to use.
Choosing according to GOST, we will most likely purchase a pine product. After all, pine is an excellent material for construction, it has excellent characteristics. But this is not the only material of its kind from which skirting boards can be made.
Let's start with the fact that the plinth should be perceived visually as a straight line, which, as it were, emphasizes the floor. For this line to be really even, the material from which the product is made must also be even. That is, the tree that was put on the baseboard should not have been deformed under the influence of high humidity. In other words, it is highly undesirable for it to be "twisted".
Moisture-resistant species are coniferous, such as pine, spruce, yew, fir, larch. They do not deform if they grow in places of high humidity, and also do not crack when they dry. Therefore, they are very convenient for installation, easy to process.
Hardwoods, on the other hand, such as walnut, linden, cherry, are very soft, subject to deformation, and therefore are not suitable for construction. Hard deciduous trees - hornbeam, oak, maple, are capable of cracking during drying, and they are difficult to process, mounted, due to their increased hardness.
According to the material, all skirting boards are classified as follows:
Mounting methods:
On the decorative layer:
According to the degree of flexibility:
Installation of such a plinth is impossible without basic skills in construction. After all, wood is not plastic, and it is not easy to work with it. And yet, if you wish, installing wooden skirting boards with your own hands may well be up to you, the main thing is to do everything according to the instructions.
First, let's determine what tools and materials are needed to install a wooden plinth, and you need quite a lot of them:
The first, very important rule: install skirting boards only from the beginning of the second day after purchase. It will take this time for the new skirting boards to “get used” to the new room: dry out, adapt to the new temperature regime, “get acquainted” with the level of humidity in this room. If the new plinth was made from raw wood, if it did not dry well enough, after installation it can “lead”, and all work will be spoiled.
But the day has finally passed, the plinth has adapted, you can install it. Where to get started? As a rule, from the inner corner of the room. We do measurements first. Measure the wall from corner to corner, its length. Next, transfer the dimensions to the wooden plinth and mark the place where you need to cut. We set the building corner in the desired position and draw a straight line, separating the unnecessary part of the plank. High-quality docking of skirting boards occurs when their ends are cut at an angle of 45 degrees. To measure and cut very evenly, a miter box is used. This simple tool helps to cut the objects that we need very evenly. You can also cut the baseboard on a circular saw.
Measured, now cut with a hacksaw on a tree. Next is matching. If everything is measured correctly and cut at the right angle, everything should lie well. But sometimes it happens that after measuring and cutting off, there is still a noticeable gap in the corner, since the corner of the room itself failed - it turned out to be uneven, of poor quality. Yes, not always the corners of the room have 90 degrees, sometimes it happens both 87 and 93. This happens when the diagonal was broken during the construction of the building - laying the foundation or erecting walls. Do not throw away the baseboard and do not be upset: after all, a small gap can be puttied. Well, a larger gap can also be removed if you grind the edges of the plinth to the minimum size of the gap. Such an adjustment of the joints can be done with a simple grinder.
The appearance of skirting boards directly depends on how correctly they are fixed, as well as on the tools that you have available for installation. For example, a tool called a countersink helps to make a recess for the head of a self-tapping screw, which allows you to hide it completely.
By the way, initially uneven corners of the room are marked out a little differently than those that do not deviate from universal standards. In this case, a plinth stick is placed between the wall and the floor to the corner, closer to the docking on the floor along the plinth we draw a marking line. We perform this operation for each corner separately on both sides. Then we saw off a piece of the required length and make markings at the end of the rail.
The top point can be the top corner of the stick, which rests against the opposing wall. The bottom point is a marking line on the floor, perpendicular to the plinth that we are marking. We connect these points with a line and cut the bar at an angle of 90 degrees to the floor. A neat cut usually does not give cracks. In relation to the length of the wall, the length of the plinth that we cut should be maximum. Only in this case they will join each other tightly and beautifully.
If two skirting boards are installed along the entire length of the room, they are also connected at an angle of 45 degrees so that an even joint in the middle is not conspicuous. If one plinth was enough for the entire length, then we adjust the other end at the corner to the same size. Let's dwell on this in more detail.
Not always one length of the plinth is enough to stretch it from wall to wall. Sometimes two or three segments are used, and a strong and beautiful joint is also needed between them. Corners cut at 90 degrees will not work here. You need to cut at an angle of 45 degrees, such a joint, if it is made carefully and processed with sandpaper, will not be visible at all.
By the way, the quality of both angular and intermediate joints depends largely on the quality of the product itself. The plinth should be the same throughout its thickness, it should not have knots, notches at the junctions.
With a drill we mark the wall where the fixing dowels will be placed. The procedure is very simple. As a rule, a wooden plinth is attached after about 50 cm - this is if the wall is even, and if not, then you can attach it more often.
Then, using the markings made, we drill holes into which the plastic dowel will be placed - these are the ones that are used if the wall is made of bricks. If the wall is made of drywall, the plinth is fixed on self-tapping screws or dowels "butterflies".
The mounting process is also quite simple. We take into account only a few points. One of them - the bar can be fixed only after careful fitting of the joints. It is very important to observe the correct depth of the holes for the dowels, it should be deeper than the length of the dowel itself no more than 1 cm. For accurate drilling, wrap the drill with electrical tape to the indicated hole depth. On the plinth, it is also necessary to drill recesses for the heads of dowel screws, self-tapping screws, so that they are not subsequently visible on the plinths. For such recesses, a drill is taken, which is slightly larger in diameter than the attachment cap. Or, for such holes, a tool such as a countersink is used.
Then we fix a well-fitted skirting board around the perimeter of the room. Everything is ready! Proceed to puttying, varnishing or painting a wooden plinth, having previously cleaned the surface of dirt and dust. To prevent varnish from getting on the floor and wallpaper, you should cover them with something.
We have described how to attach a wooden baseboard to a brick wall.
How to install wooden plinth on plasterboard walls.
We fix the wooden plinth to the concrete wall.
Fixing the floor plinth on the inside corners.
How to fix a wooden floor plinth on external corners
You can fix the plinth to the wall, or you can also to the floor. How it's done? Quite simply - nails. Sometimes it is even easier to nail it to the floor than to the wall, since it is easier to attach wood to wood. You just need to try to avoid gaps between the plinth and the wall (just in this case, the gaps between the plinth and the floor are completely excluded), which can arise from the unevenness of our typical walls and floors.
In this case, the nails are driven into the floor boards through the plinth rail at about an angle of 70-80 degrees to the floor. Well, if it’s impossible to hammer a nail into the floor, if it has a too hard or too brittle coating, then, of course, we use the methods described above: we nail a wooden plinth to the wall.
You can attach a wooden plinth to the finishing nails. Such installation is similar to installation with self-tapping screws, only finishing nails are used instead of the latter, and pieces of wood are used instead of dowels.
Such a mount has both its advantages over other types, and limitations. Dignity, of course, can be called an almost invisible attachment point. But the nails are smooth, and some types of wood may eventually
crack. If the skirting board is mounted in a stressed state as a result of uneven walls or floors, then there is a high probability that either the nails or the wooden dowels may not withstand such a load.
There are also restrictions on mounting with nails - for example, it is completely excluded if the walls are made of drywall, or the walls are very loose. In both cases, the wooden dowel will not hold on such a surface.
Wood screws, which are often used today instead of nails, are in many cases more effective than nails. After all, the self-tapping screw is easily hidden in the plinth, after which the hole is sealed with a “liquid wood” putty.
The cracks, often formed at the junctions of two planks, as well as between the floor and the plinth, or between the wall and the plinth, can be decorated with colored putty and sealant to match the wood. How to do it?
Cover the surface that borders the gap (floor or wall) with paper tape, then apply the decorating compound by pressing it into the gap with a spatula. Remove the tape immediately - if it is left for a few days, it will be much harder to remove it.
Among the many skirting boards that differ in their design, color, shape, texture, there is a model with a decorative insert in the middle, which serves not only for beauty, but also to hide the fasteners. A wooden insert is glued on top of the recess after installation.
The disadvantage of a wooden floor plinth is that it does not press tightly against an uneven surface; here a careful, accurate fit is needed: measurements, cutting and sawing. After all, even if the floor is even, the wall is not always even. Often, for this reason, you have to abandon wooden products and put plastic. Well, although plastic fits almost perfectly, it is alien, inanimate, life-giving energy, which is in a tree, it does not.
Far from all wooden plinth, its cutting, certain standards are applied. So, for example, a wide wooden plinth will give your home more comfort due to the fact that it visually brings the floor closer. White plinth will favorably emphasize the cleanliness of the room. And it is not at all necessary that the color of the wooden plinth matches the floor or walls. The play of color always gives a special charm to the room, which in a certain way affects a person, his attitude, energy, and psyche.
I would like to note that coniferous woods, which are used to make skirting boards, will have a beneficial effect on our body. In our age of high percentages of allergic, cardiovascular and other diseases that often occur due to environmental pollution, it is impossible to breathe truly fresh air, since chemistry is everywhere. All these factors speak in favor of only natural, environmentally friendly products and materials, one of which is a wooden baseboard.
As you know, the final touch in the repair is the installation of a plinth on the floor. It's not easy, but it's very responsible. After all, the first thing that catches your eye is the coating on the floor, and, accordingly, the skirting boards installed on it. In addition to an impeccable appearance, it is very important to ensure a reliable, durable fastening. Since the plinth on the floor is often touched by feet, a vacuum cleaner brush, and even moving furniture.
After finishing the floor, the final stage is the installation of floor skirting boards. It is important that the floor and skirting boards match in color.
Particular attention should be paid to fixing the outer corners. How to make skirting boards on the floor correctly? To get started, you need to stock up on the following tools:
Skirting boards on the floor must be installed correctly, otherwise, no matter how perfect your flooring is, its appearance will be spoiled. Since it is necessary to make skirting boards on the floor after all finishing work has been carried out, it is believed that this is an element of decor. For its manufacture, different materials are used, for example, wood, MDF, metal, plastic, stone or ceramics.
As a rule, floor planks are chosen based on the interior design, as well as in accordance with the flooring of the room. At the moment, few people install wooden and metal skirting boards. The thing is that the price of products made from these materials is quite high. In addition, to make decorative trims from metal or wood, a perfectly flat surface is required. Since they do not differ in flexibility, any unevenness on the wall will be reflected by a rather noticeable gap between the plank and the wall.

MDF skirting boards are very fragile, so it is undesirable to install them in rooms with high traffic.
It is impractical to make skirting boards on the MDF floor, since this material is considered very fragile. Plinth on the floor, made of ceramic or stone, is suitable for appropriate coatings, but not for parquet or, for example, laminate.
Today, the most popular among the above plinths is plastic. The reason for this popularity is the large number of its benefits. First of all, this is the low price of a plastic plinth. But at the same time, it is easier to install, flexible, water resistant, durable, and it also has special channels for electrical cable. Moreover, the construction market presents a wide range of colors for plastic decorative floor strips.

First of all, you need to calculate the required amount of plinth. The standard rail length is 2.5 m. Therefore, the perimeter of your room is divided by the length of the material. As you understand, such work requires constant movement from place to place. That is why, in order to make skirting boards on the floor as convenient as possible, put everything you need in a box and move it along the floor with you. What exactly is needed to install the skirting board on the floor? You will need accessories, fasteners, as well as all of the above tools.
Start installing the skirting board on the floor, usually from doors or corners. You should start by attaching the first two pieces of fittings to pre-marked places. Insert the end of the plinth into one of the elements, and make a mark on the second. At the same time, do not forget that 5 mm rails will go into the plug.

First of all, install those planks on the floor that do not require trimming.
Try to foresee in advance that the joints are in places that are not particularly striking or covered by furniture.
No wonder many believe that this stage of work is the most responsible. After all, if you make a mistake in the height of the holes, the installed plinth will have to be removed as a result. If your walls are perfectly flat, you should leave a distance of 50 cm between the holes. For fastening the plastic look, 6 x 30 mm dowels or 3.5 x 25 mm self-tapping screws are suitable. Having drilled the required number of holes, do not be too lazy to vacuum the floors in the room.

The height of the metal profile for drywall is approximately 30 - 50 mm. In the installation of skirting boards, one often has to deal with a situation where the fastening of the rail comes across a profile. In this situation, the dowels should be replaced with self-tapping screws. But first you need to drill the frame with a drill or use special dowels with drills designed for such situations. Using an awl, you can avoid a collision with the profile. To do this, it is enough to pierce the drywall with them.

Make holes on the rails for self-tapping screws with an awl.
Many craftsmen advise first of all to make holes in the baseboards, through which they subsequently drill the surface on the wall. But, as practice shows, this installation method leaves gaps between the floor and the plinth. In addition, if over time you want to change, for example, the floor covering, it will be quite difficult to dismantle the slats.
In order to perfectly set the bar without leaving any gaps, you can use the following method, which few people know. Holes on the rails for self-tapping screws should be pierced with an awl. By avoiding drilling, you will ensure the tightest edges of the hole. An awl can be made from an old screwdriver by sharpening its blade to a trihedral point.
In order not to make a mistake with the place for the hole in the baseboard, attach it to the wall surface so that the dowel is visible. Exactly along the line of its location in the place under which the cable channel is located, make a mark. After that, thread the self-tapping screw through the already prepared hole into the dowel and tighten it. This method of installing the plinth ensures its strong and reliable fastening, in addition, it leaves a minimum of gaps.
It is very important that the outer corners on the skirting boards are fixed as firmly as possible, since they most often have to be touched. When installing them, be careful, because often drilling a hole for a dowel ends with a chipped corner. In conclusion, it remains to install special plugs for the cable channel, and your floors will sparkle with completely new colors.
Currently, wooden skirting boards are rarely used for finishing ceilings in an apartment, mainly such products can be found in baths and saunas. Due to the low cost, people often prefer artificial materials. But when the walls or other elements of the apartment interior are made of wood, it is a bad form to use synthetics for finishing the ceiling, from the point of view of design.
Products made from natural material win, compared with artificial, in many ways:


Along with the listed advantages, wood cornices also have disadvantages:
IMPORTANT: antiseptic treatment increases the resistance of wood to mold and fungi, but does not protect against exposure to humid air.
Despite the shortcomings, with the right approach to business, wood can be used in interior design. Beautiful, durable and healthy wooden ceiling skirting boards never lose their appeal.
The main criteria here are: the cost of the material, the resistance of products to high humidity and compliance with the interior. Consider the properties of the most popular types of wood used in apartment design:
Modern woodworking machines allow you to make skirting boards from any type of wood. However, not all of them are suitable for specific operating conditions. You need to choose a ceiling plinth made of wood, taking into account the above properties and personal preferences.
Particular attention when choosing is given to the size of the ceiling fillets. The height of the walls is decisive here. The room looks harmonious when the width of the skirting board naturally fits into its proportions.
In some cases, the size of the baguette can even change the visual perception of the interior space, which experienced designers skillfully use to correct the unfortunate ratio of the height and area of the room.
The generally accepted rule is that the higher the ceilings, the wider the plinth:


In any case, baguettes that are too narrow for spacious rooms are not used - they will look unnatural. Designers prefer to increase the width of the baseboards rather than make them invisible for the sake of dubious economy. This is justified when it is necessary to hide defects, especially when installing stretch ceilings on uneven walls. Do not forget about the psychological aspect. Smoothing the corners has a positive effect on the mood of the residents - in such a room a person is much more comfortable.

The following tools are useful for installing wooden skirting boards:

Preparatory work includes the following operations:


TIP: during the first treatment, it is impossible to remove pile from the fibers of some types of wood, as it is adjacent to the baseboard. To “raise” it, the baguette is moistened with water. If this is not done, the fibers will bulge during varnishing.
Ceiling baguettes are installed in the following order:


TIP: this operation is performed with utmost care, since it will be impossible to correct an uneven cut. In order not to spoil expensive material, we recommend practicing on ordinary boards.
- To attach the baseboard, liquid nails or special glue are used. The composition is applied evenly to the entire surface of the product, the excess that comes out after pressing is immediately removed with a damp cloth.
- Carved baguettes over 70 mm wide may be too heavy to glue. In this case, triangular cross-section bars are pre-installed on the wall in increments of 50 cm, and the plinth is nailed to them with nails without hats.
- If massive parts are made of dense wood species (oak or beech), their installation is carried out using dowels and self-tapping screws. For such fasteners, holes are drilled in the baguettes for the hat in the sweat, that is, flush with the surface of the plinth.
- If the angles are different from 90 degrees, the cut is made using a template from a wooden plank. To do this, a line is applied to it at the right angle, which sets the direction of the hacksaw. The baguette is pressed against the rail with clamps, and cutting is carried out. The second fragment is fitted to the first after it is installed.
- When all the details in the corners are fixed, straight sections are mounted.
Making a wooden ceiling plinth with your own hands
If desired, you can make a wooden baguette yourself. For this, a board of a suitable size is used. Its humidity should not exceed 16%, otherwise processing and grinding will become problematic.
You will also need tools:
- circular saw with guide rail;
- planer, preferably electric;
- milling machine or manual milling cutter with a set of nozzles of the required shape;
- sanding machine;
- protective glasses.
When the repair of ceilings, walls and floors is completed, it is the turn to install the floor plinth. If rarely anyone looks up, then the floor plinth is always in sight. Therefore, it must be installed perfectly and firmly fixed to the wall, as it will be subjected to constant impacts from the vacuum cleaner brush, accidental kicking or when carrying furniture and things. The outer corners must be especially secure.
Mostly used plinth made of wood, plastic, MDF, metal, stone and ceramics. A wooden skirting board is rarely installed, since to create a beautiful appearance it requires perfect evenness of the walls, a complex paintwork and expensive (like metal ones). Plinth made of MDF is very fragile. Stone and ceramic skirting is only suitable for floors made of ceramic tiles, tiles or stone.
Therefore, today the most popular plastic plinth. It is great for laminate flooring, wood, linoleum, carpets. Cheap and waterproof, easy to install, has a cable channel for wiring, the market is represented by a large range of colors.
The floor plinth is usually produced in a length of 2.5 m. Before starting the installation of the plinth, it is necessary to calculate the required number of rails. The calculation is carried out according to the formula, as for the ceiling plinth. It is necessary to divide the perimeter of the room by the length of one rail. A specialized online calculator will help you with this.
To exclude additional joints, you should buy one rail more, since in addition to the appearance there will be additional costs for connecting elements, the price for which heels can reach the cost of one rail.
Perhaps the most important thing when buying a skirting board is choosing its color. When choosing a color in a store, due to differences in the color temperature of light sources, it seemed that the color of the skirting board that matches the floor and walls may not be the right shade. Therefore, when choosing a color, you should take a piece of wallpaper and flooring with you to the store, attaching them to the baseboard rail, making the choice will be much easier. If the walls or floor are painted with paint, then when painting them, you need to paint a small piece of thick paper or plywood, for a sample, especially for choosing the color of the baseboard.
The plastic plinth is also good because it has special fittings, thanks to which high precision is not required when sawing. Therefore, the installation of a plinth is within the power of a home master, who does not even have experience in this matter. A beautiful appearance of the result of the work is provided by the design of the plinth.
The set of accessories for the plastic plinth includes five elements: the right and left plugs, the docking element of the plinth rails, the inner and outer corners. They exactly match the skirting board in color and texture and are sold separately.

In the photo, the external and internal view of the right plug. The left plug is exactly the same, but made in a mirror image. Therefore, when calculating the amount of fittings, this fact must be taken into account. On the plug there is a foot with a hole for fixing it with a self-tapping screw on the wall. This element of fittings is usually installed on the end of the plinth rail at the door trim.

The connecting element is used to close the gap between the skirting boards when the wall length exceeds the length of one skirting board strip, usually equal to 2.5 m.

The photo shows a docking element installed on the rails; on the near rail, the decorative plug of the cable channel has not yet been inserted.

In this photo you can see the inner corner. It is held without self-tapping screws, due to pressing the plinth with slats. When installing the plinth, it is necessary to ensure the same clamping of the corner, otherwise it may be installed crookedly and look careless.

And so the outer corner is arranged from the inside. It has two legs for attaching to the wall. The outer corners rarely have to be used, but I was “lucky”. It was necessary to install eight such corners when installing the plinth.
The installation of skirting boards requires a constant change of place of work, therefore, in order to have everything you need at hand, it is advisable to place the fittings, fasteners and tools in a box and move it along with you.

The photo shows a cash box, in the branches of which accessories, dowels, self-tapping screws and small tools are laid out.
The installation of a floor plinth is the final stage in the repair of a room in an apartment and is performed when the ceiling and walls are repaired, the floors are laid.
They begin to install the skirting board from the inner or outer corner or from the door. To do this, install the two necessary fittings in the required places, insert the end of the plinth rail into one of them and make a mark on the plinth near the second element, taking into account the fact that the plinth rail should go inside the corner or plug by 5 mm.

First, it is advisable to install the skirting board strips, which will not need to be cut. In this case, it is desirable to provide that the docking elements are in places that will later be covered by furniture.

If the plinth rail cannot be applied at the installation site due to its greater length, then the distance between the fittings is measured with a ruler and 10 mm is added to the result. Then, on the rail of the plinth, a mark is applied for sawing. When marking with a ruler, it is better to add a couple of millimeters of length than to make the baseboard shorter. The excess can always be cut off.
Sawing plastic skirting is much easier than fillets, as there is no need to withstand sharp corners. All ends have a right angle. But nevertheless, if the end of the rail is crooked, then the internal corners, since they are not fixed, can be set skewed. Therefore, it is still necessary to ensure a right angle of the plinth end when sawing.

More precisely, it is more convenient and fastest to cut the plinth with a hacksaw, in a device called a miter box. If the miter box is not available, then I advise you to buy it. You can make a miter box yourself from improvised material in a couple of hours, it will be even better than cheap purchased plastic ones.

Sawing in a miter box guarantees not only the right angles of the plinth rails, but also makes it possible to saw off pieces as short as one millimeter.

After fitting the rails in place, you need to remove the burrs formed during sawing with a knife from the ends.
Perhaps the most important operation when installing a floor plinth is drilling holes for mounting it on the wall. The final result of the work depends on the accuracy of the height of the drilled holes.


With even walls, holes are drilled at a distance of 50 cm from each other. From the floor level at a height equal to the distance from the floor level to the middle of the cable channel of the installed plinth. Since no greater force is required to securely hold the plinth, it is enough to use a dowel with an outer diameter of 6 mm, a length of 30 mm and a self-tapping screw 3.5 × 25.
After drilling the holes, be sure to remove all the dirt that has appeared. A vacuum cleaner is handy for this. But you can just sweep the dirt with a brush on the scoop.
If the walls in the room are made of drywall, fixed on a metal frame made of profiles, then the plinth attachment line can fall on the profile, which usually has a width of 30 to 50 mm. In this case, the plinth is fastened without the use of dowels by directly screwing the self-tapping screw into the profile wall.
It is enough to pre-drill a hole in the profile with a metal drill with a diameter a couple of millimeters smaller than the outer diameter of the self-tapping screw. Here it is highly desirable to use the jig mentioned above, since the drill can easily go away from the drilling site. You can do without drilling, if you use special screws with a drill at the end. To check the possibility of attaching to the profile, it is enough to pierce the drywall with an awl at the level of fixing the plinth. If the awl rested against the metal, then dowels are not needed.

One of the walls in my hallway was plasterboard on a frame. But I was not lucky, because for the linoleum flooring, the floor was leveled with plywood and its level rose several centimeters. Therefore, the plinth attachment line turned out to be higher than the frame profile. I had to use dowels, specially designed for mounting on drywall walls, called "Butterfly".
For your information, one dowel "Butterfly", installed in a drywall wall, can withstand a load of up to 10 kilograms. Therefore, with its help, you can securely fix not only skirting boards on the wall, but also a TV, shelves, paintings, mirrors and other household items.

To install the Butterfly dowel into a drywall wall, you must first drill a hole in it to ensure a snug fit of the dowel in the wall. You can drill with any drill using a jig. Next, you need to press the protruding parts of the dowel rod to each other, so it is easily inserted into the hole in the wall. It remains to apply a few light blows to the dowel head with a hammer and you can proceed to fixing the baseboard.
It should be noted that the diameter of the self-tapping screw should be slightly less than the diameter of the hole in the dowel head, the length of the self-tapping screw must be at least the length of the compressed dowel, since the self-tapping screw is not screwed into the head of the dowel, but into its movable end.
Some craftsmen suggest first drilling holes in the plinth slats and then drilling the wall along them, using dowels with hats. But this method cannot guarantee the accuracy of the installation of the plinth, and in any case, even with diligence, gaps will turn out in some places.
If necessary, for example, when laying a cable behind a plinth or replacing linoleum, dismantling a plinth fixed in this way will be very difficult. In addition, dust and crumbs from drilling will remain behind the baseboard, which I consider unacceptable. Therefore, as you already understood, I use a different method of fastening, which guarantees a high quality of work.

Holes for self-tapping screws in the plinth are best not drilled, but pierced with an awl. As an awl, I use an old screwdriver, the blade of which is sharpened on a triangular point. When rotating, the edges of the awl push the material apart, which makes the edges of the hole more dense. In Soviet times, the tool was made of tool steel, which had high hardness and at the same time was not brittle. Therefore, an awl from a screwdriver serves me for many years, does not blunt and does not break. And due to the presence of edges, a hole with such an awl can be made without a drill even in plywood.

To obtain a hole in the desired location of the plinth, you need to attach it to the wall at the installation site. Make a mark in the center of the cable channel, move the plinth slightly away from the wall so that the dowel is visible, and pierce the hole along the mark strictly along the line where the dowel is located. Now it remains only to wrap the self-tapping screw, threaded through the hole made into the dowel, and the plinth will be securely and accurately fixed to the wall.
The outer corners of the plinth are often in the area of heavy traffic of people and the probability of catching them is high. Therefore, the fastening of the outer corners must be approached with full responsibility. Since the corners are attached to the wall only two centimeters from the corner, drilling a hole for the dowel can chip the corner. Therefore, even at the repair stage, when leveling the outer corners of the walls, it is necessary to provide for the possibility of securely fixing the outer corners of the plinth. If the profile is not used when leveling the corners of the walls, then only a segment of at least 20 cm long can be laid from the floor in the area of \u200b\u200bthe future attachment of the skirting corner.

If the perforated corner profile is laid in advance, then it remains only to pierce the plinth and profile sheet with an awl and screw in a short self-tapping screw with a thread reaching the cap itself. To securely hold the corner, it is advisable to place a washer under the self-tapping screw. A self-tapping screw is easier to tighten if you hold it with tweezers with bent ends.
The fastening of the outer corners of the plinth to the walls of drywall is carried out using the same technology, since usually sheets of drywall are attached to a metal profile, and, as a rule, self-tapping screws can be screwed into it.

It remains only to install decorative plugs for the cable channel. To do this, the plug is bent, its ends are wound behind the fittings, after which it is straightened and tucked into the cable channel.
All photos from the article
Wood trim is deservedly considered a classic, not subject to any newfangled trends. There are many good floor borders on the modern market, but natural wood, like a hundred years ago, is valued higher. In this article we will talk about the advantages and disadvantages of this material, as well as tell you how to correctly select and install a plinth made of wood with your own hands.
Tip: when choosing such products, you should remember that today high-quality wood cannot be cheap.
These borders belong to the upper or maximum, middle price category.
Even if you decide to make wooden skirting boards with your own hands, they will cost more than budget plastic.
At the moment, the market offers two types of natural wood products: this is a curb carved from solid wood and a veneered version.


Important: in part, planks made of pressed MDF and covered with natural veneer can be attributed to wooden products.
Most often they are used for arrangement.
Gone are the days when the entire range of such goods was limited to a few models with a triangular cut. And these plinths differed only in the presence or absence of a chamfer. The modern woodworking market is constantly improving technologies and equipment.

Now wooden planks are practically not inferior to polyurethane products or plaster moldings in terms of the complexity of the ornament. The patterns that CNC programmable machines are capable of applying can only be compared with hand-carved wood.

Each manufacturer is now trying to stand out with its unique models. Of course, there is a standard classic line of products in which the size of the bar base ranges from 10 - 25 mm. As for the height, there are no restrictions here, it starts from 40 mm and in some models can reach up to 300 mm.

Important: when choosing a size, they often start from the height of the ceiling.
For a city apartment with a standard ceiling in the region of 2.7 m, the height of the bar should not exceed 70 mm.
For ceilings up to 3 m, planks of 70 - 90 mm are suitable, for higher ceilings a plinth of at least 50 mm is taken, there is no upper limit here.
It has always been believed that the skirting board should be selected, starting from the material from which the floor is made.
But modern design trends allow you to successfully combine different breeds and bypass old dogmas.


Tip: when you buy an unvarnished, clean border, be aware that after varnishing it will seriously change the shade.
In order to find out what awaits you at the finish line, you need to wipe the bar with a wet sponge.
But this only works for colorless varnishes.
Although wooden planks are much tougher compared to their plastic counterparts, the instructions for self-assembly of even an elite plinth, as a rule, do not cause difficulties for people who are familiar with a hacksaw, screwdriver and drill. Moreover, some masters make borders with their own hands.
The question of how to make a plinth with your own hands from wood is asked by many. But here it should be remembered that independent production of borders is not always cost-effective.
First, you need to choose the right board. The moisture level of the forest should not exceed 16%.
Raw wood cannot be sanded well, plus it is poorly milled. Knots, rot, chips and other defects are also undesirable. Ideally, you need a clean, dry, planed board.
Proverbs and sayings about May HORIZONTALLY: 2. May will deceive - in ... will leave.4 ....

Popova V.N. primary school teacher MBOU "Kishertskaya secondary school" Rebus is ...

To learn how to compose and understand puzzles, you should figure out what they are from ...