Evgeniy Titov Another large agricultural enterprise in Kuban has become...


(There are two main types of pyramids: truncated and pointed. The latter can be closed - such as the Egyptian pyramids - or open, with a “emitter” at the top.
A similar type of pyramid is described by Carlos Castaneda - they were used by ancient magicians to “gather Power.” As for closed types, here the top serves as an outlet for a beam of energy, and it is not recommended to be on this path. It should be noted that a geopathogenic network is restored above the surface of a closed pyramid, therefore, to protect against it, one should use a pyramid designed by the Bulgarian Milev, the top of which is equipped with an antenna with a radiator of a certain shape. To protect against geopathogenic zones, he uses a structure based on the same Cheops pyramid. The only difference is from the top of the pyramid
a vertical antenna with a branched emitter emerges, which makes it possible to eliminate the effect of negative anomalies in the area around the pyramid.
The power of such a pyramid is very large: the radius of activity of a structure with a height of only 10-15 cm can reach 30 m, with the height of the favorable zone being at least 10 m. More accurately, the field of its activity can be determined using dowsing. When using such a pyramid, you should remember that it must be placed directly on the ground in order to avoid the possibility of a person getting into the negative part under the base. Typically, Milev's pyramid is made of metal wire.
As for the technique of making the pyramid itself, any model should be made based on the proportions of the Cheops pyramid: the length of the side of the base is 230.35 m, the height is 146.59 m. Thus, the ratio between these values is 1.572. At the same time, the triangle, which is the side face of the pyramid, has angles between the side
and base - 58°, angle at apex - 64°. The angle between the plane of the side face and the plane of the base in the Cheops pyramid is 5G52′.
A model of any pyramid can be built by reducing its linear dimensions by the same number of times.
Making a pyramid yourself is very easy. You need to cut out a 157 * 157 mm square from some hard material - cardboard, plywood or paper - and cover it with isosceles triangles 157 * 150 * 150 mm, converging at the apex. In this case, the angles at the base of the pyramid will be 58°, and at the top of the pyramid - 64°. All that remains is to make a stand inside the pyramid in such a way that it can be used to place objects at the level of one
a third of the height of the pyramid, counting from its base. Finally, the pyramid must be oriented using a compass to the cardinal points, so that its side faces are parallel to north and south.
The corners of the pyramid must be checked using a protractor, after which it is ready to perform its functions.
For economic and other purposes, which were mentioned earlier, you can build a plank, glass, plexiglass or other pyramid, keeping the indicated proportions, but increasing the dimensions themselves by the number of times you need. In large agricultural farms, industrial sites, etc., it is possible to make board “fungi” in the form of pyramids, a short rest in which will allow you to successfully combat fatigue.
Small pyramids made of paper have a short radius of action and it is enough to be located at a distance of at least 50-70 cm near them. With the help of such a pyramid, you can eliminate pain and bruise formation if you apply its base to the just bruised area for 2-3 minutes. You can also stop light bleeding from a cut in the same way.
If we are talking about a relatively large pyramid, in the upper part of which a person can be located, then it should be remembered that there are a number of serious medical contraindications (schizophrenia, cancer and a number of other diseases) that prevent one from staying in this zone. Therefore, it is necessary to first conduct a dowsing test or use rapid medical diagnostics using R. Voll’s method.
Thus, any pyramid design has a force of action, which is determined by the capture radius of the collection zone and the height of the cylindrical area favorable for humans. The active zone itself depends, firstly, on its size: the larger the pyramid, the greater the range of action, and, secondly, on the correct ratio of the lengths of the base and height: 1.572.
When putting a small homemade pyramid on your head, you should take into account the fact that the base of the pyramid will be located slightly below or at the level of the “third eye,” which breaks the energy flow. In this case, the personality is, as it were, deprived of the highest, divine principle and further functioning occurs at low levels.
Water placed in the pyramid is “charged” after some time and must be handled with care: if you drink such water, it will have the same effect as the active zone, and for a considerable time, so uncontrolled intake is unacceptable.
One of the most consistent scientists experimenting with pyramids in our country, Alexander Efimovich Golod, who has been involved in the practical use of the “pyramid effect” for more than ten years, in particular, warns: “Here’s something else that is important for those who build a pyramid to know: they should not have no dirty thoughts, the pyramid built by “bad” people is dangerous for others. “Communication” with this amazing structure requires a special state...
This kind of experimentation is becoming increasingly widespread. Romanian Mircea Sherban,
an economist by profession, he purifies tap water using a home pyramid he designed, made from ordinary copper wire. Its dimensions are taken as reduced proportions of the Cheops pyramid. He keeps a glass of ordinary water in his pyramid for 24 hours, after which, as laboratory studies have shown, the water receives an increased content of oxygen and phosphorus, and bacteria and other microorganisms almost completely disappear. Having fallen ill with a pulmonary infusion, he decided to completely abandon medications, testing the “pyramid water” on himself. After a few days, his lungs cleared and his fever and chest pain disappeared. According to his recipe, relatives and friends began to be treated with the same amazing effect: toxins came out, recovery occurred. The Romanian enthusiast himself does not try to explain the results obtained from a scientific point of view, however, according to him, he managed to save the daughter of a doctor he knew, who was in critical condition, using a similar method: after several “water” procedures, the patient got out of bed, she had an appetite, and there was no trace left of the serious illness...
And although Mircea Shcherban does not risk promising complete healing to everyone, he has already been invited to make a report at the Institute of Cosmic Fusion in the USA.
In another study, water aged two weeks under a pyramid was used daily as a facial lotion. Apart from water, no creams or rubs were required. After five weeks, the skin became elastic and youthful.
Watering plants with “pyramid water” also has a beneficial effect, increasing the amount of green mass and fruit yield. Excellent result
can be obtained by watering seedlings with such water when transplanting into the ground, and germinating seeds in this water. If you place a pyramid (base down) above each feeder, the animals get sick less, look better, and the cows increase their milk yield.
If you make a dog kennel in the shape of a pyramid, it will be good for both the dog and the adjacent plot of land - everything begins to grow better on it.
Pyramids are being built in the Swiss Alps, in the center of Paris... But, as is customary in Russia, we often do not notice our compatriots who are discovering new things, and, on the contrary, we admire foreign discoveries. In short, it has long been known: there is no prophet in his own country. But there are plenty of curious people.
Let us quote A. Golod again: “I think that they are trying to “correct” us earthlings with the help of this structure. In my opinion, the pyramid was based on a certain idea that was close to our moral principles, our moral ideal. We must have freedom of choice, freedom of thoughts, feelings and actions, and the pyramid helps a person through its information to move in the right direction. Perhaps the information contained in the pyramid returns a person to the state in which he was “conceived” and created. The man lived then for nine hundred years, knew no illnesses, and had a wonderful garden around him...”
Is it not this desire that drives enthusiasts of unraveling the mysteries of the pyramid?
The book by the Dutchman Paul Likens “Secrets of the Energy of the Pyramids” contains very detailed descriptions not only of the author’s own experiments proving the effectiveness of the pyramids, but also of methods for independently making pyramids for the home. First of all, you should clearly understand what kind of
the effect we want to get from installing the pyramid. If, for example, you decide, following the example of the author, to install it under your bed, then its height should be 1-2 cm lower than the base of the bed, and the material could well be ordinary cardboard.
When installing a pyramid in which a person can fit completely, its height should be approximately 3 m. At the same time, the very principle of making any pyramid remains the same. Let's say we decide to build a tetrahedral pyramid with a height of 20 cm. The initial value on which all other parameters depend is the height of the pyramid, i.e. the distance from the top to the center of the base.
For this pyramid you will need to cut out four isosceles triangles from cardboard. In our case, their base will be equal to: 20 cm (height of the pyramid) x 1.57075 (constant coefficient), which gives 31.415 cm or, rounded, 31.4 cm.
The sides of this triangle will be equal: 20 cm x x 1.4945 (constant coefficient), which gives 29.89 cm or, rounded, 29.9 cm.
Thus, only the height changes, but the basic numbers remain the same.
The author describes two ways to practically make a pyramid. First method (I): take a sheet of strong cardboard and draw a base line 31.4 cm long on it (from the example given). From a point located strictly in the middle of this line (“O”), using a drawing square, draw a vertical line 30 cm long. Then attach the ruler to the left extreme point of the base line and move the right end of the ruler upward until the mark coincides with the vertical “29.9” cm. Connect this point on the vertical to both ends of the base line. The result is an isosceles triangle, which should be cut out of cardboard and three more of the same should be made.
Now all that remains is to connect the three triangles so that their inclined sides touch, and connect the joints with adhesive tape. Then the pyramid is placed on the base and the fourth side is attached to it with adhesive tape.
The result is a pyramid that is an exact copy of the Cheops pyramid.
Second method (II): take a sheet of cardboard in the shape of a rectangle (length - 78.5 cm, width - 25.4 cm). From the bottom on the long side (as shown in the picture), measure 31.4 cm from left to right and again 31.4 cm. The same must be done on the top side, but start putting 31.4 cm on the right. Now all that remains is to connect points A and D, G and B, B and D, D and C, C and E, and cut out four triangles from cardboard.
If you need to use a more rigid material than cardboard, you should bevel the butt edges so that they stick together better.
Proposing another version of the pyramid, the conical one, the Dutch scientist Lykens notes that it was not for nothing that medieval magicians and astrologers wore cone-shaped caps. This type of pyramid is made simply: draw a circle on a sheet of selected material with a compass and cut it in half. Now you need to take one semicircle and fold it so that point A coincides with point B. By connecting the edges with adhesive tape, we get what we are looking for.
And the report of one newspaper that the owner of a financial firm in the United States has ordered his employees to wear... pyramid hats while working is not so fantastic! As reporters assured, the company's income tripled...
You can expect everything from this ancient miracle. For example, a purely technical effect to save gasoline. For this purpose, the same Likens installs a homemade pyramid 40 cm high directly above the gas tank in the trunk of his car so that the bottom field of the “virtual pyramid” is located 13.3 cm below the base of the real pyramid.
In this case, it will be located exactly in the center of the gas tank. The fact is that, according to Likens’ theory, above and below the real pyramid there is its virtual reflection, which looks like it is shown in the figure.
At the indicated position of the real pyramid, it is necessary to mix half a tank of “charged” gasoline with a new portion and leave it to “charge” for 72 hours, preferably not in a garage, but in an open parking lot.
Gasoline savings in this case, according to the author’s observations, reach 20%, which is quite easy to verify by repeating his experiment.
Among other experiments conducted by Likens, the previously mentioned effects of the pyramid are confirmed, such as improving the taste of water kept under the pyramid, removing dandruff and sweaty feet with its help, as well as removing wrinkles!
The effect of a pyramid without walls (a frame made according to the same rules) on plants is also interesting: the stems of plants are 35% longer than those of the control ones, and they also bloom much earlier.
According to the Dutchman's observations, water should be kept under the pyramid for 24 hours at a height of 2/3 of the total height of the pyramid. In this case, the vessel with water should occupy no more than 10% of the total volume of the pyramid.
As for sharpening razor blades, then, repeating the experiments of the Czech engineer Karel Drban, who back in 1948 managed to shave 200 times with one blade kept under a pyramid, Likens outdid the Czech, bringing this number to 260 times! At the same time, he oriented the blades under the pyramid strictly to the east and west.
Well, apparently A. Golod is right when he claims: “The pyramid has the ability to harmonize any substance. Crystals come to life in its energy field, and their stable parameters change according to the periodic law... For example, the growth of crystals is an informational phenomenon. At the physical level, the crystal will not change because it lies in the pyramid, but the information received by the substance from which the crystal is formed will undergo changes.
With the help of a pyramid, substances involved in physical and chemical processes can be equipped with information in a new way, and they will behave completely differently than before, that is, they will acquire new properties. Which? This needs to be studied, this is the technology of the future..."
And such studies are indeed being conducted, in particular, in St. Petersburg. Exploring the mystery of the origin of the pyramids, V. Babanin in his interesting book “Secrets of the Great Pyramids”, through very convincing reasoning, draws the following conclusion: “As is known, natural and artificial crystals grow independently in liquid, gaseous and even solid media. But the pyramids were built by human hands. This is how they differ from crystals. But how fundamental is this difference?.. Crystals are formed by periodically repeating blocks-cells of spatial
lattices, and in pyramids the crystal-like shapes are formed by blocks. Each cell in a crystal is a crystallization center, a crystalline nucleus. And in pyramids, almost all elements are of a crystalline nature... And, finally, the crystal has geometric shapes with faces, vertices, and edges. And the pyramids are no different from them in this regard. In general, it turns out that the pyramid is a model of a crystal capable of demonstrating its energetic properties.”
The significance of the pyramid shape has already been discussed. It should be noted here that the top of the pyramid focuses energy flows within itself, directing them out through the point of the top. Moreover, a pyramid with a square base has a very important property, working as a transformer and qualitatively changing the characteristics of subtle energies.
Karel Drban patented a paper pyramid with a base side of 157 mm, a height of 100 mm and a side edge length of 150 mm. All the corners in it coincided with the corners of the Cheops pyramid. This design is used for sharpening razor blades, for which it is first oriented so that the side of the base is parallel to the North-South line, and the blade on a special stand is placed in the upper third of the pyramid and is also located along the compass needle. This blade can be used up to seventy times.
The Bulgarian biolocator Ivan Milev uses a similar design to protect against the influence of geopathogenic zones, adding to it a vertical antenna with a branched emitter, which extends from the top of the pyramid. At the same time, the space around
the pyramid acquires positive characteristics and an energy region appears in the form of a vertical cylinder. Milev's pyramid is made of wire, its radius of action at a height of up to 15 cm is from 10 to 30 m, the height of the favorable zone is up to 10 m.
However, this type of pyramid can only be used for people who do not suffer from schizophrenia or psychopathy. In addition, approximately a fifth of people have a more subtle astral body compared to the energy of the pyramid, and for them this field will be rough. In this case, it is best to take advantage of the experience of specialists who can select strictly individual pyramids with the characteristics required by users.
The material from which the pyramid is made also plays a certain role. As I. Efimova, for example, who has been studying the influence of pyramids on the human body for many years, believes, pyramids carved from solid crystals (especially from diamond and rock crystal) can be very effective, and with the same other characteristics, the maximum radius of action, as already noted , will be for a golden pyramid, about three times less for a copper pyramid, and even less for structures made of other materials. Rounding out the row are dielectrics - substances that do not conduct electricity, and the weakest pyramids are made of paper.
It is also important how the pyramid is made: solid, hollow or framed.
Large selection of developments of simple geometric shapes.
Children's first introduction to paper modeling always begins with simple geometric shapes such as cubes and pyramids. Not many people succeed in gluing a cube together the first time; sometimes it takes several days to make a truly even and flawless cube. More complex figures, a cylinder and a cone, require several times more effort than a simple cube. If you don’t know how to carefully glue geometric shapes, then it’s too early for you to take on complex models. Do it yourself and teach your children how to do these “basics” of modeling using ready-made patterns.
To begin with, I, of course, suggest learning how to glue a regular cube. The developments are made for two cubes, large and small. A small cube is a more complex figure because it is more difficult to glue than a large one.
So, let's begin! Download the developments of all the figures on five sheets and print them on thick paper. Before printing and gluing geometric shapes, be sure to read the article on how to choose paper and how to properly cut, bend and glue paper.
For better quality printing, I advise you to use the AutoCAD program, and I’m giving you scans for this program, and also read how to print from AutoCAD. Cut out the development of the cubes from the first sheet, be sure to draw a compass needle under the iron ruler along the fold lines so that the paper bends well. Now you can start gluing the cubes.

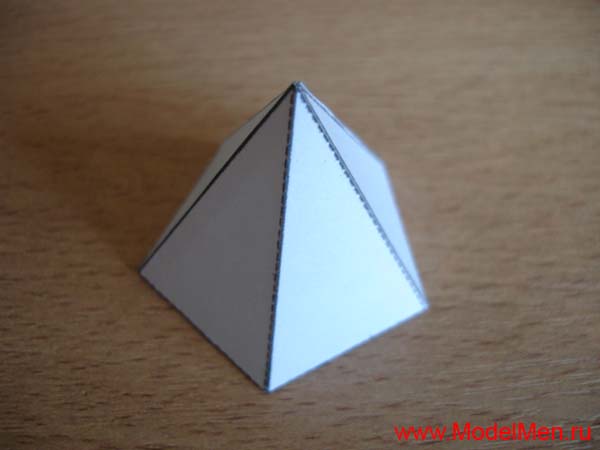
To save paper and just in case, I made several unfolds of a small cube, you never want to glue more than one cube together or something won’t work out the first time. Another simple figure is a pyramid, its development can be found on the second sheet. The ancient Egyptians built similar pyramids, though not made of paper and not so small in size :)

And this is also a pyramid, but unlike the previous one, it has not four, but three sides.

Development of a trihedral pyramid on the first sheet for printing.

And another funny pyramid of five sides, its development on the 4th sheet in the form of an asterisk in two copies.

A more complex figure is a pentahedron, although a pentahedron is more difficult to draw than to glue.

Development of a pentahedron on the second sheet.

Now we get to complex figures. Now you have to work harder, gluing such shapes together is not easy! To begin with, an ordinary cylinder, its development on the second sheet.

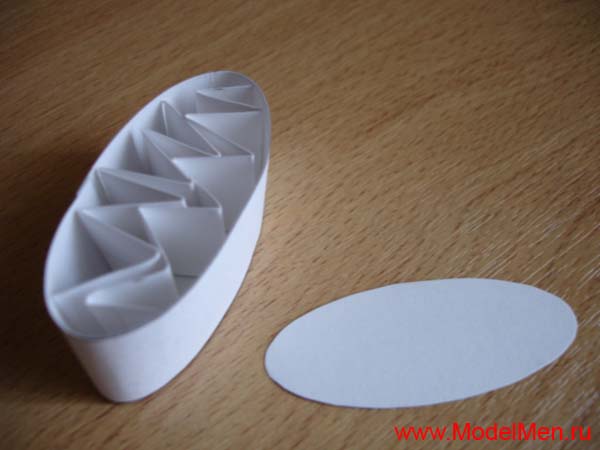
And this is a more complex figure compared to a cylinder, because at its base is not a circle, but an oval.

The development of this figure is on the second sheet; two spare parts were made for the oval base.

To accurately assemble the cylinder, its parts need to be glued end-to-end. On one side, the bottom can be glued without problems, just place the pre-glued tube on the table, place a circle on the bottom and fill it with glue from the inside. Make sure that the diameter of the pipe and the round bottom fit tightly together, without gaps, otherwise the glue will leak and everything will stick to the table. It will be more difficult to glue the second circle, so glue auxiliary rectangles inside at a distance of paper thickness from the edge of the pipe. These rectangles will prevent the base from falling inward, now you can easily glue the circle on top.

A cylinder with an oval base can be glued in the same way as a regular cylinder, but it has a smaller height, so it’s easier to insert a paper accordion inside, and put a second base on top and glue it along the edge with glue.
Now a very complex figure - a cone. Its details are on the third sheet, a spare circle for the bottom is on the 4th sheet. The whole difficulty of gluing a cone is in its sharp top, and then it will be very difficult to glue the bottom.

A complex and at the same time simple figure is a ball. The ball consists of 12 pentahedrons, the development of the ball on the 4th sheet. First, two halves of the ball are glued, and then both are glued together.

Quite an interesting figure - a rhombus, its details are on the third sheet.

And now two very similar, but completely different figures, their difference is only in the base.

When you glue these two figures together, you won’t immediately understand what they are, they turned out to be completely unresponsive.

Another interesting figure is a torus, but we have it very simplified, its details are on the 5th sheet.

And finally, the last figure of equilateral triangles, I don’t even know what to call it, but the figure looks like a star. The development of this figure is on the fifth sheet.

That's all for today! I wish you success in this difficult work!
1. Bend the square vertically and straighten it, horizontally and straighten it, diagonally and stretch it. All this is done to outline the lines. Bend all corners towards the center.
2. Raise the side corners to the top. Then straighten the top corner into a square.

3. Fold the side corners of the upper square along the lines and tuck them inward.

4. Bend the upper triangle down and turn the part over to the reverse side.

5. Repeat steps 3-4.

6. Raise the bottom corners up.

7. Straighten the side corners so that the bottom is straight.

8. Smooth out the bottom of the ribs thoroughly. Use a hole punch to punch a hole at the top of each face of the pyramid. Place a gift inside the pyramid and tighten the ribbon into the holes.

Use of blanks. You can draw them yourself, or simply download (save) our images, and then print, cut and assemble.


The pyramid in this case is made from a square sheet of paper through some steps.
Take a square sheet of paper. It is best to use a regular A4 sheet. Fold one of the corners to the opposite side and use scissors to cut off the excess or carefully tear it off. This will create a square, which we will use later.
First we fold the square along one diagonal and unfold it, and then along the other and unfold it again. With these actions we outline the necessary lines. Then roll a double triangle out of the square, holding its halves. Then you need to fold the two corners of the base of the figure towards the center. Turn the figure over and do the same operation.
After this, you need to bend the corners to the center again on one side, then turn the figure over and do the same on the other side. Then bend the diamond twice on one side, bend the corner inward and bend it again, similarly on the other. After this, let’s turn the craft over and do similar actions.
Bend the pyramid in the other direction to form a four-pointed star. With both hands, grab different ends and add volume to the figure. First, for some opposite edges, and then for the other. Gradually, the pyramid that we so wanted to assemble will begin to appear from the paper. If you succeeded, congratulations. You have achieved mastery in this and your paper pyramid is ready. Next time it will be easier to do this operation, and you can easily make a whole bunch of pyramids.
Thanks to the art of origami, you can create a pyramid. Moreover, there are both fairly simple ways to make it (for example, by cutting out the corresponding shapes from paper and assembling it), and very complex ones (for example, from a simple sheet of paper, doing various manipulations). In general, if we talk about the pyramid, then it is a mysterious figure. They say that it even stores energy. Many pyramidal structures are found around the globe. These are not only the well-known Egyptian pyramids. Such structures exist all over the world (in Mexico, China and other places).
From this article, thanks to descriptions, pictures and videos, you will learn about several ways to make a pyramid out of paper.
1. Bend the square vertically and straighten it, horizontally and straighten it, diagonally and stretch it. All this is done to outline the lines. Bend all corners towards the center.
2. Raise the side corners to the top. Then straighten the top corner into a square.
3. Fold the side corners of the upper square along the lines and tuck them inward.
4. Bend the upper triangle down and turn the part over to the reverse side.
6. Raise the bottom corners up.
7. Straighten the side corners so that the bottom is straight.
8. Smooth out the bottom of the ribs thoroughly. Use a hole punch to punch a hole at the top of each face of the pyramid. Place a gift inside the pyramid and tighten the ribbon into the holes.
Use of blanks. You can draw them yourself, or simply download (save) our images, and then print, cut and assemble.


The pyramid in this case is made from a square sheet of paper through some steps.
Take a square sheet of paper. It is best to use a regular A4 sheet. Fold one of the corners to the opposite side and use scissors to cut off the excess or carefully tear it off. This will create a square, which we will use later.
First we fold the square along one diagonal and unfold it, and then along the other and unfold it again. With these actions we outline the necessary lines. Then roll a double triangle out of the square, holding its halves. Then you need to fold the two corners of the base of the figure towards the center. Turn the figure over and do the same operation.
After this, you need to bend the corners to the center again on one side, then turn the figure over and do the same on the other side. Then bend the diamond twice on one side, bend the corner inward and bend it again, similarly on the other. After this, let’s turn the craft over and do similar actions.
Bend the pyramid in the other direction to form a four-pointed star. With both hands, grab different ends and add volume to the figure. First, for some opposite edges, and then for the other. Gradually, the pyramid that we so wanted to assemble will begin to appear from the paper. If you succeeded, congratulations. You have achieved mastery in this and your paper pyramid is ready. Next time it will be easier to do this operation, and you can easily make a whole bunch of pyramids.
Also know that at the final stage you need to be very careful not to accidentally tear the figure. If anything from the description was not entirely clear, watch the video.
You will need to cut out one figure from paper and then connect all the elements to form a pyramid.
For the craft you need to take: a sheet from which the pyramid model is made; small triangle; glue; scissors; marker.
Cut out a square. Let's draw the same one on a piece of paper, circling the previously cut out square with a marker. Fold the previously cut shape in half in different directions so that the folds are visible. Let's expand it and in our drawing we will mark the traces of the folds, which will be located in the centers of the sides. Then place the diagonal of the triangle on each marked side and make a mark again.
Then use lines to connect the drawn triangle and the vertices of the future pyramid. To ensure everything works out accurately, it’s better to use a ruler. Using a marker, then draw a line for gluing the sides. Right and left, but so that everything is the same on all sides.
Carefully cut out the shape along the marked lines. Apply glue (you can use regular PVA glue) to the gluing sides and glue the pyramid. To make the craft more stable, you need to use very thick paper. Here you can also express your imagination and creative nature. The pyramid can be decorated, various symbols can be pasted (for example, symbols of wealth, good luck) and other stickers.
Also watch the video on the 4th method of creating a paper pyramid.
It seems that if you used at least one of the methods and made this figure, then you can be congratulated - you learned how to make it and now you know how to make a pyramid out of paper.
A small pyramid is a kind of talisman that attracts silence, good luck and financial well-being into the home. And if this pyramid is made of real money, then bills will definitely be attracted to it, like a magnet. You can make a small figurine with your own hands using the manigami technique. We present a step-by-step guide to creating a small souvenir. The resulting pyramid will be tetrahedral. To begin with, let's conduct a kind of geometry lesson, imagine what kind of figure should be obtained, how many sides and angles it will have, how they will be located relative to the central axis. Next, the geometry lesson is compatible with creativity, useful for the development of motor skills.
The material for making manigami is just one bill.


Evgeniy Titov Another large agricultural enterprise in Kuban has become...

Catalog of tasks. Tasks for training and diagnostic work Sorting...

Ninth-graders are puzzled not only by how to successfully pass the State Examination Test, but also by the transfer...