There are many ways to send a file to someone over the Internet, and whoever it is ...


Currently, there are many finishing materials that greatly contribute to bringing the room to the desired state. Previously, it was believed that minimal attention could be paid to the ceiling, but now the situation has changed radically, so there are various options for finishing it.
Liquid wallpaper is one of the most original design methods. Of course, their application will require some effort, because the work is carried out in an unconventional way for such a product.
Liquid wallpaper on the ceiling is a relatively new solution that allows you to achieve an impressive effect. The material has many different advantages:
On a note! All these properties contribute to the fact that the decorative coating is very durable: the service life is up to 10 - 15 years, then a decrease in all characteristics begins.
 High quality and durability of the coating is guaranteed only if the product from a trusted manufacturer is used.
Sometimes mistakenly it seems that there are many types of this kind of material. This is due to the fact that various decorative variations are presented in hardware stores. It should be borne in mind that the technology of applying liquid wallpaper does not depend on the basis from which they are made.
In fact, there are only three types of material:
 Each type of material is of high quality, but they reveal their best aesthetic characteristics only in a combined decor.
 To determine which option is most preferable, they correlate together all the characteristics of the material, financial capabilities and the place where such a ceiling will be created.
It is necessary to prepare a tool that is suitable for working with putty or plaster.
You will need tools from the following list:
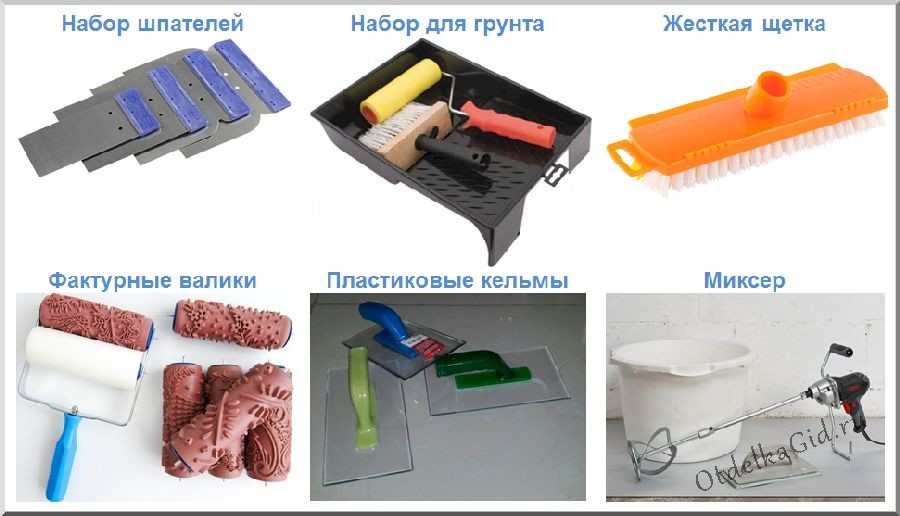 The main and most important tool for working with liquid wallpaper is a plastic transparent trowel.
 Advice! Many masters advise using an electrical appliance only at the first stage. If you overdo it, the mixture will not turn out the way you want. It is better to knead by hand.
The general technology of work is divided into three main stages, which are inherent in all finishing activities. So, initially a set of preparatory work is carried out, which should ensure the desired quality of the coating. Next, the availability of the necessary tools is checked, the solution is diluted. The final stage is the cladding process itself, which must be approached with all responsibility.
This event includes the following actions:
 For any type of contact ceiling finish, the preparation steps are identical
 It happens that the surface has significant irregularities, then you have to apply a large amount of plaster. But there is an optimal solution - the use of drywall sheets, which will help to complete the work much faster.
There are different material options on the market:
Of course, the price of each option is different. Any composition has its advantages and disadvantages, which must be considered in each specific situation.
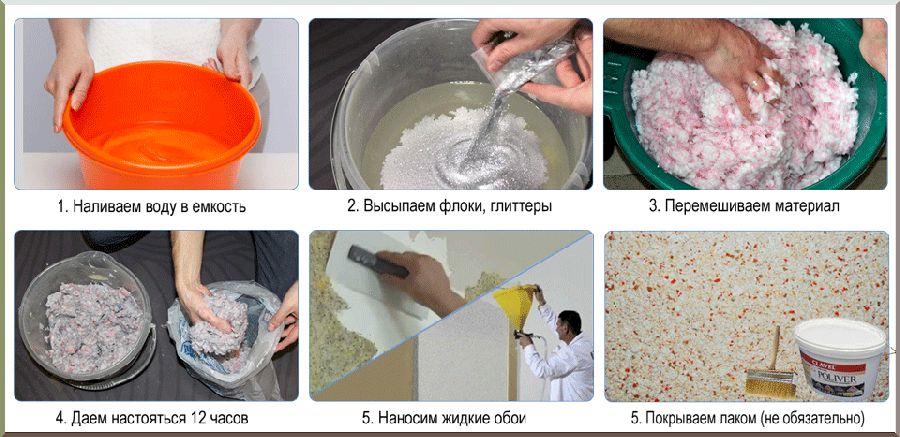 Preparation of a dry composition takes at least 8 - 12 hours
 The material is bred as follows:
The kneading itself is carried out using a mixer, but the tool can damage the components. It is better to use it for initial mixing.
Advice! So that the composition does not lose its properties, the container is tightly closed with plastic wrap.
 It is desirable to knead liquid wallpaper manually, the machine method is used only at the initial stage, and it is very dosed
 It should be borne in mind that applying liquid wallpaper to the ceiling is carried out in two ways: manual and mechanical.
The general technology is:
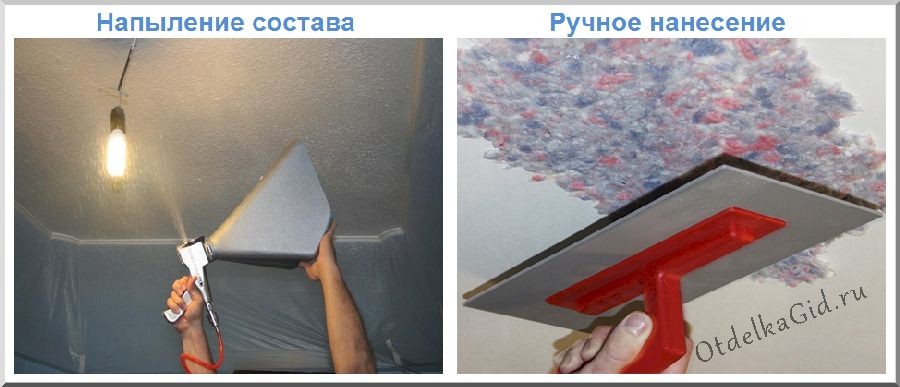 It makes sense to use machine application when arranging large plain areas, decorative work is carried out only manually
 Drying of the coating takes several days, during which the decorative layer cannot be exposed to any effect. It would be a mistake to decide to use a thermal gun.
Thus, the work is not so difficult, but rather laborious.
The ceiling coating is significantly transformed when various patterns or textures are applied to it. This opportunity is provided by liquid wallpaper.
So, a magnificent panel can be created if you follow the following rules:
It is important to consider that all layers must match. Sequins and beads can be used as decoration.
VIDEO: how to apply liquid wallpaper on the ceiling
Liquid wallpaper on the ceiling is a wonderful option for ceiling decoration, which has become increasingly popular in recent years. Such ceilings look not only stylish, but luxurious. The ecological purity of the material captivates the consumer, who at least a little monitors his health. A long service life of the coating is also important for a person who does not want to turn his life into endless repairs. In a word, this material has plenty of advantages, and as for the complexity of the production process, within half an hour after the start of work, you will already be confidently working with a trowel, improving the appearance of your home.
In our difficult time, inexpensive repairs have become relevant. You can, of course, save on material. But, such savings are doubtful, because cheap material, most likely, will not last long.
As for hired labor, there is no guarantee that this repair will be done better for you than you can do it yourself. The fact is that in our age of total unemployment, many “teams” have appeared that are not specialists at all, but they pretend to be.
After watching 2-3 videos on applying liquid wallpaper to the ceiling, you will not only have a complete picture of this work, but also do an excellent job with this work yourself. You will also understand that it is much better and easier than sticking traditional paper, vinyl or non-woven wallpaper on the ceiling. In order to apply liquid wallpaper to the ceiling, you will need the wallpaper itself and a completely simple tool.
Tool:

Of course, the spray gun will give some material savings, but. as a rule, this tool is successfully replaced by the same trowel.
Surface preparation consists in removing old wallpaper or whitewash.
Liquid wallpaper can be applied to old surfaces painted with any paint, as well as to glass. Before applying liquid wallpaper, the surface is primed.
The technology of applying liquid wallpaper to the ceiling is not fundamentally different from applying them to the walls.
Preparation of liquid wallpaper for work is as follows:

If you need to renew part of the coating or re-glue completely, a layer of a new coating is applied directly on the old layer. This quality of the material allows you to apply patterns, as well as a drawing of a different color, and indeed, use all kinds of methods for applying liquid wallpaper of a different color, boldly changing the familiar interior. Anything is possible, as long as everything is done right!
The trowel (trowel) during operation must be kept at an angle of about 15 degrees, and not the entire plane.
The next new portion of the material must be mixed with the previous one, in order to avoid uneven coverage.
When the ceiling is ready, you need to slightly smooth the material applied to the ceiling with a trowel dipped in water.
A relatively "young" material, called liquid wallpaper, has been successfully "reclaiming" more and more new living areas of apartments and houses for many years now.
Thanks to the great many positive qualities of liquid wallpaper, there are a lot of reviews, and all of them are practically positive.

Liquid wallpaper for the ceiling is a very successful material that allows you to significantly change the interior of your home.
So, reviews:
To all the reviews, you can also add that this wallpaper is an environmentally friendly material, as it contains only natural ingredients.
Liquid wallpaper perfectly tolerate temperature changes and shrinkage of the house, which is important for summer cottages and country houses.
Liquid wallpaper is not subject to fading, peeling for a long time - up to 15 years.
The vast majority of consumers are accustomed to seeing white ceilings, and this stereotype is firmly planted in the subcortex, especially among conservative natures.
However, everything depends not only on conservatism or stereotypes that have developed, almost for centuries. It is also in such an aspect as design.

Fortunately, in construction and online stores, there is an ample selection of wallpapers of any color. White is no exception.
So, the main reasons for choosing:
However, as an intermediate (between color and white), there is a variant of light colors: light gray, or pale beige, etc. It's all a matter of personal perception, basically. And one more thing: it’s not a sin to look at photos with different color options, as well as videos before choosing a wallpaper.
You will find even more information about the benefits of liquid wallpaper in the following material:.
In conclusion, I would like to note that even a completely inexperienced repairman can work with liquid wallpaper. In addition, in the rooms during the renovation, there will be no irritating odors, which allows you to make repairs without causing any inconvenience to your household. The process of applying liquid wallpaper is clean, that is, there will be no usual debris during operation. You can ventilate the room immediately after the work is completed, without waiting for the wallpaper to dry completely - this will not negatively affect them. In a word, such a repair has solid advantages! Liquid wallpaper is glued in the living room, hallway, bedroom. It is undesirable to glue in rooms with high humidity! Keep it up and you'll do great!


Many experts call liquid wallpaper for the ceiling an ideal finishing material. It allows you to create beautiful seamless surfaces that delight the eye with their impeccable appearance.
Finishing ceiling surfaces in residential premises can be done using various materials. Liquid wallpaper has become quite popular lately; on the ceiling, they look very attractive. And from a purely practical point of view, such a coating has many advantages, it:
Ceiling finished with liquid wallpaper
A huge variety of shades and textures allows you to choose liquid wallpaper for any ceiling, organically fitting them into the overall style of finishing a particular room. It is also important that the considered decorative and facing material is a home master who does not have special skills, is quite capable of applying it to the surface on his own. To do this, it is enough to deal with some of the features of such a procedure, and then immediately get down to business.
The disadvantage of liquid wallpaper can be called their high cost. But, given the long service life of such products, this minus can be ignored. In addition, it is necessary to remember one more feature of the described finishing material. According to its characteristics, as we noted, it is moisture resistant. But in no case should you wash it with water.
The finishing material we are interested in is made in the form of a dry mix. It usually includes the following components:

Preparation of the composition for application
Liquid wallpaper for ceiling surfaces is usually divided into several types. The first includes mixtures consisting of silk fibers. Such a finishing material has a high price and truly ideal aesthetic characteristics. Silk liquid ceilings are not afraid of ultraviolet radiation. They allow you to create exclusive interiors that amaze with their originality. More affordable are the combined wallpaper (silk-cellulose).
The price of such finishing mixtures depends on the percentage of cellulose and silk threads in them. The more silk in products, the more expensive they are.
Wallpaper of the third type - cellulose, are considered the most budgetary. They are recommended to be used for finishing glazed balconies, hallways, corridors. In bedrooms and living rooms, such cladding may not look the best. When choosing liquid plaster for ceilings, it is imperative to take into account the geometric features of the rooms in which it will be used, as well as take into account the decor style of the entire room. Light wallpapers are classified as universal. They are, in principle, allowed to be used in any premises. But it is undesirable to use dark wallpapers in rooms that are small in size and low in height.
Before applying the wallpaper in question to the ceiling, you should take care of preparing it for finishing, as well as deal with the technology for preparing liquid plaster. You need to remove all bulky items from the room and cover the floors with any dense material or plastic wrap. Then clean the ceiling surface. If it has been whitewashed, wash the ceiling with water. Old wallpaper is easy to remove with a spatula. With painted ceilings, in general, everything is elementary - simply clean off the peeling areas of acrylic, oil or.

Preparing the ceiling for liquid wallpaper
Next, you need to fill large gaps and cracks in the ceiling with putty. Wait until the applied composition grabs, and then carefully level it with a grater. If there are fasteners, old plaster mesh, other metal products on the ceiling surface, paint over them with enamel or remove them. Then a primer should be applied to the base treated in the manner described above. This procedure is easily performed with a wide brush or.
While the primer will set and dry, you can begin to obtain ready-to-use wallpaper from a dry mixture. All the rules for performing such a procedure are available in the instructions for the manufacturer of liquid plaster. In most cases, the operation is performed like this:
Liquid wallpaper is ready to use. They should be applied immediately. If the composition dries, it can theoretically be re-diluted with water. But the quality of such plaster will be low. Its performance will deteriorate significantly. Yes, and the wallpaper will grapple with the ceiling with great difficulty. If the plaster is too thick, add a small amount of water to the prepared composition and stir it. There is one nuance here. More than 800–1000 g of liquid cannot be added to one serving of the composition made. If adding water in the indicated volumes did not correct the situation (the solution remained excessively thick), you will have to wait until the excess moisture evaporates on its own.
Finishing measures are carried out in rooms with a temperature in the range of + 20–26 ° С. Applying liquid wallpaper to the ceiling is carried out according to the following scheme:

Applying a liquid ceiling with a sprayer
To speed up drying, it is allowed to use heaters and ventilate the room. The coating described in the article is not afraid of drafts! Many home craftsmen are interested in whether it is possible to apply liquid wallpaper on ceiling surfaces in rooms with constantly high humidity. Experts say it's possible. But with one condition. Be sure to treat the wallpaper with a good waterproof varnish. It, we note, does not need to be used for rooms with a normal level of humidity.
And the last. Finishing the ceiling with liquid wallpaper is sometimes done not by hand, but by means of a spray gun (spray gun). Such a tool must have a capacity of at least 200 l / min and a pressure of about 3.5 atmospheres. The possibility of applying liquid plaster using a sprayer is negotiated separately by the manufacturer of the decorative composition. Carefully study the instructions for the wallpaper. At the same time, decorative compositions with a fibrous rough structure are never applied with an airbrush. Remember this.
Also great for decoration. However, the installation of the latter is carried out by specialists. And finishing the ceiling with liquid wallpaper can be done independently. After traditional whitewashing, this is the most economical way to decorate a room. Learn more about this material below. The article will also talk about how to make the ceiling with liquid wallpaper.
What is good liquid wallpaper on the ceiling? Customer reviews indicate that one of the main advantages of the material is its cost. Despite the economy, the coating looks very original. Applying liquid wallpaper to the ceiling is easy. As the owners of residential premises themselves say, the process of decorating with this material is even easier than with plaster or paint. What other advantages have liquid wallpaper on the ceiling? Consumer reviews contain information about the environmental friendliness of the material. After all, it contains natural ingredients. These include, in particular, silk and cotton fibers, which are components of the pulp and paper base. The composition of the material also includes acrylic components intended for bonding, glue, dyes and special decorative elements.
The material is usually used for decorating rooms with low humidity. Liquid wallpaper is applied to the ceiling of the kitchen, bedroom, hallway, living room. Surfaces such as drywall, plaster, concrete are suitable for decoration. Liquid wallpaper on the ceiling will fit perfectly even after painting. It is not recommended to decorate with material wood, plastic, metal surfaces that have not been pre-treated with a primer. Liquid wallpaper on the ceiling can be applied in plain colors and creating the effect of fabrics. If the room is decorated in a classic style, the material may look like stucco. At the same time, the addition of bronze or silver threads allows you to get a very original coating. It will be perfectly combined with fragments of a plain surface. In addition, you can make original drawings on the ceiling with liquid wallpaper. For this, stencils and simple tools are useful.

Back in the 15th century, Charles VII ordered the restoration of the captured castle. Only three days were allocated for decoration. Silk was produced in the city where this castle was located. However, due to hostilities, all equipment was destroyed, and further production became impossible. The craftsmen decided to use the remaining silk in decoration. The canvases were crushed, and flour was added as a binder. The resulting mass was well mixed and diluted with water. This mixture was used to finish the entire castle. The originality of the decision and the beauty of the decor struck Charles VII. There were no indifferent to such decoration, and knowledge and technology were preserved. This is how the original textile coating began to exist, which later became widespread in Europe. It should be noted that, for example, in Moscow, the Bolshoi Theater is decorated with liquid wallpaper.
Liquid wallpaper got its name due to the manufacturing method. In the factory, the produced material is packed dry in bags. Before application, liquid wallpaper is diluted with water. Laying is carried out according to the technology used by decorative plaster. Because of this, the material is considered one of the varieties of this coating. Liquid wallpaper on the ceiling is a great way to economically decorate the surface. The plane looks smooth and solid, without joints and seams. Decorative silk plaster is considered a material without an expiration date. The period of operation of the coating is more than 10 years. If any area has been damaged, then it can be easily restored. The place of repair will be almost imperceptible. Surfaces that are most often exposed to pollution can be additionally treated with a colorless scuba lacquer. This will reliably protect liquid wallpaper. Application to the ceiling can be carried out by one person without the involvement of additional assistance. The material is odorless. The elasticity of the coating protects against cracks during shrinkage of the house. This is especially true in new buildings. If, however, there are gaps on the surface, then it is enough to moisten the area (preferably from a spray bottle) with water, and then smooth out the damage site. You can keep the uniformity of the pattern using wallpaper of the same batch and batch.

For work you will need:
The number of wallpapers is calculated in accordance with the recommendations on the package. As a rule, one package weighing 1.7 kg is enough for 5 m 2. In this case, the layer thickness will be 1.5 mm.
Before laying liquid wallpaper on the ceiling, the furniture and floors in the room should be covered with non-woven material or polyethylene. It is advisable to generally free the room from all objects so that they do not interfere with the work. The old coating from the ceiling surface must be removed. Removed whitewash, tiles, if any. Liquid wallpaper can be applied to a surface previously painted with oil or water-dispersion compositions. Existing exfoliating areas should be cleaned first. If there are large cracks, they should be repaired with putty and leveled with a grater.

The surface before laying the material is covered with a special mixture. If the ceiling was previously treated with a bright oil paint, then using a conventional primer, the color may be noticeable. In this regard, a special composition (waterproof) should be used. In this case, the process of coating with a primer must be carried out in two layers. Plastic surfaces must be treated with compositions based on water-dispersion components (PVA glue in particular). Metal elements are primed with oil paint or enamel. This treatment will prevent the formation of rust. Do not apply primer ST-17. This composition can cause yellow spots. After applying the primer, it is allowed to dry. Only after that they begin to lay liquid wallpaper. Application to the ceiling is carried out at normal room temperature and humidity.

For breeding liquid wallpaper, it is best to use a plastic container. The dry mixture is poured into warm water in small portions. Its temperature should be approximately 25 degrees. If it is necessary to give a shade to the coating, a dye is also added to the container. The mass is mixed to the consistency of thick sour cream. After that, the solution is left to swell. The infusion time is usually indicated on the packaging. Before laying, the mass is thoroughly mixed again. For a uniform shade, it is recommended to combine material from different packages. Ready mixes are also on sale. They are for those who have never done decoration in this way and doubt their abilities. If there is a residue after applying the material, it can be closed tightly with a lid and stored for several months.
There are two ways to apply liquid wallpaper: manual and mechanical. In short, the first method is to throw the solution on the surface, followed by leveling it with a trowel, grater or roller. Professionals often use an airbrush in their work. With this method, the mixture is also smoothed out. Textured finishing can be done with a relief roller, and a regular one can be done with a tool with a hard fur coat. The knurling of the pattern is done seven hours after laying the coating. Next, we consider in more detail the methods of applying liquid wallpaper.

Work is carried out using a spray gun. Professionals also use a compressor with a working pressure of 0.5 MPa. The capacity of the unit must be more than 400 l/min. In a spray gun, the nozzle should have a diameter of 5 to 10 mm. The size will depend on the texture of the coating. The coating flow is controlled by changing the volume of water added to the mixture. First, a layer of 1.5 mm is applied with a spray gun over the entire surface of the ceiling. After it dries, the material is sprayed again. So the coating is given the necessary density. If spraying is carried out in one thick layer at once, then the material is likely to slip from the surface.

The ceiling covered with liquid wallpaper looks original and aesthetically pleasing. The material is fireproof, perfectly tolerates temperature changes. The composition of the mixture includes antifungal components that do not allow mold to form when the humidity in the room increases. Another undoubted advantage of the material is that it does not fade from prolonged use. All components are hypoallergenic. Therefore, people who are prone to allergies do not have to worry about their health. You can work with the material without protective equipment (bare hands without gloves). After laying there is no dirt and dust. This allows the occupants of the house to remain indoors during the entire process. Liquid wallpaper is considered a universal material. With their help, you can decorate the room in a variety of styles. When laying, there is no need to additionally press the material to the base for a tighter fixation. It is enough to smooth the composition with the available tools. The rest of the material can be used at least 4 times. Liquid wallpaper can act as additional noise and heat insulation of the room. This is achieved due to the fibrous composition of the material. After drying, during the entire period of operation, dust does not accumulate on the coating. In addition, liquid wallpaper has antistatic properties. The surface covered with the material does not require special care. It is enough to carry out regular wet cleaning. To keep the coating clean, it can be vacuumed.
Anton Tsugunov
Reading time: 4 minutes
Liquid wallpaper is a modern finishing material, which, despite the name, is completely different from the usual canvases. This type of finish has been used relatively recently and is not yet familiar to everyone, however, it is rapidly gaining popularity due to its practicality, low cost and aesthetic appearance. It is easy to glue liquid wallpaper on walls and ceilings even alone, which is also a definite plus when doing do-it-yourself work.
The main difference between the material is in its structure and application. The coating is mixed and applied to the surface of the walls, like decorative plaster, and forms a silky coating after drying. Wallpapers have excellent adhesive properties, and therefore are successfully used for processing the ceiling, as well as any hard-to-reach areas.
Another plus of the material is the possibility of using it in bathrooms and other wet rooms.
For gluing liquid wallpaper on the ceiling you will need:
Advice. When using a fluffy roller, choose an attachment with a sparse pile. The mixture does not stick to it, and the coating is applied evenly.
If reinforcement is visible through the crumbling concrete of the ceiling, it is painted over with latex or oil paint to avoid corrosion, and after drying it is puttied.
Advice. If the ceiling was covered with oil paint in bright colors that is difficult to remove, you can apply several layers of primer on it. This will prevent the colors of the old and new coatings from mixing. Suitable white or transparent composition. When processing, do not use Ceresit CT-17 primer: it can lead to the appearance of yellow streaks.
Read more about how to remove old coatings - wallpaper, paint, plaster - written.
After the dust has settled and the damp spots from the soil have completely disappeared, you can begin to prepare the working mixture of liquid wallpaper. This procedure does not require viewing training photos or videos - just read the manufacturer's instructions on the package. Usually the mixture needs to be infused and swell from 5 to 12 hours, so you should calculate the time and effort in advance.
Important! Only the entire package can be mixed in one bucket, not part of it. Also, you can not mix the contents of different packages of liquid wallpaper. In order to avoid the appearance of coating drops, it is better to process the entire ceiling in the room at a time.
Important! When mixing, do not use mechanical devices: rough handling damages the structure of the material, which will significantly worsen its appearance and texture. Remains of wallpaper from the previous mixing can be added to the next.
The finished mixture can be stored in sealed packaging for several weeks without losing its characteristics.
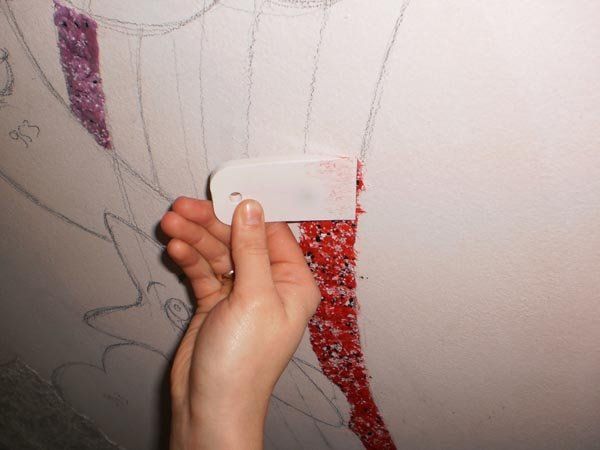
After acquiring the required consistency with the prepared mass, you can begin to apply it to the ceiling. It is not difficult to stick the mixture on the surface correctly, but nevertheless it is worth practicing on any flat area, and at the same time deciding on a suitable texture: depending on the movements of the spatula, the fibers will be arranged differently, forming a different pattern.
Important! If the ceiling is supposed to have decorative elements, then they are fixed before the liquid wallpaper is glued.
To get a decent result, when applying the material, it is enough to follow a step-by-step algorithm of actions.
Any subsequent applied fragment must overlap the previous one. It is necessary to glue the composition without long interruptions so that drying spots do not occur.
You can read about the nuances of applying liquid wallpaper on drywall in.
Liquid wallpaper can be applied with a plaster gun (texture spray gun). This method is great for use in large areas. For these purposes, a device with a minimum pump power of 200 l / min and a nominal pressure of 0.5 MPa during operation is suitable. The nozzle can be used with a diameter of 5–10 mm. However, it is worth remembering that the atomizer will not be able to work with rough textures.
Liquid wallpaper is glued with a spray gun in two layers:
The mass is sprayed in one direction. You can proceed to the finishing layer after the first one has dried.
As a result of mechanical application, a larger wallpaper texture is formed than with manual application. To make it smaller, you still need to roll the wet top layer with a roller, periodically wetting the tool in water.
It is better to find out all the nuances of working with a sprayer in the manufacturer's instructions.
Local damage to the coating or application defects can be repaired quickly and without much effort. It is best to use the remains of the dry mix that was used in this room, saved after finishing, in work.
Some types of liquid wallpaper can be reused, so it may be possible to glue the old soaked and mashed mixture in place.

There are many ways to send a file to someone over the Internet, and whoever it is ...

Topic: Setting up and installing the LastPass Password Manager plugin. This extension...

A rebus is a special kind of riddles in which the hidden words are encrypted with ...