Questions for the exam on PPRP (assistant electric locomotive driver) Shoulders...


Using tongue-and-groove joints at home will allow you to independently create beautiful furniture that is also reliable. Even the frames of low-rise buildings are connected using this scheme, especially when it comes to serious loads during operation. Therefore, it will be useful to understand how to make a tenon and groove using manual milling cutters.
In this case, the sampling of material is carried out on the surface of the beams and boards from the side. The main thing is that the proposed connection maintains its dimensions in terms of geometry.
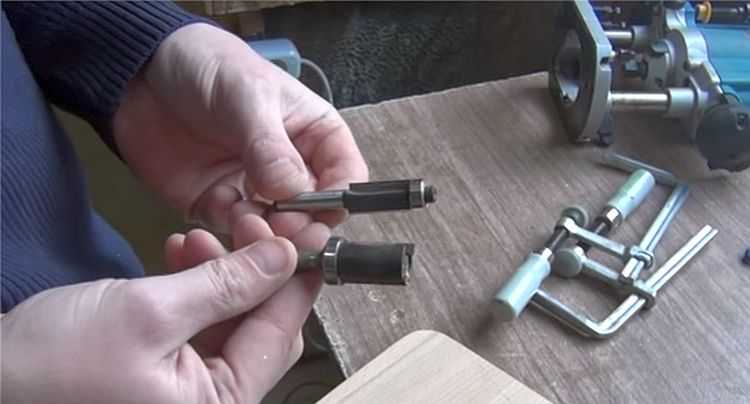
To complete the process using a milling cutter, it is allowed to use tools equipped with shanks with a diameter of 8 or 12 millimeters. The so-called groove cutter will become a universal option when performing any type of work. The device is equipped with a cutting part, the basic operating principle of which is described as follows:
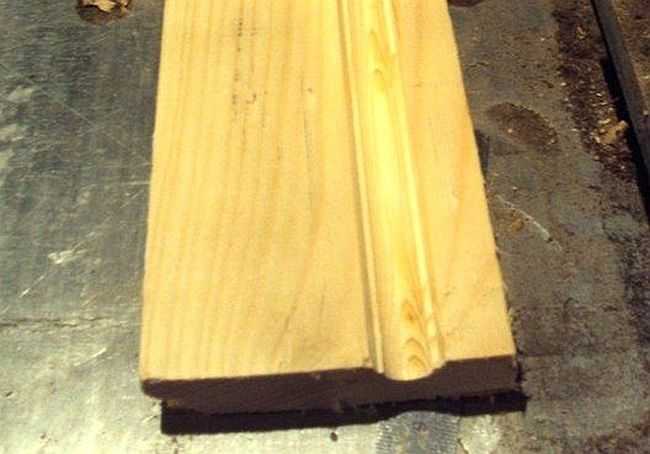
The result is the simultaneous formation of both tenons and grooves on the surface on the sides. The sizes can be individually adjusted, and the owner has quite a wide range of options in this regard.
Sometimes for grooves and tenons they choose not a rectangular shape, but the so-called “dovetail” type. This option is relevant if increased requirements are placed on connection reliability. Accordingly, the cutter used is also called a “dovetail” in this case. Such work can be easily done with hand tools if the need arises.
When parts are processed manually, the milling cutter itself does not have additional spatial fixation. But the overall result of the work and the accuracy of the connection itself in the future depend on this.
To assemble the simplest design that can cope with the task, you will need to use:
For manufacturing, the following sequence of actions is used:
There are several points during manufacturing that require special consideration:
When such devices are used, the work is carried out with the participation of hand-held milling cutters of any modern model.
Fixtures are made in the following way if dovetail connections are required.

Processing is performed using the following sequence of actions:
The operation will be successful only with high performance and accuracy parameters. Setup refers to the required steps before the instruments are turned on. To resolve the issue, actions are performed in the following sequence:

For mortises and tenons under similar circumstances: only half the normal width. This is explained by the characteristics that compounds of this type have.
The main thing is to set up the device correctly and fix it in a suitable position.
The tongue-and-groove joint should end up with some clearance. It is necessary so that later you can conveniently use the adhesive composition.

The solution to the problem depends on where the grooves are located and what size they are. Here are some recommendations for home craftsmen:
The main thing is to get rid of wood waste in a timely manner after completing each stage. Then the instrument will definitely not suffer from overheating. When doing the work, it is easiest to use a template cut out of plywood. They pass through it with the cutter itself, with the bearing installed.
When making homemade wooden furniture, the craftsman is faced with the need to make high-quality tenon joints. The tenon connection of parts is the highest quality and most reliable. And although recently more and more furniture is made and assembled using metal corners, the spike does not lose its position. Not many people can simply make high-quality spikes. If a person can do them, we can say that he has already established himself as a carpenter.
In industry, studs are said to be “cut” using special precision equipment. At home, it is, of course, not available. Therefore, many craftsmen who make simple garden and country furniture sacrifice quality in favor of simplicity. Let me also remind you that tenons are cut in the vast majority of cases only along the wood fibers. If the tenon is made narrow and across the fibers, it will definitely chip. To prevent it from chipping, the width of the tenon should be at least 15-20 times the thickness of the part. This requirement does not apply to plywood. You can cut tenons of any width into plywood, but it is desirable that the outer layers are also oriented along the tenon.
Meanwhile, for a long time there has been a fairly simple method that allows even a novice carpenter to quickly and efficiently make tenon joints of wooden parts. This method was proposed by Yu.A. Egorov. The essence of the method is quite simple and understandable.
Let's say we need to make a finger joint between two parts. For convenience, in the drawings I colored them in different colors.
A prerequisite for quality tenon joint production is the fact that each saw has a specific cutting width. It is determined by the size of the tooth set. It can be measured by making several cuts in some piece of wood. Or you can directly use the saw to take measurements when making tenons.
On each part we apply a mark to the depth of the cut; it is equal to the thickness of the parts. If the parts are the same in thickness, then the depth of cut in each part will be the same. If the parts have different thicknesses, then the depths of the cuts will be different. In a thin part the cuts are deeper (equal to the thickness of the thick part), in a thick part they are shallower.
The parts are folded face to face so that the ends coincide, and relative to each other along the side edges they are shifted to the width of the cut of the saw that we will use to make tenons. (Not the thickness of the saw blade, but the width of the cut!). We secure the parts in a vice or workbench and make random cuts evenly across the entire width of the parts. If the parts are of different thicknesses, we make cuts to a depth equal to the thickness of the thin part. (We will finish the thin part separately later). We try to make the cuts as much as possible along the axis of the part, avoiding the taper of the tenons.

After this, we release the parts and again shift them relative to each other by the width of the cut, but only in the other direction. By the way, if we now make a shift by an amount slightly less than the width of the cut, then we will subsequently obtain a tight tenon joint, which is important for furniture. And if we move the parts a little more than the width of the cut, we will get a free tenon joint. The tenons of the parts will fit freely into the grooves of the other part. This circumstance is important in the manufacture of detachable connections (on a stud) or rotary connections.
Ignoring the old cuts, we make new ones, approximately in the middle of the existing tenons. We also observe the depth of the cuts and especially carefully their length.

After this, we release the parts and adjust the depth of the cuts to the required value (for a thin part, if the parts are of different thicknesses). Using a chisel, we carefully remove excess tenons (look carefully and do not remove the ones you need!), and clean the ends in the grooves.
After this, the parts can be joined.
Permanent connections are usually made with glue. For wooden parts, wood glue or PVA glue are perfect. They will maintain a reliable connection even if the parts get wet or the moisture content of the wood increases. If the parts will be used in a dry room, epoxy resins (adhesives) can also be used.
After the glue has hardened, the joint is cleaned, sanded and processed in the same way as the entire product.

If the connection is planned to be detachable or rotating (for example, you are making blinds or an accordion door from boards or panels), then before starting assembly, you need to round the ends of the tenons so that their corners do not rest against the grooves when turning. In non-rotating but detachable connections, this is, of course, not necessary.
Having connected the parts, all the tenons are simultaneously drilled with a long thin drill. Its diameter should be equal to the diameter of the pin (nail) that you will use as an axis or fastening.
Using this method of making tenon joints, you can quickly, easily and most importantly, make very high quality tenons on the parts of your garden furniture.
Once you've mastered carpentry skills, it's great to show off your homemade furniture to family and friends. What could be more pleasant than touching a razor-sharp blade, inhaling the smell of wood, feeling its texture, and then making a clean, fresh cut!
This article covers basic carpentry techniques. How to use carpentry tools to achieve different shapes, joints and textures in wood. If you're unsure of a technique or type of wood, it's worth experimenting with scrap wood. Put your workshop in order and maintain it. Some craftsmen sharpen hand tools, clean out their workshop, and clean all their tools and machines before starting a new project.
Once you've decided what you'll be doing, separate your carefully selected and planed lumber into groups. Mark each piece according to its future location in the product, marking the top, bottom, front surfaces and best edges. Using a pencil and tape measure, mark the sections of the required length, and use a square to mark the cut lines. Use a compass to draw arcs and circles. Using a dividing compass, transfer the dimensions from the drawing to the wood.
If you need to make the board narrower or mark a joint, set the thicknesser to the desired division and scratch the mark by moving the thicknesser along the edge of the workpiece. Use a small pencil to mark lines running at oblique angles. If you need paired parts, mark them at the same time and remember that one part should be a mirror image of the second. Use a knife to mark connections.
Can be done with an electric hacksaw, jigsaw or band saw. The hacksaw is good for large radius cuts and thick wood, when the cutting line goes away from the edges.

Hacksaws are equipped with rotating bases that change the cutting angle, and depending on the type and thickness of the material, different saw blades should be used. For curved cuts of small radius and with wood thickness less than 50 mm, use a jigsaw or jigsaw.

Install the new file and tighten it until it rings when you click it with your finger. If you need to cut an opening, you can do two things: either start cutting from the edge, or, if you do not need to touch the edge, first drill a hole in the part to be removed, then release one end of the file, pass it through the hole made and clamp and tighten again.
Use a drill press and Forstner bits to drill large holes accurately and accurately. Mark the center of the hole, attach the corresponding drill bit and set the depth gauge. Then press the workpiece with clamps to the workbench (this will take some time, but it will be completely worth it). If the hole is deep, lift the drill bit several times as you work to remove waste and keep overheating to a minimum. If you have to drill a lot of holes in identical parts, it is useful to make a template from scraps of wood, which is attached with clamps to the work table of the machine.

To drill holes for screws and installation holes for nails, you should use a drill, and it is more convenient to use a cordless drill. If you need to screw in a lot of screws, install the screwdriver included with this tool into the drill chuck.

Planing is a lot of fun when the blade is sharp and you have enough time. The jointer is ideal for planing along the grain. Don't forget to secure the workpiece on the workbench. Make a test pass, make sure the blade is set to the correct depth, and then get to work.

A face plane is good for finishing sharp edges and for cleaning up ends. Position the blade so that it cuts the finest chips. When processing the end sections, try not to stray to the side and avoid chipping.

Mark the groove using a pencil, ruler, square and possibly the point of a knife, transfer the workpiece to the workbench of the drill press and use a suitable size drill bit to drill out the main part of the unnecessary wood.

Remove the shavings, clamp the workpiece in a vice and remove the remaining unwanted wood with a chisel, holding the tool vertically. By the way, there is an excellent one.

The groove can be selected using a cutter, and the working technique depends on the size and location of the groove. The router can be held in your hands and moved along the workpiece; when selecting an open groove, attach it to the work table and move the workpiece. In this case, the accuracy of the work will depend on the position of the guide bar (stop) and the height of the cutter. Always make a test pass using scrap wood. It is best to select a groove in stages and make several passes. After each pass, remove sawdust to avoid overheating the cutter.

Mark the shoulder lines (the length of the tenon) with a square and a knife, then use a thicknesser to mark the height and width of the tenon. Remove any unwanted wood with a tenon saw. First, make cuts along the grain to the shoulder line on all four sides of the tenon. Then trim the tenon along the shoulder line across the grain. Clean the tenon with a chisel.
If you have a lot of tenons to cut (or if you just like working with machines), a table router is the ideal tool. If the large size of the workpiece does not allow it to be placed on the milling table, it is better to press it with clamps to the workbench and process it while holding the router in your hands. Set the fence to the length of the tenon and the router to the desired height, then, holding the workpiece firmly against the fence, remove the excess wood in several passes. When the end of the tenon rests against the stop, turn the workpiece over and repeat the procedure on the other side. If you stop before the cutter reaches the shoulder line, trim the tenon with a chisel.

To select a groove 6 mm wide and 4 mm deep at a distance of 10 mm from the edge of the board, do this. Attach the router to your workbench and install a 6mm router bit. Set the guide bar to 10mm. Adjust the height of the cutter so that it is 2mm above the table. Make a pass along the guide to create a 2mm deep groove. Turn off the router, raise the cutter another 2 mm and repeat the pass. You will get a groove 4 mm deep.

To select a rebate with a width of 10 mm and a depth of 4 mm, proceed as follows. You will need a straight cutter that is smaller than the width of the rebate (for example, 5mm in diameter). Set the stop at a distance of 5 mm from the rear edge of the cutter, and the cutter at a height of 2 mm. Place the board against the stop and select a 5 mm wide fold. Repeat the pass, still resting the board against the stopper, to obtain a 10mm wide fold. Switch off the router, set the bit to a height of 4 mm and repeat the procedures to complete the fold.

Press the workpiece with clamps to the workbench. Select a cutter that matches the width of the groove or a smaller size and set the depth stop. Using clamps, press a wooden strip parallel to the groove onto the workpiece, which will serve as a guide. Lower the router, press its base against the guide, turn it on, wait until the router reaches full speed, and make a pass. If the cutter is narrower than the groove, move the guide and repeat the procedure until you get the required width and depth of the groove.

Cutting shaped edges with a router is very simple. Attach the router to its table and insert the cutter of your choice - round, radius or shaped. Use a cutter with a support roller.

Move the stop so that it is not in the way. Press the workpiece against the table and make several passes with the cutter from left to right. Continue milling until the workpiece begins to press against the support roller - at this point the cutter stops cutting. If the shaped edge looks burnt, it means either the cutter is dull or you were pulling the workpiece too slowly.

Use a template if you need to make several parts with the same edges. First, cut out the approximate shapes with a saw, leaving no more than 4-5 mm of excess wood on the edges to be milled. Install the guide roller on the base of the router. Cut a template from plywood with an allowance for the edges and nail it directly to the surface of the workpiece. Turn on the router and guide it along the edge of the template.
As a template, you can take an already made part and use a straight-cut cylindrical cutter with a support roller (it can be on top or bottom of the cutter).
This saw makes it easy to make cuts at any angle. Place the cutting blade on the frame at the required angle (90, 45, 36, 22.5 or 15°) and fix it. Set the depth gauge to the desired mark. Place the workpiece on the saw table, press it against the fence, and then make the cut using smooth back and forth movements.

Inspect the workpiece and decide where exactly you need to drive the nail. If this area is near the edge and there is a danger of splitting the wood, use an electric drill to first drill an installation hole using a drill bit whose diameter is smaller than the diameter of the nail. Then use a suitable sized hammer to drive in the nail. If the nail is crooked, pull it out with a nail puller or pliers. If you are driving very small nails that are difficult to hold with your fingers, use pliers to hold them.

You have a choice of mild steel, stainless steel, brass or aluminum screws with straight or Phillips slots and countersunk or pan heads. Semicircular heads stand out clearly on the surface of the wood, countersunk heads are either flush with the surface, or edged with brass washers, or hidden by wooden plugs. The screws are screwed in with a hand screwdriver, a drill with an appropriate attachment, or a screwdriver.

When using a drill, install the locking mechanism so that the screw is screwed in to the required depth. If the wood is soft, the installation hole can be made with an awl; if it is hard, drill it with a drill of a smaller diameter.

To be able to hide the screws under the wooden plugs, you will have to drill a hole for the plug with a countersink drill and a corresponding cutter for the plug. Don't use steel screws on oak - they react with the wood and moisture and cause stains. Instead, choose plated steel, brass, or stainless steel screws.
If you want to make round parts (chair legs, bowls, plates), you cannot do without a lathe. Buy the most powerful and heaviest machine your budget can afford - with an adjustable chuck and faceplate set. Spindle-shaped and cylindrical parts are turned by securing the workpiece between the front and rear centers of the machine, bowls or plates - on the outside of the spindle.

The best lathes are equipped with a device that allows you to turn large workpieces on the outside of the spindle. You will need a variety of turning tools - a chisel, a cut-off cutter, an oblique chisel and a radius scraper.
To cut a door handle or latch, you won't need anything more than a good, sharp knife (not stainless steel). Hold the workpiece in one hand, the knife in the other and cut the wood, pressing on the back of the blade with your thumb. The rest is a matter of skill. To practice, first experiment with soft linden wood, for example.

The two most common types of hinges are decorative brass overlay hinges (attached with countersunk screws that are screwed flush to the surface) and steel mortise hinges (attached into sockets with steel countersunk screws). In the latter case, outline the hinge flap with the point of a knife, cut the outline with a chisel, and then select the wood with a chisel to the desired depth. The sash should fit tightly in the socket. Always buy suitable screws along with the hinges.
To obtain smooth surfaces, numerous types of sandpaper (sandpaper) are used. The skin can be used either on its own or wrapped around a block of wood. It is best to sand the wood several times - after sawing, after the glue has dried and after final finishing.

For the first sanding, use regular sandpaper, for finishing - fine sandpaper based on aluminum oxide (it is more expensive, but lasts much longer). For sanding large flat surfaces, use a cylindrical grinder. Work in a well-ventilated area and be sure to wear a dust mask.

Originally the term "natural finish" meant that the wood was sanded and left in its natural state, but now also includes oiling or waxing. Danish or teak oil is applied in a thin layer with a lint-free cotton cloth or brush.

Allow to dry and sand with the finest sandpaper to remove the “ridges” (the rough texture of raised wood fibers that occurs when the first coat of finish is absorbed), then apply a second thin coat. If you want to make the surface less hard, rub it with wax mastic.
When finishing items that will come into contact with food, use a vegetable oil, such as olive oil, instead of teak or Danish oil. Rub it in with a cloth.
You have a choice between mineral spirits oil paint and waterborne acrylic paint. Both types of paint are applied with a brush. The visual difference between surfaces painted with one paint or another is very small, however, after working with oil paint, brushes should be washed with white spirit, and after using acrylic paint, with running water.

Oil paint fumes can cause dizziness and nausea, while acrylic paint fumes can cause a dry throat. Regardless of the type of paint you use, wear a respirator and work outdoors if possible.
When working with American oak, you can get an interesting texture by wire brushing the wood. The texture is pleasant to the touch, and the resulting rough surface means you don't have to worry about damage from pets' claws.

The brush is moved along the fibers until there are no untreated areas left on the surface, after which it is rubbed with oil.

A candle flame finish helps hide the imperfections of low-quality wood. Oil varnish is applied to the painted surface with a brush. After a while it dries out and becomes sticky, and then a burning candle is passed under the surface. Be sure to wait until the surface becomes sticky (it should show fingerprints) and keep the can of polish and brush away from the candle. It is better to do this work together somewhere away from the workshop. Practice on scraps before you get started with any serious work.
Knowing how to make a tenon and groove with a hand router, you can even at home make not only beautiful but also reliable furniture, but also various wood structures characterized by excellent load-bearing capacity. The tongue-and-groove system connects not only elements of various furniture (tables, chairs and shelves), but also frames of low-rise buildings that experience significant loads during operation.
In order to make a tenon on a wooden beam using a hand router, several conditions must be met:
Even using the simplest tenoning device for a router when performing such processing, you can not only increase its productivity and quality of the result, but also make the technological process safer. It is especially important to use such a device, which can be made with your own hands, in cases where furniture is produced not in single copies, but in series (in this case, the craftsman has to perform a large number of similar operations both with the same type and with wooden pieces of different shapes and sizes details).

The creation of tenons and grooves, with the help of which the connection of two wooden blanks will be ensured, involves taking a sample of material on the side surface of a beam or board using a hand router. In this case, all geometric parameters of the elements of the future connection must be strictly maintained.
To perform this operation with a hand router, you can use tools with shanks with a diameter of both 8 and 12 mm. The most universal in this case is a groove cutter, the cutting part of which works as follows:

Thus, using a tool of this type, it is possible to form both a tenon and a groove on the side surface of a beam or board. Moreover, their sizes can be adjusted within a fairly wide range.
In cases where higher demands are placed on the reliability of the connection of wooden parts, the grooves and tenons are made not of a rectangular shape, but of a shape called “dovetail”. Grooves and tenons of this configuration are created using dovetail cutters. It is also possible to perform the procedure for forming grooves and tenons of this shape with a manual milling cutter, but for these purposes you should use devices of a different design.

Dovetail sampling using a template
So that the question of how to make a groove in a board or beam or a tenon on their side surface does not cause any particular difficulties, it is better to use a power tool equipped with comfortable side handles, a wide guide sole and the option of protecting the spindle from turning during the process of replacing the cutter. In addition, it is desirable that such equipment have a side stopper, due to which the overhang of the cutter used with it will always remain constant.
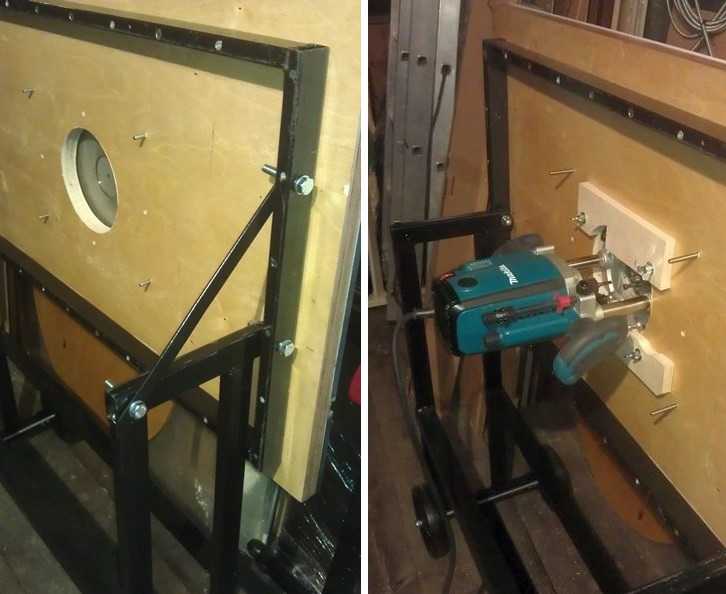
When forming tenons on wooden workpieces with a manual router, it is not fixed in any way in space and is brought to the workpiece manually. That is why it is very important that when using a power tool, the workpiece is in a device that can ensure not only its reliable fixation, but also the accuracy of the spikes formed on its surface.
The design of the simplest device that is able to cope with such tasks is:

Such a device is manufactured, the dimensions of the components are selected individually, in the following sequence:
When manufacturing a device of the proposed design, the following points must be taken into account:

You can work using the device of the proposed design with a hand-held milling cutter of almost any modern model, the options of which provide the ability to adjust the cutting speed, feed rate and overhang of the working part of the tool used.
To create a dovetail tenon on the side surface of a beam or board, a device is used that is manufactured as follows.

Such a device can be installed between two chairs or a more convenient and reliable design can be used to place it.
Using cutters for merging wood for a manual router and the device described above, processing is performed in the following sequence.

Even such a device, which is simple in design, allows you to process tongue-and-groove joints using hand mills with high accuracy and productivity.
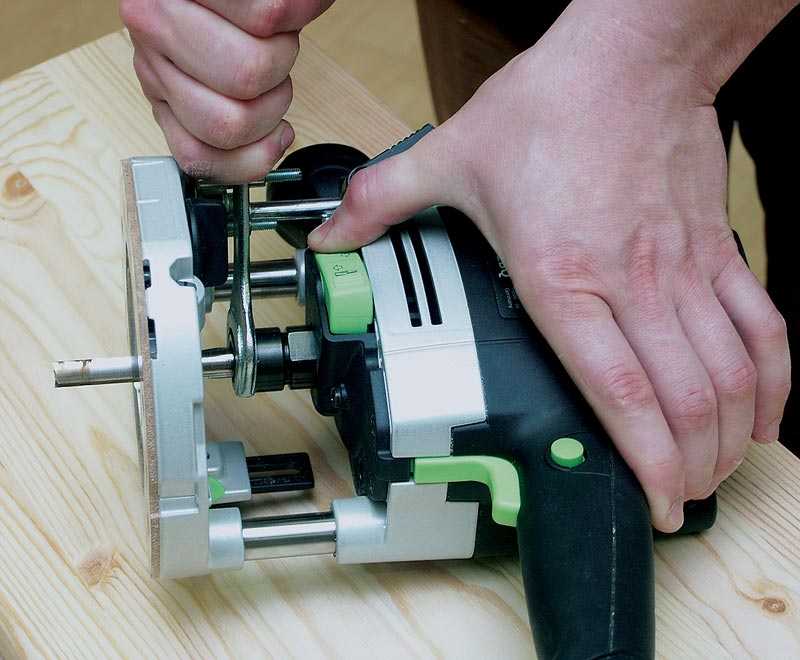
Before starting work, such a device must be configured. This can be done using the following algorithm.

Using a dovetail template, grooves and tenons are created at half their thickness, which is explained by the peculiarities of this type of connection. To make a groove in timber and boards, as well as to form a dovetail tenon, the device also needs to be adjusted and its components fixed in the required position.
Having a milling machine really simplifies the work of inserting hinges, forming complex holes, recesses, wood carving, etc. But this does not mean at all that it is necessary to have professional and expensive equipment: it is enough to have a simple manual device.
The only thing you need is to be able to basicly handle wood and use power tools. In addition, you need to have a desire, otherwise without this there will never be a result. Those who have no desire to work simply buy furniture or hire craftsmen to, for example, install a new door and cut locks. Any work, especially with power tools, requires certain knowledge, and especially safety precautions.

The milling device is designed for processing both wood and metal. With its help, it is possible to form recesses or holes of any configuration. This greatly simplifies tasks such as inserting hinges and inserting locks. Doing this with a chisel and an electric drill is not so easy, and it takes a lot of time.
There are stationary milling devices and portable (manual). Hand-held electric milling machines are considered universal devices, with the help of which, in the presence of attachments, it is possible to perform operations for various purposes; you just need to change the position of the part in relation to the device or vice versa.
Stationary devices are used in factories or factories where mass production of wood or metal products is established. Under such conditions, the cutting attachment is stationary, and the workpiece moves along the desired path. When using a hand tool, on the contrary, the part is fixed motionless and only then it is processed, although there are parts that require fixing a hand tool. This is provided for in the design, therefore, it is considered more universal. This is especially true when a large number of parts need to be processed, and it is not possible to use a stationary machine.
 A homemade milling machine is a horizontal platform with a hole in the center, to which a hand-held device is attached from below.
 There are many types of milling machines, but for use at home or for starting your own business, universal models are more suitable. As a rule, they are equipped with a set of cutters and various devices for performing various types of operations. The only thing is that if you have a manual milling cutter, simple operations can take much longer than when using a stationary machine.
Using a manual milling device it is possible to:
 Copying parts is one of the functions of any electric milling machine.
 The presence of such functions makes it possible to simplify the production of the same type of furniture or the production of identical parts not related to furniture production. This is one of the main advantages of this tool. As a rule, to produce parts of the same type, it is necessary to install copying machines, which are designed to perform only one operation, which is not always profitable, especially in small enterprises.
To understand how this device works, you should familiarize yourself with its main parts and their purpose.
A manual milling device consists of a metal body and a motor, which is located in the same body. A shaft protrudes from the housing, onto which various collets are placed, serving as adapters. They allow you to install cutters of various sizes. The cutter is inserted directly into the collet, which is secured with a special bolt or button, which is provided on some models.
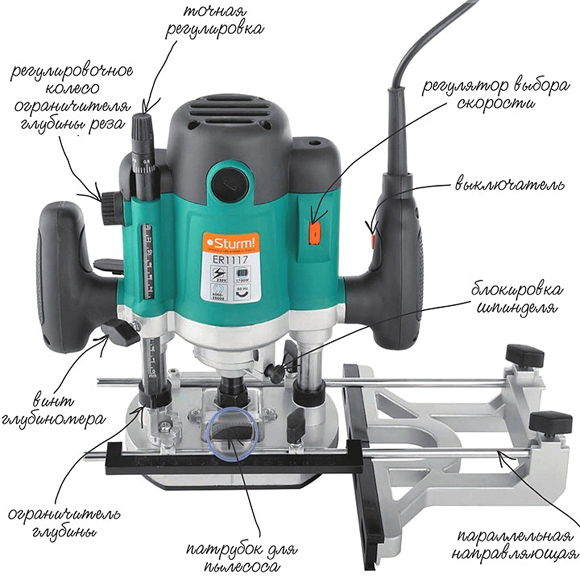 The main elements of a manual milling device and their purpose.
 The design of the milling device includes a metal platform, which has a rigid connection to the body. It is attached to the body by means of two rods. On the outside, the plate has a smooth coating that ensures smooth movement during operation.
The manual milling device has some characteristics that can be adjusted:
At the initial stages, when mastering the tool, it is better to try to work at low or medium speeds. Although you should always remember that the higher the speed, the better the work. Especially if this concerns critical, visible areas that cannot be masked.
In addition to these levers, there is also a button to turn the product on and off, as well as a lock button. These elements are considered basic, ensuring high-quality and safe performance of work. There is also a parallel stop, which contributes to ease of use. It can be rigidly fixed or with the ability to adjust the shift of the working area away from the center.

Usually, a factory product falls into the hands of a person tested and lubricated, so no additional measures should be taken. Only during its operation you need to monitor its cleanliness and serviceability. At the same time, it should be regularly cleaned of dust and the lubricant should be changed, if so written in the passport. Lubrication is especially necessary for moving parts. As an option, you can use aerosol lubricants, but you can also get by with regular ones, such as Litol. The use of thick lubricants is not recommended, as chips and dust stick to them. If aerosol lubricants are used, then this factor can be eliminated.
The sole, the smooth part of the body, also requires lubrication. Regular lubrication will ensure smooth movement.
Despite this, the purchased item should definitely be checked for quality of assembly and presence of lubricant.
Unfortunately, not all manufacturers, especially domestic ones, care about build quality. There are cases when, after the very first hours of operation, screws or screws are unscrewed from a product because they were not tightened properly.
The operation of any tool is associated with certain conditions related, first of all, to the nature of the material being processed. It can be plywood, composite material or regular wood. Depending on this, the rotation speed on the electrical appliance is set. As a rule, the technical data sheet always indicates the operating parameters of the device, depending on the technical characteristics and characteristics of the surfaces being processed, as well as the cutters used.
 Indicators of processing speeds when using various cutters.
 The first thing the work begins with is installing and securing the cutter. At the same time, you should adhere to the basic rule - all work is performed with the cord plug removed from the socket.
The cutter is installed according to certain marks, and if they are missing, then to a depth of no less than * the length of the cutter itself. How to install a cutter on a specific model can be found in the instructions, which must be included in the technical documents for the device. The fact is that each model may have its own design features and it is not possible to talk about this in the article.
 Installing the cutter on the device before starting work.
 There are both simple and more “advanced” models, as they say. Some models have a shaft rotation lock button, which makes installing the cutter easier. Some, especially expensive models, are equipped with ratchets. So it won’t be possible to specifically describe the process of installing the cutter, and it doesn’t make sense, since everyone who is familiar with the operation of such devices will figure it out in a moment.
Each model has its own maximum milling depth. At the same time, it is not always the maximum depth that is required, but a certain depth that is set before work. Even if maximum depth is required, in order not to overload the device, the milling process is divided into several stages, changing the milling depth in steps. For adjustment, special stops are provided - limiters. Structurally, they are made in the form of a disk located under the bar, on which stops of various lengths are fixed. The number of such legs can be from three to seven, and this does not mean that the more there are, the better. It is better if it is possible to adjust each of the legs, even if their number is minimal. To secure this stop in the optimal position, you should use a lock in the form of a flag.
The process for adjusting the milling depth is as follows:

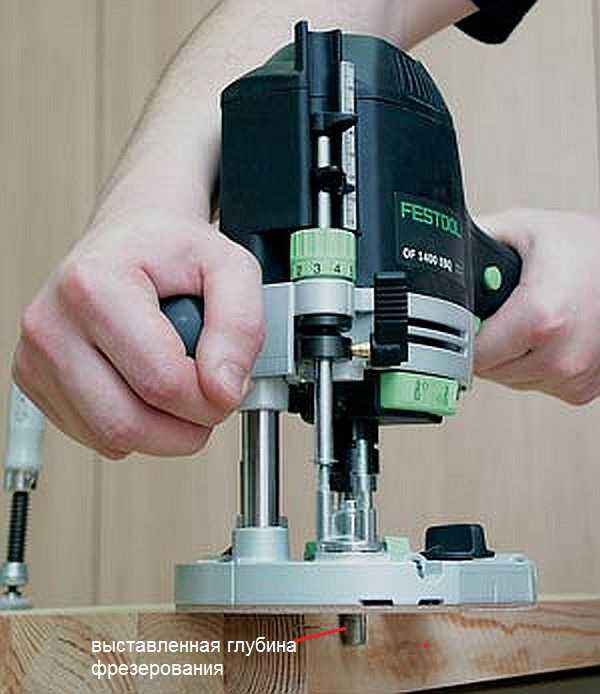
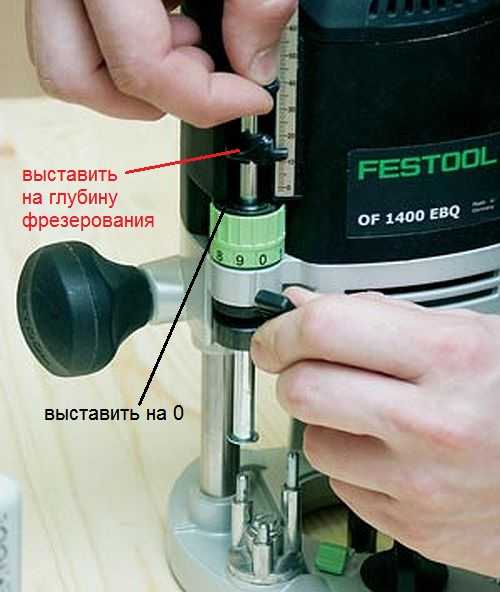 Thus, the workpiece is milled to a given depth.
 On high-quality, expensive models there is a wheel for precise adjustment of the milling depth.
 Using this wheel, you can more accurately set the depth without disturbing the previous setting.
 This wheel (green in the photo above) allows you to adjust the depth within small limits.

A milling cutter is a cutting tool that can have an intricately shaped cutting edge. As a rule, all cutters are designed for rotational movements and therefore have a cylindrical shape. The shank of the cutter, which is clamped in the collet, has the same shape. Some cutters are equipped with a thrust roller, so that the distance between the cutting surface and the material being processed remains constant.
Milling cutters are made only from high-quality metals and their alloys. If you need to process soft wood, then HSS cutters will do, and if you need to process hard wood, then it is better to use cutters made of harder HM alloys.
Each cutter has its own technical characteristics, which provide it with high-quality and long-lasting performance. The main indicator is the maximum speed of its rotation, which should never be overestimated, otherwise its breakdown is inevitable. If the cutter is dull, you should not try to sharpen it yourself. Sharpening of cutters is carried out using special, expensive equipment. After all, you need not only to sharpen the cutter, but also to maintain its shape, which is no less important. Therefore, if for some reason the cutter becomes dull, it will be cheaper to buy a new one.
There are cutters that are used in work more often than others. For example:

 Groove molds are designed to create recesses in any location on the workpiece.
 There are cutters that are simple, monolithic, made from a single piece of metal, and there are typesetters. Set cutters consist of a shank, which serves as the basis for a set of cutting elements. By selecting cutting planes and installing them on the shank, using washers of various thicknesses, you can form an arbitrary relief on the surface of the workpiece.
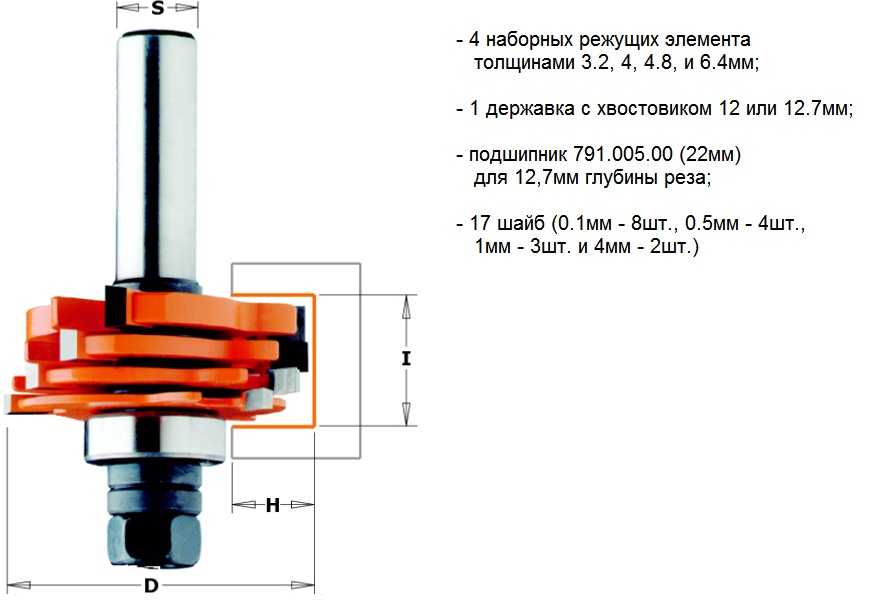 A set cutter is a set of cutting surfaces and washers that allows you to assemble a cutter of the desired shape.
 In fact, there are a lot of cutters and this is only a small fraction of what is produced. All cutters differ in the diameter of the shank, the diameter of the cutting surfaces, their height, the location of the knives, etc. As for manual milling equipment, it is enough to have a set of five of the most common cutters. If necessary, you can purchase them at any time.
Working with power tools requires special rules, especially when there are rapidly rotating elements. In addition, as a result of work, chips are formed that fly in all directions. Despite the fact that most models are equipped with a protective shield, this does not fully protect against the flow of chips. Therefore, it is better to work with such a tool wearing safety glasses.
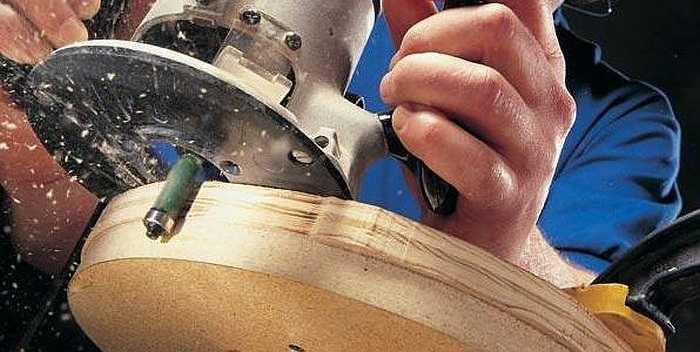
 The photo shows a model where a vacuum cleaner is connected to remove chips.
 If you follow the basic requirements for safe work with an electric hand router, the end result will please you with the quality of work and a safe outcome. These are the conditions:

The requirements are not very complex and quite feasible, but to ignore them means putting yourself in danger. And one more thing, no less important, is the ability to hold a milling tool in your hands and feel how it works. If serious vibrations are felt, then you need to stop and analyze the reasons. It is possible that the cutter is dull or there is a knot. Sometimes it is necessary to correctly set the rotation speed of the cutter. Here you can experiment: either add speed or reduce it.
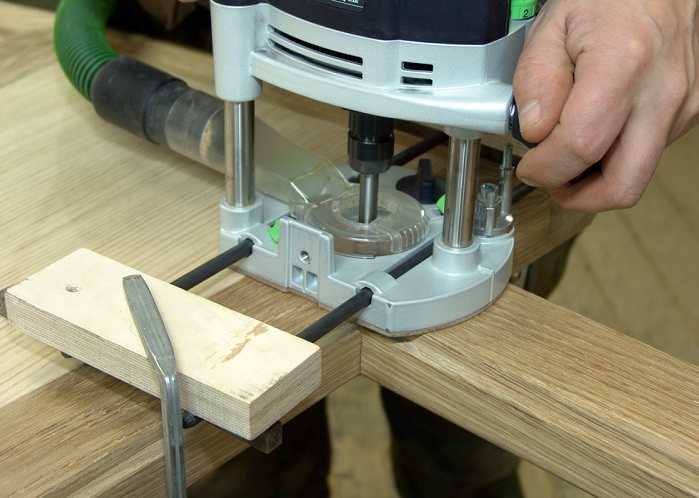
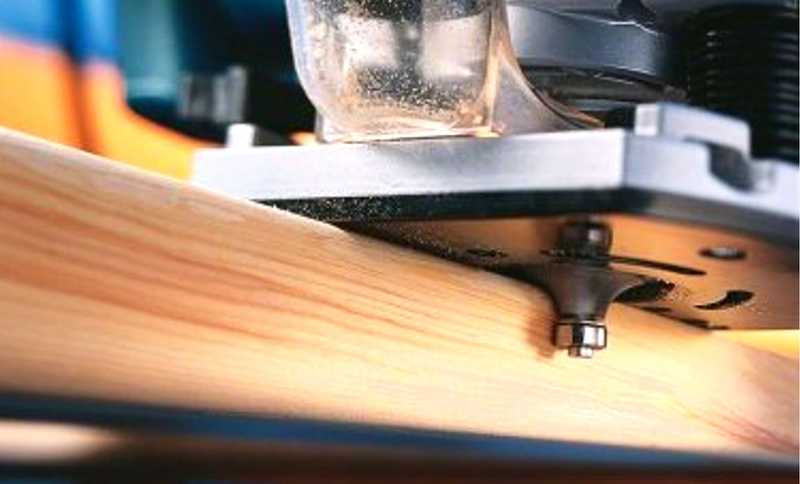
It is better to process the edges of a wooden board using a surface planer. If this is not possible, then you can use a hand router, although this will take some time. These works are carried out both without a template and with a template. If there are no skills or very few of them, then it is better to use a template. For processing edges, straight edge cutters are used, both with one bearing at the end of the cutting part and with a bearing at the beginning (see photo).
 Edge cutters.
 You can use an already processed board or other flat object as a template. Moreover, the length of the template must be greater than the length of the workpiece, both at the beginning and at the end of the workpiece being processed. This will avoid unevenness at the beginning of the edge and at the end. The most important thing here is that the template or object acting as a template has a smooth and even surface. In addition, its thickness should not be greater than the gap located between the bearing and the cutting part.
Moreover, the longer the cutting part, the more difficult it is to work with the tool, since more effort is required. In this regard, it is better to start working with cutters that have an average length of the cutting part. The operating principle for edge processing is as follows:
After the first pass, you should stop and evaluate the quality of the work. If necessary, another pass can be made by adjusting the position of the tool. If the quality is satisfactory, then the clamps are removed, freeing the workpiece.
Using this approach, it is possible to remove a quarter along the edge or in some of its parts. This is done by setting the cutting edge so that it extends to the required depth into the part.
 Quarter shot on a furniture façade.
 If you replace the cutter with a shaped one and move the guide, as well as use a stop, you can actually apply a longitudinal pattern to the part (pictured below).
 Applying a longitudinal figured pattern to the workpiece.
 If you use a similar milling technique (with a template), you can easily master the technique of working with wood in general. After some time, you can abandon the templates, since their installation takes a lot of useful time.
 How to make a straight edge without a template: you can’t do this without experience.
 Quite often, the thickness of the workpiece is greater than the length of the cutting part of the cutter. In this case proceed as follows:
 The bearing is guided along the machined surface, and the cutting edge processes the rest of the workpiece.
 In order to master the work of a hand milling tool, you will need a lot of rough blanks, which you don’t mind throwing away later. No one succeeded the first time. To achieve anything, you need to train hard.
If a figured edge is required, which is most likely necessary, then first pay attention to the condition of this edge. If it is uneven, then you will have to level it and only then begin to form a curved edge by selecting the appropriate cutter.
 Rounded edge.
 It is necessary to prepare the surface so that the cutter does not copy the curvature along which the roller will move. In this case, a sequence of actions is needed, otherwise a positive result will not work.
If you need to process a frankly curved surface, then you can’t do without a template. It can be cut from plywood, about 10 mm thick, by first applying a pattern and cutting out the template with a jigsaw. The edge of the template must be brought to perfection using a hand router.
Questions for the exam on PPRP (assistant electric locomotive driver) Shoulders...

I was faced with the question of how to determine my personality types in these typologies. TO...

Married women often fear that their spouse may cheat on them. To calm down...