Bell pepper is a wonderful tasty and healthy vegetable that you can ...


Greetings to the readers of our blog!
We have already had a variety of wireless adapters in reviews and tests many times, and once again looking through these articles, I suddenly found that we did not have detailed universal instructions on how to connect a computer to the Internet via wifi using USB adapter... I hasten to correct this misunderstanding in this post on setting up a Wi-Fi adapter!
When buying a "large" desktop PC, few users think in advance that in the future there will be a need to use Wi-Fi on it. However, if, nevertheless, such a moment has come, then the only correct solution would be to install an additional PCI or USB adapter, with which you can to plug conventional stationary computer to internet wirelessly. By the way, we have dedicated a separate large instruction - it will be useful to read it before buying.
The procedure is as follows:
Yes, everything is as simple as you thought? If you have Windows 7, 8, 10 installed on your computer or laptop, then nothing else is required.
An important nuance - in the event that your WiFi adapter supports operation via a USB 3.0 port, then it is better to connect it to it.
No, it will work on 2.0, but for your convenience, maximum speed can be achieved only on the very latest standard.
As for the disk with drivers and software, which most often comes in the kit, it makes sense to get it only if you have outdated Windows XP. Most often, it is for her that you need to separately install the drivers. The installation program, in fact, replaces the standard one built into Windows, so whether to install it or not is also a master's business. You can install out of curiosity. Sometimes, by the way, it happens that through it you can switch the USB adapter to WiFi access point mode and distribute the Internet from your computer to other gadgets.
Well, let's get to practice. We connect the WiFi adapter to the computer to the USB port
and wait for the new USB device to be recognized and installed successfully
If this miracle did not happen, then in the old-fashioned way we take the CD

and install the driver from the disk.

After that, a WiFi icon will appear in the list in the lower right corner of the panel - clicking on it will open a list of wireless networks available for the connection

We select the one we need - that is, from your router, to which you have access - and click on the "Connect" button

enter the password

and enjoy the internet via wifi.
If there is a WPS button on the adapter body, then you are extremely lucky, since connecting to a router and setting up to work with its wifi network can be done automatically.

To do this, activate the WPS mode on your router.

and briefly press a similar WPS button on its body.

After that, we also once press this button on the adapter. In a few moments, your computer or laptop will be online.
It's so easy and effortless to connect a wifi adapter to a computer and configure via USB - I'm sure you can do it too! If you have any questions - ask in the comments.
After building a home Wi-Fi network that unites laptops, mobile phones and tablets, the owner of a stationary personal computer has a question: how to connect a computer to Wi-Fi. Most often, such a PC was previously connected directly to a network cable, and there is no built-in wireless module on it.
You can solve the problem in Moscow in the following ways:

Let's figure out how to connect a desktop computer to Wi-Fi with the least chance of problems during the connection process.
Let's decide on the type of Wi-Fi module used. The newer the stationary computer and the “fresher” the operating system installed on it, the higher the chance that the device will be recognized by the system and will work without additional settings. To exclude the possibility of problems with the drivers, we recommend that you contact your provider, and, regardless of the choice in favor of an external or internal module, purchase a device accompanied by a set of drivers that ensure its operation.
For most situations, using an external Wi-Fi module as a solution to the question of how to connect a computer to Wi-Fi wirelessly is the most preferable one. Therefore, we will consider further connection primarily for external modules.
Follow the step by step instructions:

What are the benefits of built-in Wi-Fi solutions?
Most computers detect them and find the drivers they need to work, regardless of the operating system. Since such modules are equipped with additional antennas, they can also be recommended for networks in which the stationary PC is located at a considerable distance from the router.
Is there an alternative way to connect the computer to Wi-Fi?
Residents of Moscow and the Moscow region using the WIFIRE Internet provider, instead of independently setting up access to Wi-Fi networks from stationary PCs, call a network engineer to professionally install internal or external Wi-Fi adapters, install drivers, set up and connect the stationary PC to a Wi-Fi network ...
Call by phone and get a free consultation and selection of an adapter with subsequent installation and configuration of the device in a PC at a convenient time for you!
The tariffs and services of Net By Net Holding LLC may be changed by the operator. Full up-to-date information on tariffs and services - in the "tariffs" section or by phone indicated on the website.
After installing a Wi-Fi router, many people have a question, how can you connect a regular stationary computer that does not have Wi-Fi to the Internet. Previously, the Internet was connected to a computer via a cable, but now what to do? I don't really want to lay a network cable from the router to the computer. After all, that's why we installed a router to get rid of wires in the house.
Yes, after installing the router and setting up the Wi-Fi network at home or in the office, all laptops, tablets, phones and a number of other devices will be able to connect to the Wi-Fi network "over the air". These devices have a built-in Wi-Fi receiver. And if you also have a stationary computer to which you also need to connect the Internet, then there are only two options:
I faced exactly the same situation at home. After installing the router, all devices connected wirelessly. But the computer that I had to leave, I connected via Wi-Fi using a USB Wi-Fi receiver. It is about these receivers that I will now tell you in more detail.
As I wrote above, for ordinary computers that do not have built-in wireless receivers, there are a large number of network adapters on sale. These adapters are both external and internal. As for the prices, they are not very expensive. There are, of course, different models from different manufacturers. But, the cheapest will cost you about 6-7 dollars. (these are devices from popular manufacturers)... Tenda has inexpensive models. For example, I also have an inexpensive, external USB Wi-Fi adapter TP-LINK TL-WN721N. It looks like this:
Works great. You will need to prepare instructions for setting it up on a PC. By the way, many people call such adapters "flash drives for connecting to Wi-Fi" :)
Let's see what these adapters are, and how to choose such an adapter for your PC. This means that they are external and internal.
They are connected to the USB connector of the computer. To install it, you do not need to open the system unit, this is undoubtedly a plus. They look like ordinary flash drives. There are small ones, there are such as in the picture above, and there are also antennas. Those with antennas, I advise you to buy if the Wi-Fi network signal is not very strong in the room where you have a computer.
If you are not very good at computers, then I recommend buying an external Wi-Fi receiver. Almost anything will do. The installation is not false: we plugged the adapter into the USB connector of the computer, installed the drivers, and that's it, you can.

Here's another photo of external adapters:

These adapters plug into a PCI (or PCI Express) slot on your computer's motherboard. It is clear that to install such an adapter, you need to disassemble the system unit. The installation, in principle, is also not difficult. We removed the cover from the system unit, installed the adapter in the PCI slot, rebooted the computer, installed the driver and that's it.
Outside the system unit, the adapter antenna, or even several, will look out. This is all for the best reception. After all, if an ordinary USB receiver can be connected through an extension cable so that it receives a signal better, then this will not work with an internal adapter.
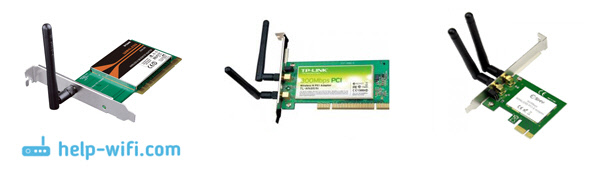
This is how internal PCI adapters look like:
Which adapter is better to buy for connecting a regular computer to Wi-Fi? In principle, what's the difference. But, for some reason it seems to me that external USB adapters are more convenient and practical. They can be easily connected to another computer. The connection and installation process is a little easier.
As you can see, connecting a desktop computer to a Wi-Fi network is not at all difficult. But, you can get rid of the wires. This is especially true if the router is far from the computer.
Quite often, you can face the problem of using wireless networks on a stationary computer. To connect a PC to Wi-fi, you can use the following methods:
Step 1. Remove the side panel from your system unit.
Step 2. Install the wireless network card into the appropriate slot (usually PCI or PCI-express).
Important! Network cards can have one or more antennas. The larger the number of antennas installed, the wider the Wi-fi coverage area and data transfer rate. To avoid mistakes, it is worth remembering that you can calculate the required amount as follows: each antenna increases the speed by about 70 Mb / s.

Step 3. Install the drivers for the new network card.
Step 4. Set up the connection to your wireless modem. To change the parameters of the network adapter, you need to enter the "Control Panel" and change the view mode to "Small icons".

Step 5. Access to changes in the properties and settings of the network card is available through the link "Network Control Center ...".

Step 6. In the directory that opens, use the link in the left frame "Changing adapter parameters".

Step 7. Changing the settings of a network adapter occurs through its properties. Call the context menu and use the required item.

Click on "Properties"
Step 8. The settings you need are stored in the "Internet Protocol Version 4 (TCP / IPv4)" subdirectory. You can open it by double-clicking, or by highlighting this item and clicking on the "Properties" button.

Step 9. Specify the settings of your wireless connection and save them via the "OK" button.
Important! Make sure that no two are alike on the same network.IP addresses, otherwise there will be a conflict of data separation, and, in fact, only the device that received this address before the others will work. If your wireless router is transmittingIP addresses automatically, use this option.

External network adapters are connected via USB ports. They are, as a rule, miniature, and represent a "flash drive". When choosing such an adapter, you should also pay attention to the number of antennas. Cards with built-in antennas are most often used, but their data transfer rate is not the best, in addition, the area coverage is rather small.
Step 1. Connect the external adapter to your personal computer.

Step 2. Install the drivers. They usually come with the adapter itself.
Step 3. Complete the network setup as described earlier.
The configuration of each router is very specific, but there are some general points. Let's consider these nuances using the example of a TP-Link router.

Quite often in a computer environment, the meanings of the words "switch", "hub", "router", switch are confused. Let's give a brief explanation of the switching levels and their corresponding devices (switching levels are determined by the OSI network model):
Step 1. To connect the computer to the router, use a patch cord (patch cord). Usually one such cord is supplied with the router, but you can make it yourself (see how you can do it).

On a note! Separately, it should be noted that the router has two typesEthernet ports -LAN (local area network) andWAN (Wide Area Network). The global port is used to connect to the Internet, the local port is used for the internal network of a home or business. In our case, you need to connect the computer toLAN, and asWAN we will useWi-fi.

Step 2. To change the settings of the router, you need to log into the device's Web interface. You can find the default address, as well as the login and password on the router itself.

Step 3. Configure the address of your network card. It must be different from the IP of the router, for example, for our case, you can use the range from 192.168.1.2 to 192.168.1.254. Follow the instructions above to make changes. Remember to change the Wired LAN settings.
Step 4. Open your browser and enter the IP address of your router. The "http: //" prefix is added automatically, and you do not need to register it manually.

Step 5. Enter the credentials provided by the manufacturer. Typically, when you first log into the device, you will be asked to change them.

Step 6. In the right frame of the Web interface, expand the Network list. Inside the list, you can configure the settings for connecting to the Internet. Since the configured router will be used as a Wi-fi adapter, you should select the "Dynamic IP" or "Static IP" option. Remember to save your changes.
Important! It is preferable to enterThe IP address is manual, since the dynamic address may change and it will be difficult for you to connect to the router to change any settings.

On a note! Some models of routers have several save buttons - "Apply" and "Save settings". When using the first button, without using the second, the changes are applied only for one session (not yet closedThe router's web interface), when you reconnect, the settings will be reset to the previous ones.

Step 7. In the same list enter the “MAC Clone” menu and specify the preferred Media Access Control address. Optionally, you can leave the factory one, or "Clone" the address of your personal computer.

Step 8. Expand the Wireless list and enter the Settings menu. Enter the name of the wireless network (SSID) to which you want to connect. The indication of the region is not important, you can set any. Other settings can be ignored, with the exception of the "Enable SSID Broadcast" option - this option allows you to distribute Wi-fi and connect other routers and other network devices.

Step 9. Go to the "Wireless Security" security setup menu. Specify the type of encryption of your access point, and the key for connecting to the wireless network. Remember to save any changes you made.

Step 10. Using the “System Tools” list, enter the “Reboot” menu, and using the corresponding button, restart the router.

We examined the nuances of connecting a stationary personal computer to a wireless network. Any of the above methods requires the purchase of new equipment, while its choice is due not only to the monetary factor, but also to the additional capabilities of each of the devices, which are shown in the table.
| Information / Wednesday | Internal | Outer | Router |
|---|---|---|---|
| Stability of work | Yes | Not | Yes |
| Ability to connect multiple computers at the same time | Not | Not | Yes |
| Maximum number of antennas | 3 | 2 | 8 |
| PC components price | Average | Average | High |
| The ability to move the antenna a significant distance from the PC | Not | When using a USB extension cable (up to 5 meters) | When using a patch cord (up to 100 meters) |
Most of the currently produced devices have the function of connecting to the Internet via Wi-Fi. Thanks to the adapter already built into the gadget by the manufacturer, the user has access to the Internet literally as soon as he took out the purchased device from the package, for example, a laptop, camera, smartphone, tablet, etc.
You just need to enable the necessary function and you can enjoy surfing the Internet. But what to do when you need to provide access to the World Wide Web through a stationary computer? In this article, the owners of such PCs will find detailed instructions for solving this urgent issue in the modern world.
If the computer is not equipped with the necessary equipment to connect to the Internet via WiFi, then you can equip it with such. Below we will consider the types of devices that can enable a stationary PC to recognize wireless networks.
Adapters that provide connection to Wi-Fi, belonging to the category of external devices, have the ability to connect to a computer via USB connectors.
 Sometimes such devices are equipped with a special antenna that amplifies the received Wi-Fi. The device is easy to operate and connect, because you just need to insert its USB-plug into the computer system unit and install the drivers to the adapter. The software on CD is always included with the instrument. Below will be presented step-by-step instructions on how to perform the subsequent settings in the case of choosing an adapter in the form of an external Wi-Fi receiver.
The connection to the wireless network of a stationary PC is often provided using another method. The built-in type Wi-Fi receiver can be used by connecting it through the computer motherboard. 
The cost of these devices is almost the same. Software installation and configuration are also not very difficult. It is advisable for owners of several computers to purchase an external type of device, since it can be quickly disconnected from one PC and immediately easily connected to another computer to access the Internet. However, the external device takes up valuable desktop space, so aesthetics and lack of space are advised to purchase a built-in adapter, the advantages of which can also be attributed to the absence of the risk of damage as a result of external influences.
Obviously, without the presence, near the location of the computer with the installed Wi-Fi network receiver, its source, and more specifically the router, it will be impossible to connect to the Internet.
 In turn, the WiFi router itself must be connected to the global network via an Internet cable. Then you can already turn on the router to distribute the Wi-Fi network to PCs and other gadgets.
The procedure will be described for "TP-LINK TL-WN721N", but all steps are similarly applicable for other devices of this type. 
Remove all of the following items from the packaging:
Connect the PC system unit to the Wi-Fi receiver via the USB cable. It is recommended not to pay attention to the display of notifications on the PC monitor that the software has been found and installed on the equipment, since the driver must be installed manually from the CD.
Insert the CD into the drive and activate the installation procedure. In the displayed window of the installation wizard, find and specify the model of the WiFi receiver and click "Install driver and utility".
 After that, the installation wizard will guide you through intuitive menus, where the user is only required to follow the sequential instructions of the pop-up windows.
 When the procedure is over, an icon will appear in the system tray about the start of the Wi-Fi device.
 In the next menu that appears, type the WiFi access code and click "Ok".

Ready! Now you can turn on the browser on your PC and start active Internet surfing.
The procedure will be described for "TP-Link TL-WN751ND", but all steps are the same and applicable for other devices of this type.
Take the device out of the packaging and disconnect the antenna from it. 
Turn off the PC and open the system unit. Insert the device into a PCI slot.
 Install the antenna back to the original place of the wireless Internet receiver.
The process for setting up the built-in receiver is completely similar to the above procedure for an outdoor unit.
Bell pepper is a wonderful tasty and healthy vegetable that you can ...

A rather specific injury is a fracture of the fifth metacarpal bone with ...

Translation from English: Cand. honey. Sciences Gorelov V.G., Dobrodeev A.S., Candidate of ...