Chronic diseases. If you are chronically ill, for example, with an ulcer, ...


If you decide to do"upgrade"(upgrade) the motherboard, or replace the non-working motherboard with a new one, your old Operating System will no longer boot. During downloadwindows arise blue screen (BSOD) with an error STOP 0x0000007B. This happens due to the change of the bus controllerATA/SATA.
The whole point is that Windows does not have the ability to independently change the controller driver at boot. As a result, at boot time, the operating system - just loses the hard drive and won't be able to continue running.
So - the question is:
how to change motherboard without reinstalling windows 7? Reinstalling Windows is not difficult, but with all this All programs and settings will be lost. And just this is quite often - unacceptable!
Return Windows 7 updating it from the installation disk will also fail, because this function can only be launched from an already loaded OS.
But no need to get upset! It will help us (download the disk image here: ERDC.rar). Unpack it from the archive (just drag the file ERDC.iso- for example, on the desktop) and write to "blank" using a disc burning software ISO Burner. Thanks to him, we make the necessary changes to,
required to boot on a fresh controller.
Let's start!
1. We boot from the recorded disk. Select the version from the boot menu ERD Commander 6.5 for Windows 7.
2. Question "Initialize network connection in the background?" we answer No.

3. Question "Reassign Drive Letters..." we answer Yes.

4. Select a keyboard layout and click the button Further. After that, select our operating system from the list and click Further.


5.
In the event that the previous boot of Windows 7 failed, the search for boot problems will begin.
Davim Cancel, so as not to waste time, because this startup recovery tool in case of a motherboard change cannot help. Question "Stop Troubleshooting?" we answer Yes. The next news that it was not possible to eliminate the problems, do not get scared and press the button Ready.

6. In the window that appears, select the item Microsoft Diagnostics and Recovery Toolset.

7. Now we launch registry editor.

8. First you need to delete the registry branch HKLM\SYSTEM\MountedDevices

9. Now you need to enable the launch of services that load standard controller drivers IDE And SATA.

10. Opening a branch HKLM\SYSTEM\CurrentControlSet\services on the left side of the registry editor. Now we check the following sections in this branch: amdide, amdsata, amdxata, atapi, intelide, msahci, pciide. Parameter start everyone must be equal 0x00000000 (0). Meaning Start=0- start the service when Windows boots. If it is equal 0x00000003 (3) double click on the parameter name (Start) and change the value to 0 and we press OK.

11. After start will be set to 0 for all the above registry keys, close the registry editor and restart the PC in normal mode. This is usually enough to successfully boot Windows 7. Now you need to install the drivers on a fresh motherboard.
In case it didn't help!
If the above did not help and Windows 7 still does not boot and gives an error STOP 0x0000007b, then the required controller driver is not loaded. To correct the situation, we enable the loading of all drivers known to the operating system.
To achieve the desired result, set the parameter value start equal 0
in the following services: adp94xx adpahci adpu320 aic78xx amdsbs arc arcsas elxstor vsmraid, aliide, cmdide, nvraid, viaide.
Reboot the PC in normal mode. The OS must boot.
The failure of the motherboard to start up can be associated with both minor system malfunctions that can be easily fixed, and serious problems that can lead to the complete inoperability of this component. To fix this problem, you will need to disassemble the computer.
The motherboard may refuse to start due to one reason or several at the same time. Most often, it is these reasons that can disable it:
Step-by-step instructions for conducting an external examination of the motherboard looks like this:

If an external examination did not give any results and the computer still does not turn on normally, then you will have to reanimate the motherboard in other ways.
Sometimes resetting the BIOS to factory settings helps solve the problem of the motherboard not working. Use this instruction to return the BIOS to default settings:

The motherboard has such a name for the reason that it is through it that all other parts of the computer are connected. There is nothing surprising in the fact that if it fails, then the operation of the machine becomes impossible.
To restore your computer to working order, you need to know Why is your motherboard not working? The interested reader will find a lot of useful information that can help in the proposed material.
No mechanism breaks or fails just like that. There are causes for any malfunction, and the ability to identify them yourself will save you a lot of time and nerve cells. Given the technical complexity of the product in question and the presence of a huge number of working elements, the scenario of its failure and further methods for solving the problem differ in each individual case.
For simplicity, our service invites the reader to classify a specific problem according to the prerequisites for occurrence in order to identify the reasons why motherboard won't start with maximum precision and without unnecessary gestures. In most cases, malfunctions occur due to the factors described below.
Many owners of desktop computers like to supplement and upgrade it on their own (which is quite simple due to the block device of the power supply). Install a powerful graphics card to play the latest games with huge system requirements; finish off the RAM to work with professional graphic editors and samplers; to introduce a super-powerful processor to increase performance - all this is well known to those who want to squeeze the maximum out of their hardware.
If the computer failed after one of these upgrades - most likely, you simply exceeded the limit of its capabilities. Unfortunately, each specific model has its own ceiling - and the more powerful the devices installed in the system unit, the more energy they consume.
Most likely, the last part installed exceeded the maximum allowable power limit. Reverse replacement (downgrade) in most cases solves the problem. It is worse if some time has passed since the installation of the new hardware - in the board that was working at the limit of its capabilities, the contacts could simply burn out, which would require a comprehensive diagnosis.
Power surges and emergency power outages are a common occurrence in most regions of the country. It is especially scary when, after an emergency shutdown, repairmen bring a voltage of 380 volts to the household network - fuses, circuit breakers and shields sparkle and burn like sparklers. And, worst of all, equipment is not always saved.
Sudden surges and voltage drops can lead to a lot of unpleasant consequences - in the form of burnt and short-circuiting transistors in the motherboard. Dismantling the system unit with the extraction and step-by-step ringing of the tracks with a voltmeter is the surest way to find the cause of the malfunction.
An old desktop computer can work like clockwork for several years - although it will not impress the owner with outstanding performance characteristics for its time. Then it stops loading even the BIOS, without any first alarm signals that can inform the owner in advance about the imminent failure of the hardware ..
The wear of individual components of the unit in question is one of the most common risk factors. Only total diagnostics performed by a person who understands the meaning of the manipulations will help here.
It is extremely difficult for an unprepared person to understand why motherboard won't start and even more difficult to understand the intricacies of solving this problem. Arm yourself with a set of screwdrivers and a voltmeter - the information below will allow you to quickly find the root cause of trouble and save on repairs.
First of all, you need to make sure that the actual cause of the inoperability lies precisely in the malfunction of the board itself. To do this, the user of a personal computer will need to do two relatively simple things.
The first is to remove the side panel of the system unit and remove the motherboard. It must first be disconnected from the network. After disconnecting the element under test, reconnect the unit to the network and press the power button. If the coolers work, then the problem really lies in the board.
Second, lay the board on an isolated surface and connect it to the power supply. One of the LEDs, indicating the presence of standby voltage, should light up automatically. The absence of a reaction of any light indicators will give you the opportunity to automatically cut off possible problems with flying BIOS settings - then a voltmeter will go into action.
If the computer stops working after updating the hardware, visually inspect the unit for signs of overheating after removing dust from the surface. If they are missing, try replacing the newly installed unit with a previously functioning one; In most cases, it solves the problem.
Sin for problems with the BIOS? A banal reset of its settings to factory values will help. The main question is how to do this without having programmatic access to start the BIOS using a computer.
Fortunately, the possibility of its manual reset is provided by the functionality of the board. What do I need to do to manually reset the BIOS?
Please note: this method helps only if the product is fully functional (or does not have critical breakdowns). In the absence of voltage supply, the presence of short circuits and damage to the circuits, all the manipulations described above will not have any effect.
The problem is not in exceeding the maximum power and not in the wrong BIOS settings? So, there are purely technical problems.
First of all, unplug the board from the mains and carefully clean it of dust. It is advisable to do this with dry wipes in a clean workplace, wearing rubber gloves on your hands. Blowing chips with a hair dryer or vacuuming them is a frankly unwise decision.
It is highly recommended to have a magnifying glass handy and perform a visual inspection in bright light - this will reduce the chance of missing significant damage. Pay attention to the existing scratches, chips and dark spots dangerously close to the circuits.
No damage found? Consider capacitors - they look like small barrels, somewhat similar to AA batteries. On older motherboards, they break most often. The presence of streaks, swellings and oxides indicates the need to replace damaged or exhausted capacitors - they must be carefully removed using a soldering iron and similar new ones installed, just as carefully soldering them to the vacated places.
Pay attention to the plus and minus marked on the board at the place of attachment of the removed product. When replacing a capacitor, polarity must be observed - otherwise a miracle will not happen and the computer will not work.
Using a voltmeter, make a ring of transistors - small rectangular objects that are present in large numbers on the repaired product. If there is a short circuit, the built-in protection system will simply prevent it from starting. Identify all foci of malfunctions and carefully rewrite the markings of all shorting elements. To replace them, the user will need a soldering iron and some free time (and, of course, new transistors that are completely identical to the failed ones).
Unfortunately, the proposed solutions do not help in all cases. . Self-repair in such a situation is almost impossible even by the hands of an advanced user who understands hardware. If you have checked and corrected everything that was possible, but the result was disappointing, it is better to take the defective item to a service center.
If you don't feel confident that you can handle the repair yourself, don't try. The motherboard requires extremely delicate handling - an inaccurate attempt at self-maintenance can lead to even more serious damage. Take on this matter personally only if you are completely and completely confident in your skills in handling the tool necessary for diagnostics and repair; Otherwise, entrust it to professionals.
With all the Plug-And-Play claims of modern Windows operating systems, replacing the motherboard can lead to a blue screen and complete inoperability of the computer. This article is addressed to those who have decided to update the hardware of their computer and describes the procedure for replacing the motherboard without problems.
In the days of the total domination of Windows XP, when replacing the motherboard in the device manager, it was enough to remove the main hard drive controller (sometimes additionally the USB controller), or by replacing its drivers with a standard controller.
After that, the hard drive could be connected to a new motherboard and the computer booted quietly.
With the advent of Windows 7 and Windows 8 (8.1), the above steps are often not enough. That is, after connecting the hard drive to the new motherboard, the computer does not start. But fortunately, as part of the Windows 7 operating system, there is a Sysprep utility that allows you to “untie” the installed operating system from a specific hardware. With this utility, all unique information about the installed system is cleared. This includes clearing information about installed drivers. In this case, the user's programs and settings are not affected and remain "as is".
ATTENTION!!! The utility should be used before connecting the hard drive to the new motherboard. That is, on an old computer even before replacing the motherboard. All actions at your own peril and risk.
Run the utility: to do this, press the "Win + R" keys on the keyboard at the same time and enter the command: c:windowssystem32sysprepsysprep.exe, click "OK". 
In the window that appears, configure everything according to the figure below, namely “Actions to clean up the system”, select the option “Go to the system welcome window (OOBE)” and check the box “Preparing for use. In "Shutdown Options" select "Shutdown". 
We press "OK".
The process of cleaning the system from information about the "old hardware" will start, after which the computer will turn off. Now the hard drive can be connected to the new motherboard.
That's all.
The first time Windows boots, it will install device drivers and ask you to specify the regional settings. Everything will look like you just reinstalled the operating system. 
After that, you must specify a username. I recommend getting a new user that definitely didn't exist before the motherboard replacement. This should be done to ensure that the settings of existing profiles are not lost. In the future, after the transfer is completed, when you set everything up, this temporary user can be deleted. Don't forget to delete his personal folder in the Users directory as well. 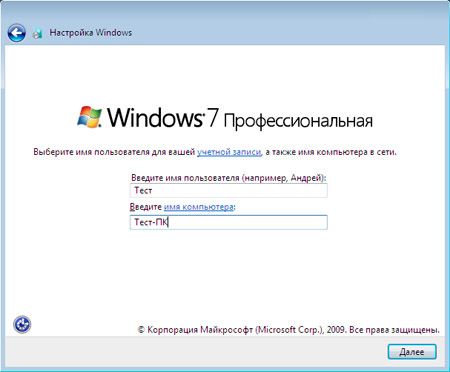
As you can see, everything is simple. The only BUT - Windows activation will fail. And you will have to activate the operating system again.
All the steps described in this article were carried out by me when replacing the motherboard in the computer AsRock G31M-GS per model Asus P8H61-M LX3. The operating system used was Windows 7 32-bit.
This instruction will not help if the installation of a new motherboard is forced due to the fact that the previous one failed. The article describes the algorithm of actions for a situation where you can start a computer on an old motherboard.
Chronic diseases. If you are chronically ill, for example, with an ulcer, ...

Heaviness in the stomach is a familiar phrase, well known to most ...

Almost everyone has experienced discomfort in the stomach. Noting...