Bell pepper is a wonderful tasty and healthy vegetable that you can ...


A plot located on a slope makes the owners additional requirements for the improvement of the territory. On such a site, it is more difficult to arrange a beautiful landscape, to arrange communications, to set up a garden. The drainage of the area on the slope will also require special attention, because its device has its own characteristics.
Such building plots are most often located on the slopes of hills, on the banks of rivers and lakes. If the slope is not more than 8%, the site can be conditionally taken as normally flat and landscaped in the usual way.
What should the owner of the site pay attention to with a slope of more than 8%:
It would seem that water leaves the slope perfectly, why is drainage needed here? The answer to this question is ambiguous. Difficulties of a different nature may arise:
Therefore, when designing the drainage of a house on a slope, a balanced and integrated approach is required. Drainage systems of closed and open types, complementing each other, will help to achieve the desired result.
Note! The advantage of such a site is the presence of a low-lying part of the slope, where it is possible to naturally locate a reservoir or to organize the discharge of water "to the relief", which will make it possible to do without forced pumping of water, as in flat areas.
Types of drainage used:
When arranging the drainage of a plot with your own hands, you must be ready for a large amount of land work. For ring drainage, drainage pipes are laid at a depth of 1-1.5 m. For this:
Note! Drainage pipes are cut at the points of connection with manholes. This makes it possible to bring in a hose from the high-pressure cleaner for cleaning.
Note! At slopes of more than 15% of a closed type, the drainage system is not used or is arranged in "steps".

It is better to entrust the drainage of the suburban area to specialists, however, if this is not possible, then you can try to figure everything out on your own. First of all, it is necessary to disassemble the types of drainage and the various schemes of its device, as well as its purpose. Drainage is essential because this system protects the house and site from excess moisture. If it is incorrectly installed, then the effect may be the opposite. This will lead to flooding and soil leaching.
To begin with, you need to disassemble its types and find out the features of each work.
Drainage happens:
Surface drainage can be done without the involvement of craftsmen. This is a relatively straightforward job.
Deep drainage is best done at the stage of building a house.
The structure also needs protection. It often happens that the flow of groundwater penetrates into underground rooms. Water can flood a cellar, garage, underground car park or break room. It all depends on what is below the surface of the earth.

Surface drainage of the site is carried out using various storm water inlets and trays. This type of drainage got its name because the entire system is located on the surface. The trays can successfully cope with the flow of rainwater, as well as moisture that forms as a result of melting snow.
Surface drainage is of two types: point and linear.
This is not to say that one type of drainage is better than the other. Often, both varieties are used together for greater efficiency. All devices in the system require regular cleaning, otherwise they will not function properly. A well-organized gutter serves well and does its job.

With point planning, trays are installed, first of all, under the drain pipes of the house. Otherwise, water will constantly fall on the foundation and on the site.
Improper layout will entail the penetration of moisture into underground rooms.
The trays must be installed so that they are underground. They will have to lead pipes to the sewer. The top of the tray is covered with a grate. It is both a protective and a decorative element at the same time. To clean the tray, you just need to lift the grate and remove the debris from the container.

The linear system has been known for a very long time. It was used as far back as Ancient Egypt and Babylon. Today, only the materials used have changed, but the principle of operation has remained the same.
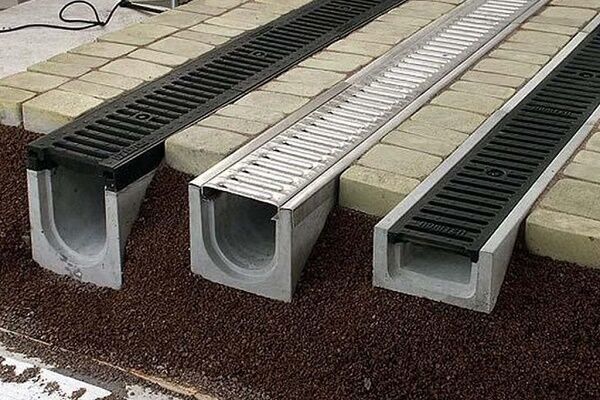
 Plastic or reinforced concrete trays are used for drainage. They are equipped with a grate on top that covers the gutter. The system has garbage collectors that make it easier to care for the trays.
The installation of such systems is necessary in cases where:
Installation of water drain will not be a difficult procedure, even for a beginner. Its structure is very clear.

![]()
Usually, both types of drainage are installed on the sites: both deep and surface. Such a drainage network will provide absolute protection from moisture.
Before arranging a buried system, it is necessary to determine in which direction the water flows during showers. This indicator is one of the most important.
If you make a mistake with the level of bias, then you can harm yourself with your own work.
You can find out the direction of water flow without exploring the area. To do this, it is enough to wait for the first shower and see where the streams are directed.
The general drainage scheme: a receiving well, drains and a collector that removes excess moisture.
Calculation and design always depend on the characteristics of each specific site. You cannot take and install the same system on everyone. Somewhere additional drainage means are required, but somewhere the simplest device will do. As a last resort, you can refer to the maps to determine the nature of your site. 
Even with map data, you should not neglect additional practical grade verification. If it is not possible to achieve the desired flow direction in some places, you can try to fix it with the help of embankments. However, such a procedure is also not carried out without preliminary calculations. A number of problems can be solved with a drain pump. This is a forced drainage system, which is used in cases where it is impossible to create a natural one, or an additional water outlet is required.

Not all types of soils are water permeable. These include clayey. Clay soil is characterized by an excess of moisture. Because of this, the required amount of oxygen does not enter the roots. As a result, the plants die. Dense turf also leads to oxygen starvation of plants.

When arranging a small area with a drainage system, it is not necessary to make a calculation during the design process. In this case, it is necessary to take into account the parameters related to drains:
The natural relief of a site with a slope is best used when constructing a drainage system.

It is easier to work with an inclined area than with a flat one. This is due to at least a decrease in labor costs. All you need is to correctly combine open and closed drainage.
Clay soil is dense and heavy, therefore, to improve drainage properties, the soil should be thoroughly loosened. In the process of laying drains, it is necessary to bypass the places intended for the passage of the car.

In peat bogs, the groundwater level is usually high. Because of this, these types of soils are practically not used for growing plants. In peat bogs, the root system of plants simply rots.
Drainage of peat bogs allows you to reduce the level of groundwater to 2–2.5 m. You do not need to do this if the soil has already been drained on your site. This can be easily identified. Drainage was carried out on the site, if there is no stagnation of melt water on it, and the groundwater level during a flood does not exceed 1.5 m.
This is found only on low-lying peatlands or land cultivated by someone. Most often, on peat bogs, you can observe a picture when the water is close, and in spring, even in some places it is not absorbed into the ground. The only exception is the hot summer, when the groundwater level drops significantly, as a result of which the peat dries up and needs watering. Perennial roots suffer greatly during the thaw period in winter or spring. In such a situation, over time, the death of plants is inevitable.

Not everything is so unfortunate. Peatlands can be drained. What can be done to achieve this? If the water is at the level of 0.8-1.2 m, then its excess can be taken away from the site, for example, by planting birch trees or viburnum bushes in the north-western side of the site or outside of it. The fact is that birches actively collect moisture at a distance of 30 m from themselves. So, you will drain the area without obscuring it with these trees.
If the water is closer, then you will have to make a high-quality drainage system. To do this, divide the area into sectors. In this case, the drainage ditches are laid in the slope of the place for collecting water. In the lower corner of the site, dig a sewer well or make an artificial reservoir. All excess water from the peat area will drain into it. If you decide to make a drainage basin in the form of a well, then the accumulated water in the summer drought can be used for irrigation.
Plant moisture-loving fruit / ornamental crops around the pond.
Two ditches should run along the edges of the land plot, transverse ones should be provided for high-quality drainage of the peat bog. For example, for 6 acres it is enough to make 1-2 transverse ditches. In this case, the depth of the ditch should reach about 40-50 cm. When digging a trench, dump the top layer of soil onto the edges of the beds, which will be developed later.

For safety reasons, it is better to make a closed drainage system. The principle of its installation will be described below.
It is impossible for even a small piece of land to accumulate water - melt or rain. If you find such accumulations, then make in such places embankments of soil and sand, as well as fertile soil. The hoses of the drainage system must converge to the well / reservoir.
In peatlands, plants should be grown in raised beds. If the peat dries up in summer due to the heat, then it will need to be watered regularly and abundantly.
In cases where the groundwater level cannot be lowered to the level of 2 m, fruit trees on it will need to be planted on artificial hills with a height of 30-50 cm. Moreover, as the tree grows, the diameter of the mound will have to increase.

The most common mistake when arranging a drainage system is that it is installed without proper design. When installing drainage pipes and systems, it is necessary, first of all, to understand the situation. In this case, it is necessary to analyze the site itself and the nature of the groundwater.
For example, water very often affects the foundation. To protect it, you need to design a drainage system when building a house. In this case, it will be necessary to install an additional basement, which will serve as a barrier to groundwater. If the design was done incorrectly, then the situation can only get worse. Groundwater will flow into the basement and act on the foundation. In difficult cases, you will have to contact specialists.
These diagrams will help you plan the drainage of your site according to your requirements:


![]()


The drainage of ground and storm water from the foundation will significantly increase the service life of both the capital building and the summer cottage. An uncomplicated drainage system will protect underground concrete structures from gradual erosion, and basements from flooding. But it is extremely important to prevent the destruction of the very foundation of the structure, right?
A well-designed drainage scheme around the house will help to build an efficient collection and drainage system for natural water. We invite you to familiarize yourself with carefully selected and verified information based on regulatory documents and the real experience of builders of low-rise buildings.
We will tell you in detail about the types of drainage systems, the features of their device, the specifics of operation. Let's give reasons in favor of choosing a certain type of drainage. The useful information offered to your attention is supplemented with photos, diagrams and video instructions.
When designing a drainage system, first of all, they determine the goals that are planned to be achieved. They can consist in draining the entire site, in protecting the foundation and basement of the house from excess moisture.
Of the existing drainage systems, two main types can be distinguished - open and deep (closed). The first can be used for the needs of agriculture, for drainage from cultivated areas. Closed drainage is used to drain water at summer cottages and cottage plots, to protect buildings from the negative impact of high GWL.
The organization of the drainage system is necessary when the groundwater table is high, which is especially evident during the flood period. Drainage to protect the concrete foundation from the aggression of underground water and reduce the hydraulic load
Combined drainage systems are also used. They are often supplemented with storm sewer branches designed to utilize atmospheric water. Provided they are competently designed, they can significantly save on the construction of each system separately.
Image gallery
The first and main sign, according to which the owners of the site need to arrange drainage, is stagnation of water during the period of snow melting. This means that the underlying soil has a low filtration capacity, i.e. poorly pass water or do not let it pass at all
Drainage is necessary in areas with pronounced signs of soil erosion: cracks that appear during dry periods. This is a manifestation of soil erosion by groundwater, which ultimately leads to destruction
Collection and drainage of water is required if, during the period of snow melting and heavy rainfall, groundwater rises to the level of laying communications
Drainage systems are constructed in areas with a characteristic slope. But in this case, they are needed for a balanced distribution of water and its retention in elevated areas.
Flooding of the site during the period of snow melting
Erosion and undermining of soil under the foundation
Water at the level of laying communications
Suburban plot with a slope
Open drainage is the simplest and most economical way to drain water, which can be used if the following conditions are met:
Open drainage is arranged in areas with a high GWL, the mark of which is most often due to the location of the land plot in the lowland or the clay composition of soils, which do not allow or very weakly pass water into the underlying layers.

The drainage system, designed to drain excess groundwater, works perfectly in tandem with storm water, the work of which is to collect and remove atmospheric precipitation (+)
Planning a drainage scheme is best done at the design stage of a house. This will allow you to tie the work and place the storm water inlet under the gutters before the blind area.
Open drainage is considered the simplest and does not require a diagram. It is a trench 0.5 m wide and 0.6-0.7 m deep. The sides of the trench are positioned at an angle of 30 °. They encircle the territory around the perimeter and direct wastewater into a ditch or foundation pit, into a storm sewer.
Areas with a slope towards the street are easier to drain. To do this, in front of the house, across the slope, a drainage ditch is dug, which will retain water from the garden. Then they dig a ditch, it will direct the drains towards the street, into the ditch.
If the site has a slope in the direction opposite to the road, then a transverse drainage ditch is dug in front of the facade of the fence and another longitudinal one is made to the end of the site.
The disadvantage of such drainage is its low aesthetics and the need for regular cleaning of the gutters from silt and dirt that periodically accumulate in them. This type of drainage is not recommended to be arranged under the road surface, as it leads to subsidence of the soil and deformation of the road.
The length of the lines for water drainage, the number of wells and sand collectors depends on the area of the site, its relief, the intensity of precipitation in a particular area.
Drainage ditches can be strengthened from erosion with reinforced concrete slabs, stone paving, matting with crushed bottom
If the site is considered more or less even, and the level of its swampiness is not too high, then you can get by with the device of the simplest drainage system.
Along the foundation of the fence, at the lowest point of the site, they dig a ditch 0.5 m wide, 2-3 m long and 1 m deep. Although such a drainage system will protect against high GWL, and perfectly cope with atmospheric precipitation.
To prevent the edges of the ditch from collapsing, it is filled with rubble, broken glass and bricks. Having filled it, they dig the next one, it is also filled and tamped tightly. The excavated soil is used for filling low-lying places on the territory
Over time, this simple drainage system can become ineffective due to gradual silting. To prevent this from happening, it can be protected with a geotextile. It is laid on the ground, after filling the ditch with an overlap, they close the drainage layer with it. From above, to hide the ditch, it is sprinkled with a layer of fertile soil.
Storm sewage is necessary for the accumulation and removal of water from the site that falls in the format of atmospheric precipitation. It is equipped with point and linear drainage devices.
Image gallery
Storm sewer systems are arranged to collect atmospheric water and prevent it from penetrating into the soil, and then into the underlying soils
By the type of water intake devices, storm sewer systems are divided into point and linear. The first are built in areas with an organized drain, the second - with an unorganized
The collection area of linear water intakes is much larger than that of point ones. They are installed next to houses with unorganized drainage and on sites paved with a waterproof coating.
In linear storm drains, water is both collected and transported through a network of canals closed with a metal or plastic grate. In point systems, water is drained through a system of pipes laid in the ground
Storm sewer with a point water intake
Drainage channels of point stormwater
Linear water inlets
The structure of trays with grates
The first type of collectors is installed under the risers of an organized drainage system. The second type of collectors is located under the slopes of roofs with an unorganized drain.
Water entering the catchment is transported through an open or closed pipeline. It is discharged either to a common drainage well, or to a collection well, from which it moves to a centralized sewer network or gutter.
The stormwater inlet is a container for collecting water, equipped with outlets for connecting pipes of the linear drainage system. Devices are made of durable plastic or cast iron (+)
The elements of the stormwater system with point collectors are also drainage drains, ladders, dampers. Some manufacturers provide for the possibility of connecting storm water inlets with roof gutters, as well as with underground drainage systems.
In addition, off-the-shelf production models include sand traps and waste bins to simplify system maintenance.
The device with the installed decorative grill should be located 3-5 mm lower than the level of the track, ground
This is a system of shower gutters made of plastic or concrete, which are installed on site in those places where water accumulation is most likely, but highly undesirable.
For the drainage well, they choose the most distant place from the house, well, cellar. If there is a natural or artificial reservoir nearby, then water drainage can be organized into it
When designing with linear water intakes, the first step is to plan the placement of a catchment or collection well. Next, the location of the device for rotary and revision wells is determined. Their placement will depend on the placement of storm gutters and closed sewer branches.
To prevent water from the street from entering the courtyard, gutters are installed along the line of the gate leading to the courtyard, garage doors, and also in the area of the wicket. When choosing the elements of the system that will be installed on the roadway, take into account the future load on them.
To prevent moisture from getting into the building, the slope of the cover in the garage is made towards the water intake grate. So water, when washing a car or thawing snow on a vehicle, will drain into the chute.
Drainage trays must be installed on the porch around the pool. They are also installed along the blind area, garden paths, lined with facing material sites
To give the stormwater a neat look, use special trays made of polymer concrete, plastic, which are closed with metal or plastic gratings. At the entrance to the house, a special tray is used for cleaning shoes.
The grate for the gutter installed near the pool is chosen plastic, white, in order to avoid burns on a hot summer day.
With intensive use, drainage trays are mounted on a concrete base. The higher the load class on the roadway, the thicker the concrete base should be (+)
Gutters and water intake points are connected to a drainage tank. At the junction of the gutters and pipes, inspection wells are provided. They are designed to facilitate access to the system and clean it from possible clogging.
Revision wells are made mainly of plastic. In order to obtain the required depth, their design provides for the possibility of building up with the help of special extension elements.
Placement, slope and length of storm sewer pipes - all these characteristics are very individual and depend on many conditions on the site
A wide range of system elements allows you to design the most efficiently, which will be optimal from a technical and financial point of view.
The main elements of linear drainage are gutters made of concrete, polymer-concrete, plastic, point receivers, sand traps, gratings (+)
Underground, closed drainage is used if the device of an open system takes up too much space on a land plot or it does not at all fit into the landscape picture of the territory. The conditions for its construction of a closed drainage system are similar to those for the organization of a network of open drainage ditches and ditches.
Closed drainage schemes are used to protect the foundation, basements from the effects of groundwater and increase their service life. They, by analogy with open ones, are used to drain the suburban area from surplus groundwater.
It is imperative to organize underground drainage at the site if:
Underground drainage can be divided into two types:
Both types of underground drainage are carried out at the stage of building construction. If it was decided to start the problem of water disposal after the construction of the house, then a trench ring system is used. There are limitations for the use of trench drainage. It can be used if the house does not have a basement.
The fact is that, after, backfilling the pit with sand or soil creates a looser environment between the bedrock and the foundation. As a result, this environment is penetrated by the top water, and then even the presence of a castle made of clay does not protect the building from the effects of moisture.
Therefore, if the house has a basement, it is best to do wall drainage for effective drainage. It drainage is used to drain groundwater directly from the foundation of a building, to protect basements, cellars, basements from flooding.
Do not plant trees and shrubs near the drain. The distance to the planted tree can be at least two meters and to the bush at least one meter
Wall-mounted limits the rise in water level, preventing it from rising above the line of the location of drainage pipes - drains. It is believed that a 1 m long drainage pipe is capable of draining an area of about 10-20 m 2.
When arranging wall drainage, the pipe is laid along the perimeter of the building. The depth of placement of drains cannot be lower than the base of the foundation slab or the base of the foundation. If the foundation is very deep, then it is allowed to lay the pipe slightly higher than its base (+)
The distance from the drainage pipe to the foundation depends on the placement. They are laid in each corner (or through one corner) of the building, as well as in the places of turns and pipe connections.
Revision wells are also located in places where there is a large difference in the level of the site and with a long pipe length - the distance between the wells should be no more than 40 meters.
In the inspection well, the pipe cannot be solid, it breaks. This is done so that when the pipeline is clogged, it remains possible to flush it using a high pressure hose.
The whole system is connected to the last well. It should be located at the lowest point. Further, the water flows into a regular sewer or open water body. If it is not possible to divert water from the house by gravity, then pumping equipment is installed and it is pumped out forcibly.
To ensure gravity drainage of water, the pipes are laid to the side to the collecting manifold. The slope should be two centimeters per meter of drain piping. The depth of the pipe must be greater than the depth of the soil freezing.
The pipe is covered with drainage material - gravel, fine gravel or sand. The minimum layer that will ensure the flow of water into the drain is 0.2 m
To save on geocomposite materials and prevent them from mixing with the soil, geotextiles are used. It freely passes water to the drains and at the same time retains particles that lead to siltation. The pipe itself must also be wrapped in protective material before backfilling. Some drain models are produced with ready-made geotextile filters.
To increase the efficiency of wall drainage, you can use a profiled polymer membrane, which can be two- or three-layer. One of its layers is a polyethylene film with formed protrusions, the second layer of the membrane is geotextile fabric.
The three-layer membrane is equipped with an additional layer of smooth polyethylene film. The membrane helps filter water out of the soil and at the same time serves as a waterproofing layer for the foundation of the building.
A closed trench-type drainage protects the structure from flooding and moisture. It is a filtering layer that is poured into the trench at a distance of 1.5-3 m from the wall of the house.
It is better that the depth of the drain is 0.5 m deeper than the base of the foundation - so the water will not put pressure on it from below. A layer of clay soil remains between the drainage trench and the foundation of the house, which serves as a so-called clay castle.
As with the installation of a wall drainage system, drains are laid on a layer of gravel or fine gravel. Both the pipes and the gravel layer are protected from clogging by the geotextile.
In order to get a visual idea of the process of arranging drainage around a country house, consider an example. The area given in it required the device of a groundwater drainage system, since under the soil-vegetation layer are loams and sandy loams, which are extremely poorly permeable to water due to their low filtration capacity.
Image gallery
For the drainage device, we are developing a trench around the house. Since the work was carried out by a mini-excavator, we retreated 1.2 m from the walls so as not to damage the building. If you save by hand, you can do it closer. The bottom of the mine is 20-30 cm below the foundation
The branches of the trench formed around the house should have a slope towards the common trench, intended for the pipe for draining the collected water to the collector well
We fill the bottom of the trench with sand. We ram it and form a slope of 2-3 cm per linear meter. We direct the slope towards the common trench, the bottom of which is also poured and rammed. In the case of crossing the trench with communications, we take into account that the drainage pipes must pass below them
We prepare drains, perforated polymer pipes, for laying in a trench. We wrap them with geotextiles, which will prevent clogging of the system and filter the groundwater
We cover the tamped bottom of the trench with a second layer of geotextile, pour gravel on it and put drains
The channels for the drainage of water from the storm sewer and the drainage system are laid in one trench. It is permissible to drain the water collected from them into one collector and use common inspection wells
Having wrapped the gravel backfill together with the drainage pipe with a second layer of geotextile, we fill the trench with quarry sand. We do not use the soil dumped during the development of the trench, the sand will better let water through to collect drainage
We bring the common trench, to which the circular drainage is connected, to the installation site of the collector well
High humidity in your area is fraught with harmful consequences: water suppresses the root system of plant crops, which provokes their diseases and subsequent death. Moreover, moisture washes away the foundation of the building and outbuildings, so the structures are flooded and begin to quickly collapse. Can these problems be avoided? The best option for their prevention is a drainage device in the summer cottage. This procedure is not difficult enough to hire a professional builder - you can do it yourself. And in order for you to succeed, we invite you to learn more about the advantages and features of drainage and get acquainted with the simplest ways of arranging it.
Each summer resident invariably asks the same question: does his site need drainage so much? You can find the answer yourself - just evaluate your summer cottage territory. Your garden is often overgrown with sedge, there are puddles on the site for a long time after rain, the earth dries for a long time after watering or melting of snowdrifts - the first signs that you cannot do without drainage. In order to be even more convinced of this, conduct a simple experiment: dig a hole 50-70 cm deep - if in a day it is full of water, without hesitation, proceed to the arrangement of the system.
 Drainage arrangement scheme at the site
 But there are four more conditions for which drainage is required:
As you can see, drainage is indispensable in almost all areas. So, if you want plants and trees to please with their growth, the paths are not deformed, and the dacha is not flooded, start construction work.
When the question of the importance of drainage is closed, decide which system you need. It can be of two types.
Superficial- the simplest drainage option. Its functional purpose is to drain water that falls on the land in the form of various precipitations, for example, rain or snow. This system works well on level ground without pronounced slopes. This drainage is essentially a system of ditches located along the entire perimeter of the site. Over time, the water that collects in the ditches is either discharged into a special drainage tank, or simply evaporates. The surface system can be combined with traditional storm sewers.
 Deep drainage
 Deep- closed drainage. Such a system is needed if your site:
Deep drainage allows you to effectively protect from increased moisture not only garden and horticultural crops, but also the cottage itself, and all utility rooms.
Advice. Since the installation of a deep drainage system requires serious land work, it is recommended that you engage in it even before you start planting the bulk of the crops. An even more optimal option, if possible, is to arrange drainage in parallel with laying the foundation.
Drainage is an engineering structure, which is a branched system of trenches and pipes. All its elements are interconnected and scattered, as a rule, along the entire perimeter of the site. Based on the above features, installation work cannot begin without a clear design of the drainage system.
The following points should be indicated in the project: the location of all drainage trenches, water flow, a diagram of vertical sections of drainage, the location of wells, the depth of the drains. It is also important to determine the dimensions of all components of the system and their slope, in relation to the upper soil. Such a detailed project plan will give you the opportunity to quickly navigate the location of all the elements of the drainage system in the process of its arrangement, that is, it will simply make your work easier.
 Drainage pipe laying
 An important component of pre-construction procedures is the preparation of a set of tools and consumables that are necessary for installation work:
This type of drainage is technically a simple process.
Advice. To make sure that the trench is working, do a simple test: pour water into the trench and see if it flows in the right direction, that is, towards the well. If you notice deviations, be sure to correct the angle of the trench walls, otherwise the system will not be able to fully perform its functions.
 Surface drainage system
 In the second case, the continuation of the construction of the drainage after digging the trench is as follows:
The algorithm for constructing a deep system in difficult areas is as follows:

As you can see, there is nothing unreal in the device of the drainage system at the summer cottage, so do not be afraid to take on such work yourself. The main thing is to accurately determine the required type of drainage and follow the rules for its installation. And do not forget that by making efforts just once, you can protect yourself from a host of problems in the future, namely, from the death of garden and horticultural crops and flooding of your own summer cottage.
It is better to entrust the drainage of the suburban area to specialists, however, if this is not possible, then you can try to figure everything out on your own. First of all, it is necessary to disassemble the types of drainage and the various schemes of its device, as well as its purpose. Drainage is essential because this system protects the house and site from excess moisture. If it is incorrectly installed, then the effect may be the opposite. This will lead to flooding and soil leaching.
In this article, we will tell you how to properly drain a site with your own hands on peat and clay soils, and also show diagrams, photos and video instructions for draining the site.
Drainage system for home To properly drain the site, you need to disassemble its types and understand the features of each work.
Drainage happens:
Surface drainage can be easily done by yourself, without the involvement of masters. This is a relatively straightforward job.
Deep drainage is best done at the stage of building a house.
The structure also needs protection. It often happens that the flow of groundwater penetrates into underground rooms. Water can flood a cellar, garage, underground car park or break room. It all depends on what is below the surface of the earth.
 Surface drainage
Surface drainage of the site is carried out using various storm water inlets and trays. This type of drainage got its name because the entire system is located on the surface. The trays can successfully cope with the flow of rainwater, as well as moisture that forms as a result of melting snow.
Surface drainage is of two types: point and linear.
This is not to say that one type of drainage is better than the other. Often, both varieties are used together for greater efficiency. All devices in the system require regular cleaning, otherwise they will not function properly. A well-organized gutter serves well and does its job.
 Point drainage
With point planning, trays are installed, first of all, under the drain pipes of the house. Otherwise, water will constantly fall on the foundation and on the site.
Improper layout will entail the penetration of moisture into underground rooms.
The trays must be installed so that they are underground. They will have to lead pipes to the sewer. The top of the tray is covered with a grate. It is both a protective and a decorative element at the same time. To clean the tray, you just need to lift the grate and remove the debris from the container.
 Linear drainage system
The linear system has been known for a very long time. It was used as far back as Ancient Egypt and Babylon. Today, only the materials used have changed, but the principle of operation has remained the same.
 Drainage of linear type Plastic or reinforced concrete trays are used for drainage. They are equipped with a grate on top that covers the gutter. The system has garbage collectors that make it easier to care for the trays.
The installation of such systems is necessary in cases where:
Installation of water drain will not be a difficult procedure, even for a beginner. Its structure is very clear.
 Deep drainage device diagram
 Drainage trenches Deep drainage of a garden area is a very difficult procedure. However, if you have skills in construction work, then you can cope with the task.
Usually, both types of drainage are installed on the sites: both deep and surface. Such a drainage network will provide absolute protection from moisture.
Before arranging a buried system, it is necessary to determine in which direction the water flows during showers. This indicator is one of the most important.
If you make a mistake with the level of bias, then you can harm yourself with your own work.
You can find out the direction of water flow without exploring the area. To do this, it is enough to wait for the first shower and see where the streams are directed.
 Drainage pipe laying Their scheme resembles a herringbone.
 Fill up the trench Trenches are covered with rubble and small stones. This will allow moisture to flow easily to the pipes. The drainage device on the site must be carried out in accordance with all the rules, so every little thing must be taken into account.
The complexity of the arrangement of the drainage system is that in each case its design is individual.
The general drainage scheme is simple: a receiving well, drains and a collector that removes excess moisture.
Calculation and design always depend on the characteristics of each specific site. You cannot take and install the same system on everyone. Somewhere additional drainage means are required, but somewhere the simplest device will do. As a last resort, you can refer to the maps to determine the nature of your site.  Drainage system diagram
Even with map data, you should not neglect additional practical grade verification. If it is not possible to achieve the desired flow direction in some places, you can try to fix it with the help of embankments. However, such a procedure is also not carried out without preliminary calculations. A number of problems can be solved with a drain pump. This is a forced drainage system, which is used in cases where it is impossible to create a natural one, or an additional water outlet is required.
 On clay soils
Not all types of soils are water permeable. These include clayey. Clay soil is characterized by an excess of moisture. Because of this, the required amount of oxygen does not enter the roots. As a result, the plants die. Dense turf also leads to oxygen starvation of plants.
If you want to do a landscape design on a clay area, then before implementing it you will need to make a drainage system. Thanks to her, the site can be processed immediately after the snow melts.
 Laying in clay soil
When arranging a small area with a drainage system, it is not necessary to make a calculation during the design process. In this case, it is necessary to take into account the parameters of the drainage system regarding drains:
The natural relief of a site with a slope is best used when constructing a drainage system.
 Use of relief
It is easier to work with an inclined area than with a flat one. This is due to at least a decrease in labor costs. All you need is to correctly combine open and closed drainage. The features of drainage systems and methods of their installation will be discussed later in the article.
Clay soil is dense and heavy, therefore, to improve drainage properties, the soil should be thoroughly loosened. In the process of laying drains, it is necessary to bypass the places intended for the passage of the car.
 On peat soils
In peat bogs, the groundwater level is usually high. Because of this, these types of soils are practically not used for growing plants. In peat bogs, the root system of plants simply rots.
Drainage of peat bogs allows you to reduce the level of groundwater to 2-2.5 m. You do not need to do this if the soil has already been drained on your site. This can be easily identified. Drainage was carried out on the site, if there is no stagnation of melt water on it, and the groundwater level during a flood does not exceed 1.5 m.
This is found only on low-lying peatlands or land cultivated by someone. Most often, on peat bogs, you can observe a picture when the water is close, and in spring, even in some places it is not absorbed into the ground. The only exception is the hot summer, when the groundwater level drops significantly, as a result of which the peat dries up and needs watering. Perennial roots suffer greatly during the thaw period in winter or spring. In such a situation, over time, the death of plants is inevitable.
 Excess water in the ground
Not everything is so unfortunate. Peatlands can be drained. What can be done to achieve this? If the water is at the level of 0.8-1.2 m, then its excess can be taken away from the site, for example, by planting birch trees or viburnum bushes in the north-western side of the site or beyond. The fact is that birches actively collect moisture at a distance of 30 m from themselves. So, you will drain the area without obscuring it with these trees.
If the water is closer, then you will have to make a high-quality drainage system. To do this, divide the area into sectors. In this case, the drainage ditches are laid in the slope of the place for collecting water. In the lower corner of the site, dig a sewer well or make an artificial reservoir. All excess water from the peat area will drain into it. If you decide to make a drainage basin in the form of a well, then the accumulated water in the summer drought can be used for irrigation.
Plant moisture-loving fruit / ornamental crops around the pond.
Two ditches should run along the edges of the land plot, transverse ones should be provided for high-quality drainage of the peat bog. For example, for 6 acres, it is enough to make 1-2 transverse ditches. At the same time, the depth of the ditch should reach about 40-50 cm. When digging a trench, dump the top layer of soil onto the edges of the beds, which will be equipped later.
 Wetland Drainage Pipe
If you are constructing an open drainage, then the ditches can be closed with grating or built over them bridges. But for the sake of safety, and for greater convenience of movement around the site, it is better to make a closed drainage system. The principle of its installation will be described below.
It is impossible for even a small piece of land to accumulate water - melt or rain. If you find such accumulations, then make in such places embankments of soil and sand, as well as fertile soil. The hoses of the drainage system must converge to the well / reservoir.
In peatlands, plants should be grown in raised beds. If the peat dries up in summer due to the heat, then it will need to be watered regularly and abundantly.
In cases where the groundwater level cannot be lowered to the level of 2 m, fruit trees on it will need to be planted on artificial hills with a height of 30-50 cm. Moreover, as the tree grows, the diameter of the mound will have to be increased.
 The main mistakes of the drainage system
The most common mistake when arranging a drainage system is that it is installed without proper design. When installing drainage pipes and systems, it is necessary, first of all, to understand the situation. In this case, it is necessary to analyze the site itself and the nature of the groundwater.
For example, water very often affects the foundation. To protect it, you need to design a drainage system when building a house. In this case, it will be necessary to install an additional basement, which will serve as a barrier to groundwater. If the design was done incorrectly, then the situation can only get worse. Groundwater will flow into the basement and act on the foundation. In difficult cases, you will have to contact specialists.
The following video will also help to understand the features of drainage:
These diagrams will help you plan the drainage of your site according to your requirements:
 Drainage and storm water drainage
 Closed drainage scheme
 Drainage system nodes diagram
 Layout of storm water pipes and drainage system
 Surface drainage scheme
 Drainage scheme
 Sectional drawing of a drainage trench
 Closed type drainage system
 Drainage system diagram
 Drainage and drainage scheme
 Wall drainage
 Removing excess water from the site
 Drainage of an area with a slope
 Drainage system drawing
Bell pepper is a wonderful tasty and healthy vegetable that you can ...

A rather specific injury is a fracture of the fifth metacarpal bone with ...

Translation from English: Cand. honey. Sciences Gorelov V.G., Dobrodeev A.S., Candidate of ...