Fluffy buds with a wide variety of shades and a charming aroma - all this...


Do you have a blank wall in your home with nothing to hang on? Do scarlet pillows on the sofa look lonely and require another bright accent? Just take a canvas and paint a picture that suits you!
We live in an era of triumphant abstract art, when about every second gallery work one would like to say that even a child could draw it. So why not put aside your fears and forget about realistic art for a while and create your own little masterpiece? Drawing is fun, and it’s simply impossible to draw an abstract painting poorly or incorrectly! All you need is a canvas, paints, courage, a few hours of free time and perhaps a nice group of collaborators to create a unique work of art, perfect for your interior. This is much more interesting than just buying a poster from IKEA! If you agree with us, we offer you a selection of the best techniques and master classes for creating your own painting.
The most favorite color of everyone who undertakes to make a stylish painting with their own hands is gold. You just need to add a little leaf foil or just paint to any background, even a plain one. Gold looks good and not too provocative with an uneven gray concrete color.
Photo: JenniferFlanniganart / etsy.com
Horizontal jagged lines always resemble some kind of graphs or visualization of sound waves, in general, something important, and therefore it is interesting to look at them. To dilute the boring monochrome of the image, you can, like the author of this master class, add a little (or a lot!) of gold.
Have you noticed how beautiful the cuts of stones are? This is a drawing with a story, a story about changes in climate, relief, and wildlife. You can create your own beautiful specimen of the rock: simply take a vertical canvas and apply horizontal stripes of different widths and different colors to it. Invite the children to draw with you - let them come up with the story of a fictional world in which such a beautiful cut could appear.

Photo: BrennaGiessen / etsy.com
Polka dots are a magical pattern: you can paint them on anything and it will turn out beautiful. You don't even need to have a brush on hand - just make a stamp from a wine cork or the bottom of a glass. If you use thicker paint (as in this case), the pattern of the prints will resemble a coral pattern!

If you want something more complex, then make a print with a colored pattern. In this master class, in order for the peas to be even, they are cut out with a special hole punch and then pasted onto canvas.

One way to create an abstract painting is to step back from the work as much as possible and let the paint do everything for you. For example, pour a large blot and then tilt the canvas so that the paint flows picturesquely down it. You can make such a picture together with your child; you don’t even need a brush for this.

Photo: CelineZiangArt / etsy.com
Tested: any abstract spots look cooler if their edges are very smooth. This contrast effect can be achieved by painting through a stencil, or pre-reserving part of the canvas using masking tape, or applying white borders using a stencil later, as in this master class.

Make squiggles of any color on a canvas of any color, inspired by famous works, or relying only on your own inspiration - there are no boundaries or laws here, doodle art is a very democratic direction! You can, like blogger Michelle, create many layers, achieving a complex texture, or you can paint with pure color on white. The main thing is to relax your hand and not forget that this is pampering, and a bad option can always be painted over.

Paintings with careless horizontal lines look as if they are a sample of colors from the desk of a Pantone Institute employee or a fashionable makeup artist’s palette. The secret to success here, as blogger Julia demonstrates, is to leave enough white space and apply the paint in one motion. Colors can be any.

Gradient, or ombre, is a very simple and very beautiful effect. To repeat it, you don’t even need a master class. Two paints - main and white, a brush or roller, five minutes of time spent, and the picture is ready. An excellent solution if your bright apartment has a bright accessory that requires color support.

There is nothing easier than making a print in an avant-garde style. Draw straight lines with tape, like in this tutorial, and use bright paint straight from the can. My only advice is to take the time to make a few sketches in advance.

The most budget-friendly paintings do not even require the purchase of brushes: just take the first object that comes to hand and use it as a stamp. You will be surprised what stylish thing you can draw using an ordinary glass!

And the last painting idea for today is an impressionist canvas painted with large strokes. Artist Ashley Sturgill shows how to create a vibrant painting with gold accents.

Get inspired and experiment, and we will help you with this!
Many housewives often think about what decorative decorations they can make for their home with their own hands. Paintings made from scrap materials will be an excellent way out of this situation. They can be made from fabric scraps, coffee beans, old yarn and threads. Dry leaves and flowers are suitable for such purposes, which are often assigned to elementary school students to collect as homework, after which they settle in the apartment as dead weight.
To update the interior of an apartment, sometimes it is enough to change just a few details. There are many ideas for decorating rooms using decorative items from improvised materials. Creating them with your own hands is not only interesting, but also profitable. There is no need to purchase expensive and refined materials; such a transformation of the living space does not require large expenses.

The interior consists of a large number of elements. Its visual appearance is especially influenced by the design of the walls. Even if they look aesthetically pleasing due to high-quality and suitable finishing, many housewives strive to complement and improve their appearance with various accessories and paintings.
Unusual handmade items will help add originality to your interior.
The usual standard finish looks too gray and faded, which is why the room may seem completely uncomfortable. You can revive the situation yourself, without resorting to the help of specialists.
You can create interesting elements for decorating your apartment from available materials. By using various handicraft techniques, you can get chic compositions in a single copy. The main advantage of homemade paintings is that it is unlikely that any of your relatives and friends have exactly the same one hanging in their living room.
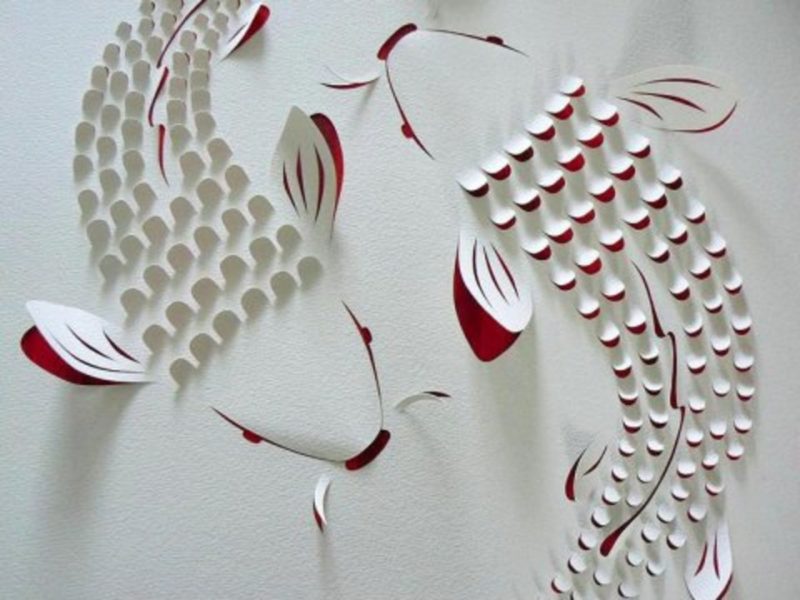
This type of needlework came to us from the Land of the Rising Sun. Translated from Japanese, kinusaiga means “multi-colored silk paintings.” She quickly gained popularity among the craftswomen of her historical homeland, after which she also quickly conquered handmade lovers around the world.
The fact is that the Japanese are a very thrifty nation, so various patchwork techniques are widely used in their country. They help you get rid of unnecessary scraps of expensive fabrics and get homemade decorative elements, such as panels, pillows and bedspreads.
In Japan, fabric collages are made only from silk fabrics, and wooden boards are used as a base for them. European needlewomen developed this art and began to combine it with other areas, such as embroidery, knitting and appliqué. And they collect paintings from various materials: lace, satin, cotton, fur and even leather. To secure them, foam is most often chosen.
It is worth noting that Kinusaiga denies the use of glue or threads in the work. Shallow slits are made on the base along the contours of parts of the design, after which the edges of the patches are pressed into them.
To learn the technique of making such crafts, it is better to start with something easy. Inexperienced craftsmen will definitely be able to cope with a picture consisting of large geometric shapes.

It is better to take a thin material that will not stretch much. It is desirable that its edges do not crumble or crumble.
Almost any scraps long forgotten on mezzanines are suitable for making panels. In addition, you can cut unnecessary clothes or tablecloth into shreds.
Algorithm for creating DIY paintings for decoration using the Kinusaiga technique:

Some needlewomen simply decorate the craft with ribbons or fabric, making a border out of them. The materials are secured using glue or colored pushpins. Solid silver or gold buttons will fit well into this composition.
Do not forget that the color of the fasteners should fit into the overall palette of the picture.
The result is an unusual and colorful house. It is perfect for decorating a kitchen or a child's room.
Some needlewomen strive to learn how to make three-dimensional paintings with their own hands. From scrap materials, for example, scraps of fabric and padding from old toys, you can actually make similar crafts.
To do this you need to prepare:
Kinusaiga helps craftswomen bring any ideas to life. Stencils and sketches for the work can be found in craft stores or made yourself. It will be easier for beginners to start learning this technique by using templates in their creativity. For example, you can make a couple of lovers like this:

Instructions for creating a volumetric composition:

The result of your efforts will be such a nice panel. You can involve your child in its creation by diversifying his leisure time.
Mom cuts out the parts, prepares the grooves, and the child transfers the picture onto foam plastic, after which he tucks the scraps into the slots. A homemade painting can be given as a gift to your aunt or grandmother. Children will definitely enjoy this kind of work, and parents don’t have to worry, since little craftsmen won’t need scissors and a needle.
People's imagination has no limits, so lately there have often been master classes on creating decorative paintings from the most simple things. For example, compositions of ordinary buttons can decorate an apartment and add a little originality to the interior.
You can consider several ideas for making such panels, choose the one you like, and bring it to life. Children will definitely like the button owlet and will live in their room for a long time. To create such a picture need to prepare:
After preparing all the necessary materials, you can begin to work.
 First, choose the design you like and transfer it to cardboard, after which you think about the placement of the buttons. Then they are greased with glue and the owlet is laid out. It is recommended to place some buttons in two layers, then the craft will be more voluminous and there will be no gaps between the individual parts. They can be filled with small beads or seed beads. Additionally, various patterns are applied to the picture using paints, for example, a landscape or the owl’s legs are completed.
Another decoration for a children's room can be a funny and cute baby elephant. His sketch is also transferred to a paper base, after which it is filled with buttons. The largest ones are glued first, and then the voids between them are filled with smaller parts. The finished drawing is supplemented with doll eyes or made from large white buttons (whites) and smaller black ones (pupil).
You can use green rounds to lay out grass under the elephant’s feet and give him a bunch of balls in his trunk, as shown in the photo of the finished work:

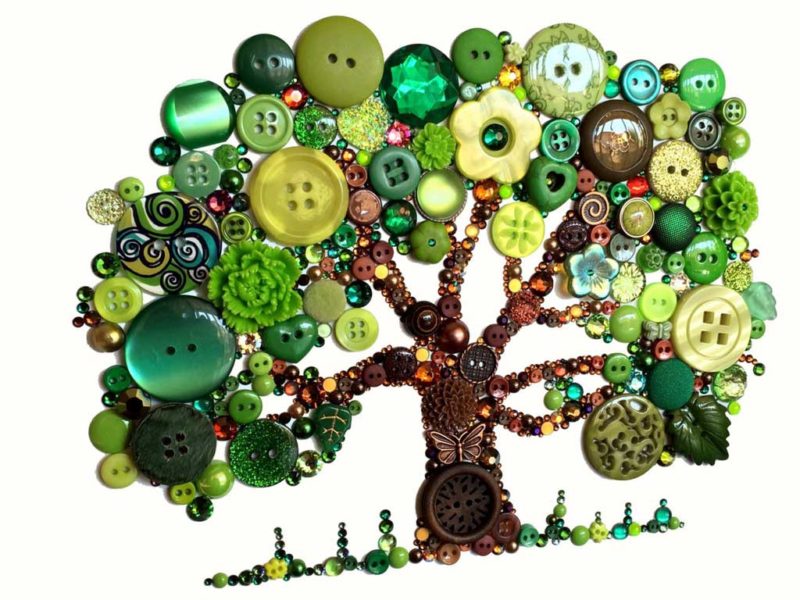
Today, various landscapes and images of plants, such as flowers and trees, are very popular. These button projects are performed similarly to others, only you need to prepare more materials.
 To make a tree, as in the picture, you should find a thin board of a suitable size. Using a simple pencil, the contours of the design are applied to it, after which the trunk is filled with brown buttons, and the crown with green ones.
To complement a composition made of fabric or paper, you can cut out birds and stick them on the base. The resulting panel can be hung in the hallway or given as a gift to someone.
Original autumn-themed paintings look interesting and stylish. For a similar craft worth getting:
On a white sheet of thick cardboard, the earth and sky are depicted using watercolors. After they dry, a strong trunk and branches of a spreading tree are drawn with brown gouache. The dried picture is completed with buttons, pasting them in the manner of leaves. You can also make sun, flowers or grass from them.

While working, you can look at examples of similar crafts and bring them to life or come up with your own drawing.
The finished painting is placed in a frame, hung on the wall or placed on a chest of drawers. You can make beautiful crafts from buttons with children; it will be useful for developing creative skills and imagination.
Another technique for creating paintings comes from Japan, only now the main material will not be scraps of fabric, but dry plants.

The work is similar to button and rag crafts. The contours of the future composition are applied to a sheet of paper or cardboard, after which they are filled with dried leaves, buds and flower petals, wormwood branches, stems, roots, and poplar fluff. These elements are attached to the base with glue, whole or in pieces.
If small fragments are needed to create a panel, they are cut out from large blanks or torn off by hand using the pinching method.
In addition to these methods of creating decorative items, there are many others. For example, contour quilling may appeal to craftswomen for its simplicity and originality. The paintings are laid out from paper strips, placing them on the edges, along the contours of the drawings. It turns out simple, but tasteful. Housewives can also dream up their own imaginations and come up with their own method of making crafts for interior decoration.


Decorating the interior with paintings made with your own hands has become popular. Placing them on the walls of your apartment will add comfort, individuality and breathe a piece of your soul into the room.
First, you need to decide what you want to see as a result. You shouldn’t imitate other people’s ideas, it’s better to find your own. Think about what is missing in your home, feel the mood of the room in which it will hang. Any, at first glance not even real, fantasies have their place. Abstract images will add irresistibility to the interior, and posters in black and white will fit perfectly into modern design.
Having determined the style of work, you can begin to create a masterpiece.

Before applying the drawing, it is necessary to prepare the canvas. To do this, you will need cardboard and the fabric itself on which the image will be. A square or rectangle is cut out of cardboard, the size of the intended work. Fabric is cut out from this blank with an allowance of 5 cm. Then, the fabric is glued to the cardboard, and it should be stretched well. The corners are cut and carefully glued so that the fabric does not unravel.
You can use a simpler version of the base - cardboard painted with a roller with white acrylic paint. It must dry thoroughly before painting is applied to it. This will be the background of the picture.

Before applying the drawing to the canvas, you should make a sketch on plain paper. It is cut out, applied to the canvas and outlined with a simple pencil. The outline of the drawing must be outlined with black paint.
Now you can begin to design the planned picture. There can be different methods:

You can use any paint: acrylic, watercolor, oil. The main thing is to correctly combine the color shades of the paints, then the picture will look impressive.

A stencil is an ideal device for creating an image using paint or a can of spray paint. You can also apply a design using a stencil using the graffiti technique, which is at the peak of popularity today. The best base for this painting would be cardboard or plywood, which is painted in a contrasting color. Such ornaments look original on a gold or silver background.
The use of herbarium elements instead of a stencil or openwork napkins looks impressive.

A modern and stylish interior can be created if you use paintings ordered from a printing workshop. Such workshops produce high-quality prints on any surface.
Family photographs in covers or frames fit perfectly into any interior; they can be color or black and white, placed in a chaotic order or in one plane. It is possible to arrange photographs as modular elements, which creates the impression of a single image.

Masterpieces in the patchwork style can be easily achieved using scraps of fabric, braid, and ribbon. Such paintings are made using the appliqué principle. The basis is textiles, dense in quality and not flashy in design (polka dots, stripes). The elements of the picture, on the contrary, are cut out of bright fabric. Using different colors of scraps, you can get an original picture. And if you place it under glass, it will look stylish and impressive.
The combination of fabrics of different textures in one picture looks great. And from materials that hold their shape (felt, corduroy, flannel), you can cut out design elements: a house, an animal, fruit.
These products are ideal for the kitchen or children's room. And a silk painting will be a decoration for the hall.

Modular paintings are several paintings with a similar plot or one drawing divided into separate elements that can be of different sizes. Currently, they are popular as they fit perfectly into the interior of any room. You can make them yourself and arrange them at your discretion.
You should start by choosing a picture: landscape, abstract image or photo. Blanks can be printed on paper or canvas in a photo salon, and then cut into separate parts. The paper version is glued to plywood or chipboard, and the fabric version is secured to the back of the frame using a stapler. It is good to work on a fabric base using the batik technique.

If you create a drawing yourself, it is better to do it right away on individual elements. To make such a picture you will need:
You should start working by dividing a sheet of polystyrene foam into the intended number of parts. To do this, you need to measure it with a ruler and cut it into modules of the required size with a hacksaw. Then sand the edges.
Now, all the parts are put together into a single canvas and the process of applying the image can begin. First, the background of the picture is made, the sponge is wetted in the paint of the intended shade. When the paint has dried, you can begin the drawing itself using brushes with paint, a marker, and applique.

Three-dimensional paintings look impressive in the living room; they can be made to suit any room design. Options are available: leather, paper, and even coffee and pasta. The following technique is perfect for making such paintings:
A picture made of textiles or foam rubber will look creative in the living room; it is easy to make an original multi-layered image from this material. The picture frame should be taken simple and decorated according to the interior of the room.

The easiest way is to use plain paper as a basis, onto which elements (butterflies, animals, flowers) made of various materials are glued.
If the hall is large, then a plaster image - a bas-relief - will fit perfectly. It is done directly on the wall and goes well with the overall interior. However, making such a picture is quite difficult. Skills in drawing and working with plaster are required. There is no general recommendation for making a bas-relief; some craftsmen create it directly on the wall, others separately make elements from plaster, which they then fit into the overall image. If you have no experience, it is better to use a stencil.

An unusual and modern solution is to decorate the interior with a 3D painting. They are fun to make and look impressive. There are different ways to make such products.
One of the easy ways is paper applique. To work you need:
Step-by-step actions, using the image of a butterfly as an example:
This method can add volume to any drawing.

To create a 3D picture you don’t need expensive leather, pieces from old boots, bags, gloves, raincoats will do, but it is important that it is natural. To obtain the desired color, you can use acrylic paint.
The technology for creating paintings from leather is similar to the technology from paper. Leather is a material that can be easily manipulated and whole bouquets of ornaments can be created from it. The tools at hand are the same as when working with paper. Operating principle:
You can use buttons, dried plants, and beads as additional decoration.

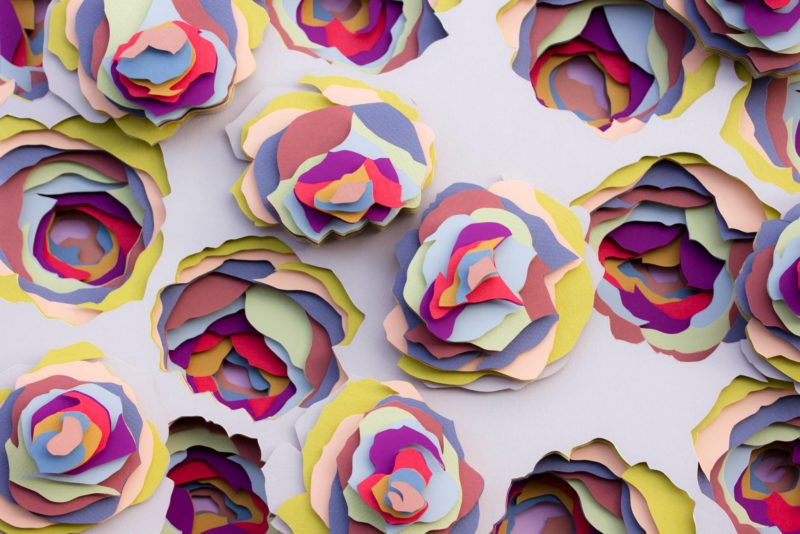
Multilayer 3D paper paintings look beautiful; they are not difficult to make. You should prepare:
Having chosen a drawing, we get to work. It’s good if the picture consists of several elements that can be cut out. You must make at least 10 copies on landscape sheets. If you use an inkjet printer, then you need to apply varnish to the pictures, otherwise the image will bleed; when using a laser printer, you can do without varnish.

The next stage is to cut out a base from cardboard, the size corresponding to the frame, and glue one drawing to it. The remaining images are cut out, but in different ways. Several copies (let's say a flower) are cut out completely: flower, leaves, stem. Others are just the flower and the leaves and just the flower.
Now the base for the laminate parts is cut out, and the elements are glued onto it. Then, these blanks are glued to a common base. The sides of the substrates should be painted in a color that matches the image so that they do not stand out.
The final stage is coating the painting with several layers of varnish.
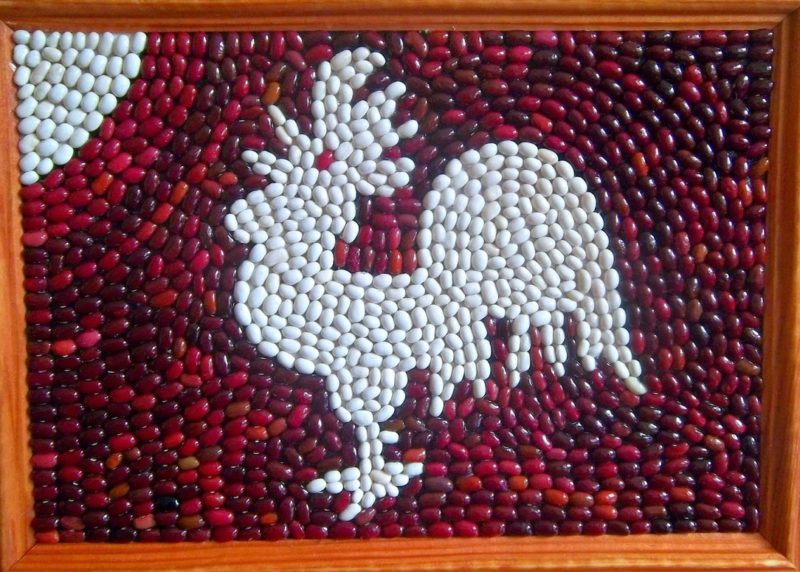
In the kitchen, homemade paintings look out of place. They add even more warmth and comfort. There are different options for making them, and any items that can be found at home are suitable here: buttons, seeds, cereals, coffee.

This type of interior decoration is increasingly popular, it is environmentally friendly and inexpensive. These paintings look especially good in a rustic kitchen. Making a picture from cereals is not difficult. You will need several types of cereals, glue, cardboard and thick material.
First prepare the base. To do this, the shape of the future painting is cut out of cardboard, and then the fabric is made from it, with an allowance of a few centimeters for folding. The fabric is glued to the cardboard.
The intended design is applied to the resulting canvas. Now you need to lay out the grain or cereal; if necessary, it can be painted in the desired color. After completing the drawing, you should glue all the elements to the canvas. This can be done using regular glue, but it is more convenient to use a silicone gun.
Spoons and forks made of metal coated with enamel are sewn onto the prepared base. This still life will fit perfectly into the interior of any kitchen.
If you take plastic forks and spoons, you can create a more original picture. Plastic objects easily stick to any surface and are easy to paint.
A decoration with cupronickel silver appliances will fit perfectly into a French-style kitchen.
A canvas with glued porcelain dishes will look aristocratic.
You can arrange objects arbitrarily or following a specific idea.

Buttons can be used not only for their intended purpose, but also to create original paintings. They can be glued or sewn. It’s easy to make different patterns, animal shapes, and flowers from buttons. Or you can use them as a background for an image; they are sewn onto fabric and all kinds of plates and saucers are hung on top. If necessary, paint with acrylic paint.
Do-it-yourself works will wonderfully decorate a child’s room, and they don’t have to be very complicated. When choosing a painting, you should take into account the design of the room, its color, the gender and age of the child, and his hobbies. Anything will do: a hand-drawn painting, an appliqué, a panel, a photo, maybe a large painting or a modular version, the main thing is that it fits into the overall interior. Children's works framed will look original.
An excellent solution is a fabric version based on foam. To do this, you will need: a piece of foam plastic, shreds, pencil, glue, carbon paper, a sharp object to press the drawing.
The polystyrene foam is cut out to the required size, and the design is transferred onto it using carbon paper. The picture is pressed out with a sharp tool. The part on which the fabric will be placed is coated with glue, and the fabric is applied to it. It is pressed into the previously pressed outline, the excess fabric is cut off with scissors, and the threads of the shred are hidden inside using a ripper. Using this technique, it is easy to create different fairy-tale pictures.

There are many ways to create paintings; you can use any materials and objects for this. It all depends on your imagination and creativity. The photo shows possible ideas.
There is nothing better for adding comfort to your home than things made with your own hands, because your love and warmth are invested in them. Don’t be afraid to experiment and then you will create a unique picture that will decorate your home.
Decorate your home with hand-painted paintings, which, of course, do not have to be works of art. The secret lies in the correct selection of colors that will match the interior. Read on to find 14 cool and easy DIY painting ideas using scrap materials.
Find a color that fits perfectly with your decor. Think about where you could place your painting and buy the required number of canvases.

Ideally, you should focus on 1-2 colors that are already present in the interior: monochrome paintings look very harmonious in any setting. However, maybe you think the room is lacking color? Then bright shades will become a magnificent decor for the room.

In the pointillism technique, when the brush does not make strokes, but simply makes dots, unusual and eye-catching paintings appear. Fill your hand with preliminary training on a piece of paper, and then transfer your idea to canvas.
READ ALSO: Wall decor ideas, 68 photos

Contemporary art, striving for abstraction, can easily be imitated (or even created :)). A harmonious combination of selected shades that repeat the color scheme of furniture and accessories in the room is the key to the ideal picture for your room. Be inspired by artists' paintings, the combination of colors in nature and don't forget that sometimes it's better to stop in time. And, most importantly, create your picture with pleasure!


An original handmade painting in a rustic interior
Paintings made by yourself are ideal for interior decoration, because no one can feel the spirit of the house better than the owners, perfectly emphasizing its mood with the help of appropriate details. Paintings made in various techniques will personalize even a template apartment design, refresh a boring living room or kitchen, and fill the house with comfort and positive emotions.

You can create an impressive home decor element with your own hands

Bright modern interior with a large abstract painting

Golden arrows in a frame - simple and original

A bright painting with an abstract plot can become an original interior accent
A stylish interior is not necessarily associated with huge financial costs, because you can decorate it with accessories created using available materials and priceless imagination.

Pictures with photo printing will easily and simply decorate a modern interior

A bright picture with photo printing will decorate a modern kitchen
The main condition for creating a masterpiece is inspiration. It’s better not to copy someone else’s work, but to try to feel the mood of your own home, imagine what is missing in the interior, what could highlight its advantages. It is better to write down any thoughts and sketches in a separate notebook - they may come in handy when creating a painting. Think about where the future work will hang - in the living room, kitchen, bedroom.

An interesting poster will decorate a Scandinavian-style bedroom

A simple “lip print” is a creative interior decoration

A child’s bright drawing, framed, will decorate his room.

Interior in Art Nouveau style with a bright large abstract painting that you can paint yourself

This handmade masterpiece will be a worthy decoration for your home.
Having decided on the style, you can begin to select materials for the future work:
Advice! Don't throw away old children's drawings, scraps of fabric, magazines, jewelry - all this can become part of the picture. Store them in a separate box, periodically reviewing and arranging them together.

A spectacular picture made of shells will become a chic decoration for your home.

A colored modular painting can successfully hide a TV

A painting can be made from a printed macro photo

Any item can become the basis for a handmade masterpiece
The easiest way to create an original painting for your interior with your own hands is to paint it. The subject is limited only by the imagination of the creator. Even if you have no artistic skills, you can create a masterpiece: use abstract techniques, study master classes and photos of finished works.

To create an original painting, minimal painting skills are required.

Abstraction is always in trend

The spectacular combination of colors in the painting will attract the attention of household members and guests.

A simple but very attractive picture

Simple abstraction is suitable for a fusion style interior
Oil, watercolor, and acrylic paints will become faithful assistants in creating paintings for the interior. As a base, you can use either professional canvas or regular thick paper or a primed board. You can draw inspiration from nature if there are picturesque places near your home. If you are unlucky with either the location or the weather, feel free to draw your household, pets, fruit compositions - whatever. The accuracy of the reproduction of reality does not play any role, the main thing is to approach the process with soul.
You can order a frame for your work at a framing workshop, where it is easy to find a suitable edging option.
Technique for creating an abstract painting using paints

Stylish interior in turquoise tones with a rectangular diptych painting in the primary colors of the bedroom

Using paint in a spray can, it is easy to apply an image through a stencil. It is better to take plywood or very thick cardboard as the basis for the picture. The background paint should be different in color and effect from the color of the drawing. For example, colored patterns on a gold or silver field look original. You can make several pictures of the same size and arrange them into a single piece, similar to modular paintings, which will decorate the wall in the living room.
Advice! Instead of paper stencils, use dried leaves and herbs in interesting shapes.

A painting created using a stencil. Fun and cheerful!

Using a simple flower or tree leaves can create a unique canvas

New Year's painting made using a “deer” stencil

Openwork paper napkins can be an excellent stencil.
Modular paintings look very original and give the interior a mysterious depth. They represent an image divided into several canvases, often asymmetrical. You don't have to be an artist to create such a masterpiece.
To make a modular painting with your own hands, you need to find a suitable image - it can be a beautiful old photo, landscape, still life, abstraction, and print it in a photo workshop on paper or fabric.

Bright, creative modular painting

Modern living room with a large modular painting

Original modular painting with a picture of a bicycle
All that remains is to cut it into segments and fix them on a suitable base. The paper can simply be carefully glued onto a base made of plywood or fiberboard, and the canvas can be stretched onto a wooden frame and secured on the reverse side with a stapler.
Advice! When painting an interior painting yourself, the image is applied on top of already prepared modular segments. The canvas can be replaced with any suitable fabric, painted with batik paints. It is better to paint on paper blanks with acrylic or waterproof markers.

Modular painting with photo printing of flowers in the bedroom

Modular picture with a world map in the nursery

A modular bright painting depicting beautiful flowers will decorate the living room
Modular paintings are suitable for almost any room: from the kitchen to the living room, but it is important to select the appropriate images. If you don’t have the time to create a masterpiece with your own hands, then we have good news for you - today you can buy modular paintings in any specialized store or on the Internet.
The technical side of the issue is taken care of by a photo workshop, which can print a suitable image on almost any basis: canvas, paper, ceramics, etc. These can be ordinary posters depicting interesting places, people, ornaments.
Advice! A poster is not just a picture, it must convey a certain idea, correspond to the interior, the theme of the room and the character of the owners of the house.

For the loft style, paintings using photo printing are popular

Black and white photos in white frames as an alternative to paintings

A small bedroom in gray tones will be decorated with a black and white painting in a black frame
If the poster is large-format, you can divide the image into several segments and, when combined into a single canvas, play with the joints, making it look like a modular picture.
If there is a child in the house, then you can scan his drawings and, choosing the ones that match the color and shape, make a collage out of them. Such a poster can be complemented by a photo of the artist himself. All that remains is to print the poster and place it in a frame that matches the color and style of the nursery’s interior.
A collage of old and new family photos can be hung as a picture in the bedroom or living room, and posters depicting the corresponding paraphernalia and fruits are suitable for the kitchen. Finally, it is worth noting that it is recommended to choose posters and panels for the kitchen in rich and bright colors, however, no one forbids you to go against the rules and create a stylish monochrome kitchen design.

Paintings using photo printing are very popular in Art Nouveau interiors.

Small black and white photographic paintings are also suitable for a cozy, bright bedroom.

Atmospheric modular painting from photography
From all kinds of scraps, fabric with beautiful patterns, ribbons, braid or lace, you can create real masterpieces in the patchwork style with your own hands. Fabric paintings are most often made using the appliqué technique. The basis is taken of dense textiles with discreet and inconspicuous patterns (stripes, polka dots, etc.), and the main elements are cut out from bright shreds.

You can create real masterpieces from fabrics of different colors

Bright modular textile painting under glass

Original wall decoration with fabric paintings
Most often, kitchens and children's rooms are decorated with textile works, since these rooms are characterized by a certain simplicity present in the appliqué. From felt, flannel and other fabrics that hold their shape well, you can cut out fruits, animals, cars, and houses. You can safely combine different textures and patterns on fabrics, use braid, decorative cord, and buttons for decoration. For the living room, you can make a textile picture from crinkled silk with abstract patterns.

Unusual textile paintings made of bright fabric in the nursery

Interesting textile modular picture at the head of the bed
Using buttons with your own hands, you can create original paintings by sewing or appliqué. Often this type of fittings is used to depict leaves on trees. Buttons can be glued in an original way inside any outline, for example, the silhouette of a butterfly or cat. In sewing stores you can select parts of various shapes, colors and materials and lay them out, like a mosaic, according to a pre-prepared pattern. Such button creations will fit perfectly into the kitchen, however, they can also be used for the living room and bedroom.
Advice! Buttons can be glued around the perimeter of the picture frame, giving it individuality.

An unusual picture created using a variety of buttons

Original painting with a bright heart made of buttons
Often, after renovation, large pieces of beautiful wallpaper remain, which are useful for making unusual interior paintings.

Delicate, exquisite paintings from beautiful wallpaper will decorate the wall of a home or public space

Dark blue dining room decorated with wallpaper patterns

A small picture of patterned wallpaper in a light frame

The stylish bright interior of the living room is decorated with a picture of patterned wallpaper

Unusual bathroom decorations
Many people are fond of embroidering pictures, and in handicraft stores you can find a variety of patterns and kits for creating masterpieces. You can embroider the canvas with beads with your own hands or try your hand at laying out mosaic paintings. The latter are made using diamond technology, that is, by laying out rhinestones. This process is quite labor-intensive and requires perseverance and accuracy, but the result exceeds all expectations. You can use either a full lay-out technique or a partial one, where crystals cover individual areas of the canvas.

Very stylish picture made of fabric accessories

Original wall decoration for Halloween
You can create amazing collages from photographs, clippings, book pages and sheet music. Depending on the theme of the images, the paintings can decorate the living room, bedroom or any other room.

Bright unusual painting created with your own hands
You can also make three-dimensional paintings from leather or cardboard, use decoupage and quilling techniques, paintings, paintings from coffee and even crafts from pasta.

A painting using the quilling technique will decorate a child's room

To create such a picture you will need a lot of patience and time.

Unusual paintings made from wooden blocks

Fusion style interior with a variety of small handmade paintings
From thick colored paper, textiles and foam rubber you can create creative multi-layered images with curved space. Finally, it is worth noting that when choosing a frame for a masterpiece created by yourself, you can choose the simplest frames. They can also be decorated at your discretion using various decorative materials.


Fluffy buds with a wide variety of shades and a charming aroma - all this...

We know from the fairy tale about... that a rose bush can bloom even in the middle of winter.

Hello to all homemade people! And after that I became interested in what kind of homemade products...